SNEAKER • AIR JORDAN • AIR JORDAN 4
How To Spot FAKE Air Jordan 4 in 2023 (All Colorways)

The most complete and up to date legit check guide for ALL Air Jordan 4 Colorways in 2023. See comparisons between Real Vs Fake shoes.


"We're creating a reliable and up-to-date guide for authenticating sneakers, streetwear, and luxury items. Our team of experts use multiple references during the authentication process for the most accurate results."
- Dype Team
Here's How You Can Legit Check This Item
- •Rear View
- •Window
- •Toe Box
- •Tongue Label
- •Sole
- •Size Tag
- •Insoles
- •Footbed / Insole Stitching
- •Box Label
- •UV Light
Context
Some important information to take note of is that certain pairs of retail/authentic Nike Dunks have many factory flaws and inconsistencies. This is important because when determining whether your pair is fake, simply because the stitching is unusual wouldn't be sufficient. Therefore for specific pairs, we must loosen up on defining what "flaws" are.
In the cases where factory flaws are rampant, we stress that having a retail or authentic pair of Air Jordan 4 sneakers to compare to, becomes increasingly more important. But if you don't have a retail sneaker for comparison, it is still possible to legit check Air Jordan 4s. Hence why we'll be examining and looking at multiple indicators of authenticity for a more holistic approach.
Rear View
Let's begin by taking a look at the rear view of the Air Jordan 4. Depending on the sneaker, it will either display the Jumpman logo or the "NIKE AIR" Swoosh logo. A couple flaws we'll focus on will be: [1] Logo and [2] Stitching.
We'll go over multiple examples...
Air Jordan 4 Retro Fire Red [Ex: 1]

Stitching
Denoted by the yellow circle. On the fake Air Jordan 4, you can clearly see the extremely crooked stitching at the corner. However, on the real Jordan 4, the stitching is neat and doesn't change direction abruptly. Although some retail Jordan 4s have inconsistent stitching, we have to make distinctions between what is considered "inconsistent" and a "flaw" relative to retail pairs.
Denoted by the red oval. On the fake Jordan 4 we can see that the stitching separates too far out from the edge. On retails, the distance between the stitching and the edge of the leather is consistent (even if the stitching itself may be messy at times). On the replica, you can also see that the spacing between both threads are inconsistent (alternates between coming close and far from each other).
Logo
Denoted by the green box. Here we can notice that on the fake Jordan 4, the size of the letters are ever so slightly larger than on the authentic pair. This is difficult to tell without a retail to compare it to.
Air Jordan 4 Retro Lightning [Ex: 2]

Logo
Denoted by the red circles. On both feet of the Jumpman logo, you can notice an extra detail on the shoes with the replicas. You don't see this on retails, and if you do, it doesn't come close to being the same size as shown on the fakes.
Stitching
Denoted by the blue circle. On the fake Air Jordan 4, where the leather material connects, you can see 3 threads. The retail pairs do not show these same threads, and are quite good at making it not noticeable. However, retail pairs will seldom have this as well, so consider this a reference point not a 100% indicator of authenticity.
Window
Next, let's move onto the window at the side profile of the Air Jordan 4. This is the triangular black tab that attaches from the sneaker to the laces. There are 2 types of windows on the Jordan 4s: opened (space in center) and closed (no space in center). We'll take a look at both of them.
Air Jordan 4 Retro Fire Red [Ex: 1]

Stitching
First we'll take notice of the 2 threads of stitching beneath the window. This is denoted by the red circle. On the real Air Jordan 4s, these 2 threads must be extremely close to one another without leaving a lot of space/gap between it. On the fake Jordan 4 in this case, you can see that the spacing is far too wide from each other.
This may seem negligible, but it's not because all Jordan 4s share this property.
Rubber Lace Grid
Denoted by the yellow circle. We'll refer this to the piece as the "lace grid" for simplicity purposes. This is where the shoe lace will go through, and you'll see 9 cells in the grid. Notice the size difference of the cell on the authentic and fake Air Jordan 4. The fake Jordan 4s have bigger cells when they should be narrow like on the retails.
Air Jordan 4 Retro Union Off Noir [Ex: 2]

Color Tint
Take a look at the translucent closed window. The real Jordan 4s should always have a white tint to it. Many fake Air Jordan 4s (even top-tier counterfeits) will have a yellowish tint to the window. The lighting in the image above is the same. Keep in mind lighting differences will change this, so be intuitive when using this indicator.
Toe Box
Next, let's take a look at the toe box of the Air Jordan 4s. We will be focusing on: [1] Curvature [2] Stitching [3] Shape
Air Jordan 4 Retro Lightning [Ex: 1]

Shape
Denoted by the blue outline. Notice on the difference in the slope of the curvature on the authentic and fake Air Jordan 4s. On the real Jordan 4, the toe box is much wider and has a flatter curve towards the bottom. However on the replicas, the toe box is much more narrow and sharp. This is a common flaw amongst counterfeit sneakers, not just Air Jordan 4s.
Air Jordan 4 Retro Union Off Noir [Ex: 2]

Stitching
Denoted by the yellow box. On the fake Jordan 4, the stitching is missing in that area, most likely due to it being sewn too deep.
Denoted by the red box. This is the midsole stitching, which provides a great indicator for legit checking the Jordan 4s. On the real pair, the threads are much shorter and more frequent, as well as consistent. Whereas the fake shoe has longer threads and less frequent threads while being inconsistent.

Curvature
The real Air Jordan 4s will always display a natural curvature towards the toe box or tip of the shoe. Many fake Jordan 4s will either remain flat relative to the surface or will overcompensate and curve upwards too much.
Denoted by the green arrow. We can see how this natural curvature lifts the sneaker up on the authentic shoe. This doesn't happen with the fake Jordan 4.
Denoted by the red dotted outline. We can also see the difference in slope of the curvature, where the real sneaker curves much more than the replica.
Tongue Label
Next, let's take a look at the tongue of the Air Jordan 4s. We will look at the front and back of the tongue. Due to the embroidery of the Jumpman logo and "Fight" text being quite complex, even retail pairs aren't identical to each other. So slight differences will not immediately be deemed as "flaws".
However, one feature that is quite consistent amongst retails is the stitching around the perimeter. When a Jumpman logo is abnormally distinct from retails, then it will be made obvious.
Front Tongue

Denoted by the red box. Take a look at the arm of the Jumpman logo. The fake Air Jordan 4 has the Jumpman logo's arm abnormally skinny and disproportional. Even amongst retails, the thickness will vary, however the proportionality will always remain.
Denoted by the green box. Notice the sloppy and inconsistent stitching on the fake Air Jordan 4s. The threads are crooked and sewn in with very little care.
Denoted by the blue circle. We zoomed into the texture/design of the Jumpman logo. You can notice that there are holes within the embroidery on the replicas. Whereas on the real Air Jordan 4, there are not holes or gaps.
Back Tongue

The back tongue is where the "AIR JORDAN" badge is stitched on. Top-tier counterfeits usually have this are well replicated. However in this case, the fake Jordan 4 has the all the embroidered letters slightly thicker than on the real shoe.
Denoted by the green boxes. You can notice the difference in letter thickness being more noticeable on the letter "A" and "N".
Sole
Next, flip the shoe over and take a look at the bottom/soles. We'll go over 2 variations of Air Jordan 4 soles. It will either have the Jumpman logo or the Nike Swoosh logo. We'll take a look at both.
Jumpman Logo

Color
Denoted by the yellow outline. On the real Jordan 4, the Jumpman logo uses a lighter shade of red, which almost looks pinkish. Meanwhile the fake is a darker shade of red. Note that the lighting will change your perception of the color. For this example, we've used the same lighting image above. Also keep in mind, this will be difficult to tell without a retail comparison.
Texture
Denoted by the red box. Notice on the authentic Air Jordan 4, there is a sectioned strip that is smooth. However on the replica, you can see that this same sectioned strip has a grainy texture to it.
Denoted by the green circle. You can see the difference in the texture in the zoomed-in green circle. You can also notice that the fake Jordan 4 is much more glossy and reflective to light compared to the retails.
Nike Swoosh Logo

Texture
Denoted by the red circle. The authentic Jordan 4 has a grainy texture to the soles within the blue panel. However, if you take a look at the fake, it is nearly completely smooth.
Paint
If you take a look at the areas where paint is involved, the replica is extremely sloppy leaving stains of paint on different sections.
Denoted by the green circle. Notice the blue paint overlap with the white section of the sole on the replica. On the real pair, the paint is neat and is contained within its own section.
Denoted by the blue box. Take a look at the black painted section of the sole - particularly focus on the outline/perimeter of this section. Denoted by the blue arrows. You can see the sloppiness of the paint overlapping with the white.
Size Tag
Next, let's go inside the Air Jordan 4 shoes again. We'll take a look at the size tag label, and some flaws we'll focus on are text [1] Thickness [2] Spacing [3] Defects

Overall, without a close examination, we're able to already notice the slight difference in the font thickness. The authentic size tag is much bolder on almost all letters compared to the fake tag. The replica's text used is much too thin and appears weak, making it look slightly smaller than the retail.
Some examples of this is denoted by the green, red, and orange boxes.

The text differences in this example may not be as obvious. However upon closer inspection, we can clearly see that the fake size tag has its text smudged and sloppy.
Denoted by the green box. On the fake tag, you can see letters "C9" being much too thin at the bottom of the letter. Whereas, the real one is filled in and doesn't have such flaws.
Denoted by the red box. The letters on the replica is much too smudged and sloppy. You can see this most prominent on the letter "P" in "UPC". You can also see this being prominent on the number "1"s in the code. The real one is clean of any smudges.
Denoted by the yellow box. You can see the same smudginess an sloppy text flaw most prominent on the "(2.5)". This isn't present on the retails once again.
Denoted by the orange box and the light blue box. From top to bottom of the text, we can begin to see that the smudginess and sloppiness of the text gradually worsen. At the bottom inside the light blue box, the text is nearly unreadable on the replica.
Insoles
Next, let's look at the insoles of the Air Jordan 4. We'll go over 2 variations of insoles that will come with the Air Jordan 4s. The back insole will either be light blue or white with arch support. There are more variations, however these are the most common ones. We'll be examining the front and back of it.
NOTE: Retail Air Jordan 4s are known to use insoles from other Jordan models as well. So you may see "AJ 11" or "AJ 3" on the back insoles sometimes. This is normal.
Back Insoles (Light Blue)
Flip the insole around to the backside, which will be light blue. The authentic insoles should have parallel glue stain markings. We'll look at multiple examples as well because the glue patterns will differ depending on the Air Jordan 4 release...
NOTE: The glue pattern will differ in percentage of coverage depending on the release. Some will have 60% coverage, while some will have 80% coverage, and etc. Hence we stress that having the original pair as reference is vital.
The flaws we'll be focusing on is: [1] Color [2] Glue Pattern
Air Jordan 4 Taupe Haze (Ex: 1)

Color
You can easily tell the difference in the shade of blue that is used on the fake compared to the real Jordan 4 insole. The authentic pair is much darker, while the fake is way too light.
Glue Pattern
Denoted by the dotted red line. The authentic insoles have around ~80% glue coverage. However, as you can see, the fake insoles have ~60% glue coverage.
Air Jordan 4 Red Thunder (Ex: 2)

Glue Pattern
Denoted by the dotted red line. We can see the difference in glue pattern once again in this example. The authentic Jordan 4 Red Thunders have ~80% glue coverage, while the replica has ~65% glue coverage.
Back Insoles (White Arch Support)

Without having to look too closely, we can tell the difference in the prominence/depth of the text imprints. The fake insoles have the text much more sharp/defined and prominent. The authentic pair has a much less noticeable or weaker prominence to the text. You can also notice the random "dots" or "holes" within the text of the fake insoles.
Denoted by the dotted red line. The real Jordan 4 insole will have its number "8" loops much wider. The top and bottom loop are also usually not identical in size and shape. On the fake pair, you can see that number "8" is smaller, while the upper/lower loop are identical in size and shape.
Denoted by the yellow circles. The authentic insole has the "R" stamp much higher as and the letter is flipped/mirrored. Whereas, the fake is lower and not mirrored.
Front Insoles
On the front insoles, you'll either see a Jumpman logo or a Nike Air Swoosh logo. We'll take a look at both.
Air Jordan 4 Fire Red (Ex: 1)

We can see the obvious difference in the logo style used. The fake manufacturers made a careless mistake and imprinted the wrong logo on the Air Jordan 4 insole.
Air Jordan 4 Lightning (Ex: 2)

Denoted by the red circles. Notice the difference in the Jumpman's feet. The authentic Jumpman has thicker feet, as well as the extra piece of design that sticks out. The replica does not have the same tiny design, as well as the feet being smaller.
Denoted by the yellow circle. The fake Jordan 4 has the hand of the Jumpman way too small compared to the retails.
Denoted by the green arrows. First, notice the striations in the texture of the insoles themselves. The real Air Jordan 4 insoles should have horizontal striations. However, on the fake Jordan 4, you can clearly see that the striations are vertical instead.
Footbed / Insole Stitching
Next, let's take a deeper look into the sneaker. We'll examine the footbed of the Air Jordan 4. This is the area that is beneath the insoles, once we remove them.
NOTE: The consistency and frequency of threads in the footbed stitching will differ depending on the release. The retails also at times do not remain 100% consistent. So this will be a used as a loose indicator. Counterfeits will usually have much less threads or way too many threads in the stitching compared to retails.
Air Jordan 4 Bred (Ex: 1)

The authentic Air Jordan 4 has a much lower density of threads compared to the fake Jordan 4s. The replicas have too many threads in the stitching, as well as the threads being consistently much shorter than the retail.
Air Jordan 4 Fire Red (Ex: 2)

The authentic Air Jordan 4 has a much higher density of threads compared to the fake Jordan 4s. The replicas have too few threads in the stitching, which makes the space/gap between each thread too sparse.
Box Label
Next, let's take a look at the box label of the Air Jordan 4. We'll look at multiple examples and focus on the text [1] Thickness [2] Spacing

Denoted by the red box around the barcode. The fake box label is extremely faded and is very light with weak ink. You can see that it looks almost like the printer ran out of ink while printing the barcode. The most prominent on the code is the number "9" and "1" are noticeably thin and faded.
Denoted by the green box. On the replica box, you can see that the fake has the text "JORDAN.COM" bolded unnecessarily. The real box has the text thin and unbolded.
Denoted by the yellow box. The same issue arises with the unnecessary bolded letters on the fake Jordan 4 box. The retail box has the text thin.

Denoted by the orange box around the barcode. The fake barcode numbers are much too thick and bolded relative to the authentic barcode.
Denoted by the green box. The fake box once again has the text unnecessarily bolded, and the spacing between each letter is also much greater than on the real box. This makes the text look more sparse.
Denoted by the yellow box. The same issue arises with the letters being too sparse on the replica box. Notice the sizes, such as the text "UK 11" on both the authentic and replica box. The fake one has the spacing between the letters too far apart, particularly on the "11".
Denoted by the red box around the QR code. Notice how dark the QR code is on the replica compared to the retail box. Also the QR code is much bigger than the authentic one. You can notice this by seeing the size of the paper relative to the QR code.
UV Light
Finally, to tie it all up. This final step is optional only for people who have a UV light source. This step is universal for ALL sneakers/shoes. Turn off all external lights, and shine your UV light on the Air Jordan 4 and the box itself. Your goal is to look for any marks, stamps, or liquid/glue stains.
NOTE: Some very bad quality retail Air Jordan 4s will have noticeable glue stains at times. However, stamps/marks should NEVER be on the authentic shoe nor box.
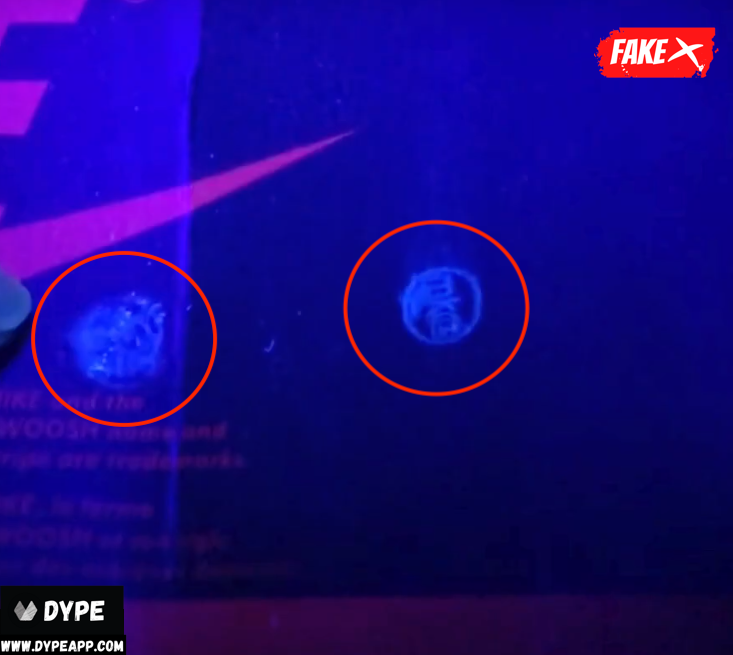
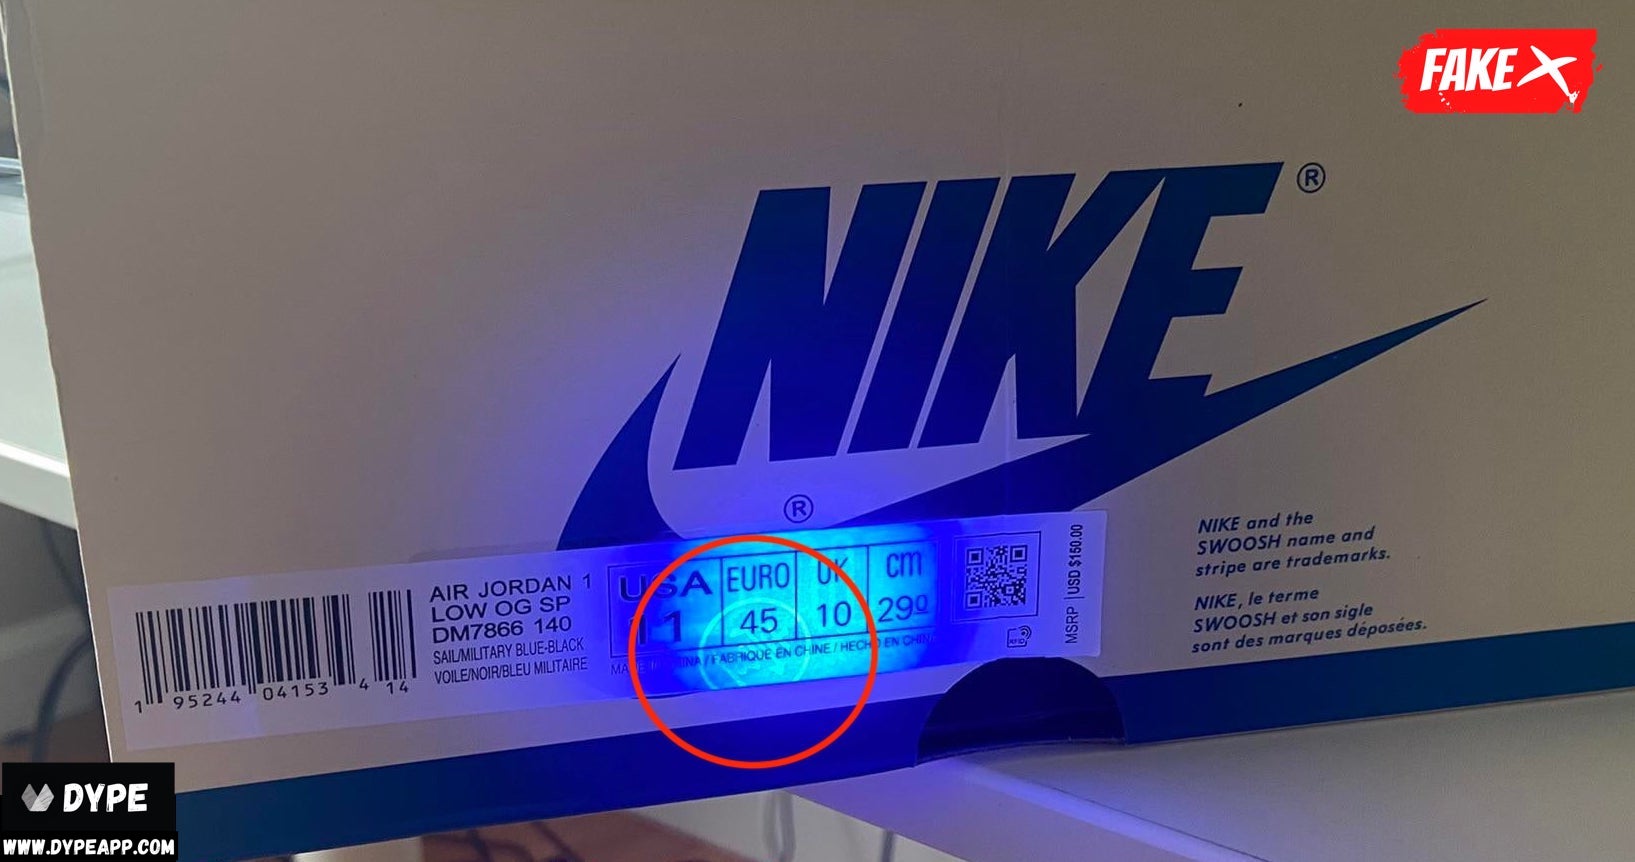
Above are some examples and indicators you're trying to look for. Authentic Air Jordan 4s should be completely clean and mark or stamp free on the shoe itself and the box as well.
The marks shown in the above images are stamps from counterfeit manufacturers.