SNEAKER • AIR JORDAN • AIR JORDAN 1
How To Spot FAKE Air Jordan 1 Patent Bred in 2023

The most complete and up to date legit check guide for Air Jordan 1 Patent Bred in 2023. See comparisons between Real Vs Fake shoes.


"We're creating a reliable and up-to-date guide for authenticating sneakers, streetwear, and luxury items. Our team of experts use multiple references during the authentication process for the most accurate results."
- Dype Team
Here's How You Can Legit Check This Item
- •Rear View
- •Toe Box
- •Wing Logo
- •Swoosh Logo
- •Tongue
- •Footbed/Insole Stitching
- •Insoles
- •Size Tag
- •Family Embroidery
- •Box Label
- •Shoe Tree
- •UV Light
Rear View
Let's begin by taking a look at the rear view of the Air Jordan 1 Patent Bred. We will be looking at the shape of the rear, which we'll call the "Hourglass" shape
Hourglass Shape
Take a look at the authentic Air Jordan 1 High, and you'll be able to see a prominent and iconic shape that the Jordan 1 is known for - the "Hourglass". This shape is most prominent on Air Jordan 1s released after 2015, and less on pairs such as the 2013 Shadow 1s and 2013 Royals. Also keep in mind that the Hourglass shape will deteriorate as it's worn more and more, so it's more significant for "New" or "Like New" shoes.
Top tier replicas have this Hourglass shape as well, so it is not a 100% fool-proof indicator, but it's good to know that if the Air Jordan 1 doesn't have it, then it is most likely fake.

We've taken the time to show and describe this property for you in the authentic Air Jordan 1 Patent Bred and the replica. An "Hourglass" shape should have the following: [1] Curvature [2] Heavy Upper [3] Skinny Center [4] Heavy Lower
If one of these properties fail, then you're most likely dealing with a replica.
Curvature
Denoted by the yellow lines. In the authentic shoe, you can see how the outline of the rear view in the Air Jordan 1 curves in the upper and lower section of the "Hourglass". Whereas, if you take a look at the replica pair, you can barely visualize the curvature. Instead it looks almost like a straight edge outline. The overall shape of the fake is rather rectangular.
Heavy Upper
Take a look at the upper section of the Hourglass on the authentic Jordan 1s. You can see the significance of the curvature from start to end. On top of that, the distance created by the shape - denoted by the upper blue dotted line - is greater than the middle and lower section. Keep in mind the extent to which the upper section flares out will change depending on whether the laces are tied tightly or not. However, it should be greater than the middle, and greater or equal to the lower section.
Skinny Center
Now move down and take a look at the center and how it's much slimmer relative to the upper and lower on the authentic Air Jordan 1s. Whereas, in the fake the distance - denoted by the dotted blue line - between the upper, center, and lower sections are extremely close to each other. The distance in the center should be the less than the upper and lower sections.
Heavy Lower
Finally, let's move down to the lower base section of the Air Jordan 1. Notice on the authentic the curvature creates "plumped" look at the bottom - like it's been blown up with air. The fakes have no such visual to it, and it looks deflated/flat. The replicas are also straight as denoted by the yellow lines.
Toe Box
Next, let's take a look at the toe box. We will focus on a couple areas: [1] Toe Box [2] Perforation Holes
Toe Box Curve

Denoted by the dotted red arrow. Notice the curvature and how much the toe box is lifted by the midsole on the retail compared to the replica. When laid flat on a surface, the toe box should lift upwards leaving a moderate distance from the surface. However, the fake is laid almost completely flat where the entire sole is coming into contact with the surface.
Denoted by the green line. Notice the toe box size and shape on the replica; it curves back much more than the authentic Patent Bred. The replica is also perceived as being too flat as well.
Perforation Holes

Notice the difference in the size of the punched holes. The replica is much larger than on the authentic pair. The originals should have a mild radius to the hole size.
Wing Logo
Next, let's take a look at the iconic wing logos of the Air Jordan 1 Patent Bred.

Denoted by the yellow circle. Take a look at the punched shoe lace hole. They've punched 2 holes on the replica, which is easily noticeable.
Denoted by the blue circle. The fake Patent Bred has the stitching in this area much too sloppy and overlapped. You can see the the density of threads in this area which is extremely inconsistent with the rest of the stitching on the shoe. The retail pairs should be mostly consistent throughout the entire sneaker.
Denoted by the green arrow. The wing logo should be aligned and pointed towards the upper shoe lace hole. However on the replica, you can see it slightly misaligned with the shoe lace hole.
Swoosh Logo
Next, let's move onto the swoosh of the Air Jordan 1 Patent Bred.
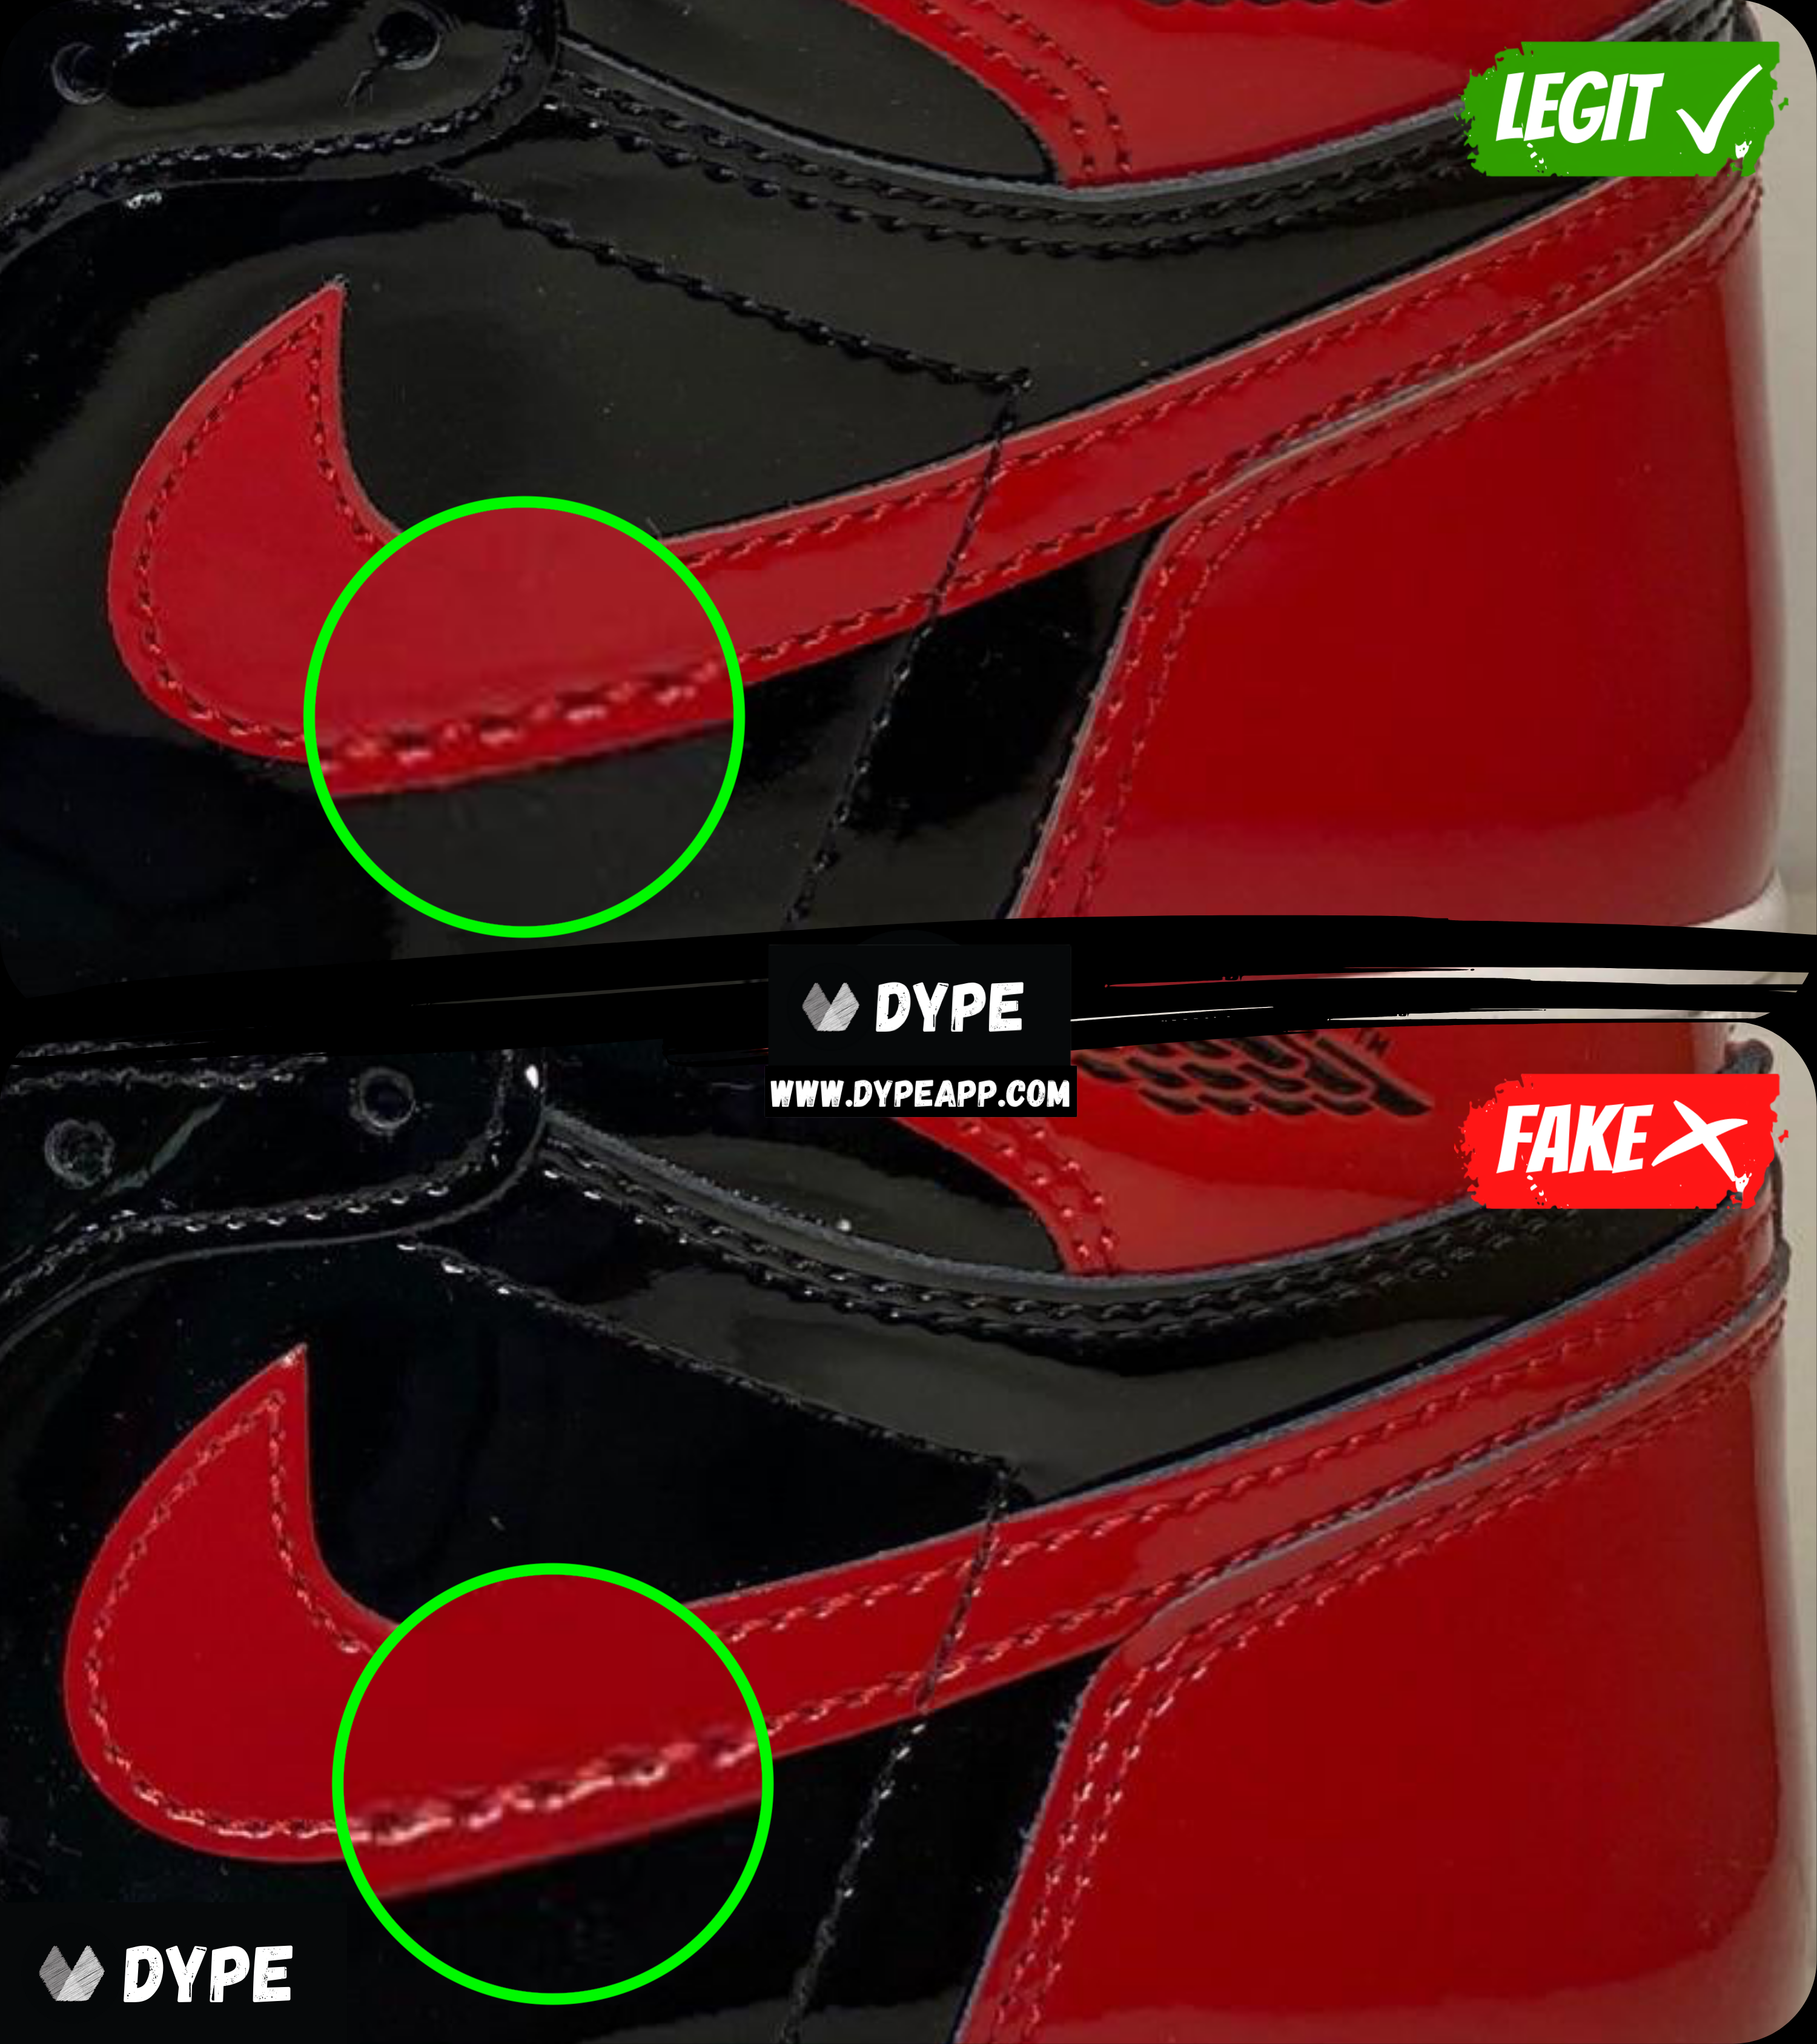
Denoted by the green circle. On the replica swoosh stitching, you can see the difference in coloring of the stitches. In addition to that you can notice lower quality stitching that is inconsistent for each thread on the fakes.
Tongue
Next, let's move onto the tongue of the Air Jordan 1 Patent Bred. We'll take a look at the front and back tongue labels.
Front Label

Denoted by the yellow circle. Take a look at the angularity of the "K" when it connects to the "E". It creates a sharper and angular turn. However the replica is curved when it should be angular.
Denoted by the green circle. The upper section of the "A" on the replica is completely cut off by the swoosh. The real pair should always display the entire letter "A".
Denoted by the green arrow. The replica swoosh curves upward abruptly, which creates a pointy and angular edge. The authentic swoosh should always gradually curve upwards naturally without it being abrupt.
Back Label

Overall you can tell that the embroidery of the letters are slightly thinner and sloppier on the replica than on the retail pair.
Denoted by the yellow box. On the fake pair, notice how the black stitching is sewn directly over the bottom words. However the authentic Patent Bred has the black stitching underneath the words without overlap. Also, the letters on the replica are much too small and sloppy and difficult to distinguish, whereas the retail is human readable.
Footbed/Insole Stitching
Next, let's take a look deep inside the Air Jordan 1 Patent Bred. We'll be taking a look at the footbed of the sneaker, which is underneath the insoles. You'll have to remove the insoles from the sneaker to see this area. If it is glued shut, you may want to use a blow dryer to heat and soften the glue...

Denoted by the yellow outline. First notice the variety of colors for the threads in the stitching of the authentic pair; you have 3 colors: white, pink, and black. However for the replica, the counterfeit manufacturers only used white threads to compensate.
Another thing to notice is the stitching density (frequency of threads) between the real versus fake. The authentic Patent Bred has a higher density of stitches in addition to the threads being thicker. The replica has its stitching too sparse and also too thin.
Lastly, notice the most upper stitching (black on retail & white on replica). The fake uses a much thicker thread and the stitching is also extremely sloppy.
Insoles
Next, let's move onto the insoles of the Air Jordan 1 Patent Bred. We will look at the front and back of the insoles.
Front Insole

Denoted by the yellow arrows. Notice the texture of the insole material on the fake versus real Patent Bred. The authentic one has horizontal striations that are visible and run parallel to each other. However, the replica has no striations and uses a more generic foam.
Back Insole

First thing to notice is the thickness of the glue patterns. The replica glue stains are much thicker than the retail Jordan Patent Bred glue stain. Also another thing to keep in mind is the spacing between the glue stain. In this example, the spacing is much less on the replica than on the retail pair.
Lastly, you should also examine the direction in which the glue stains run parallel to each other. In this case, they're similar, but some counterfeits will have vertical glue stains.
Size Tag
Next, let's take a look back inside the Air Jordan 1 Patent Bred shoe, where the size tag resides. On the size tag, we'll be on the lookout for any discrepancies in the font.

Denoted by the yellow box. This is an extremely hard to spot differentiation without a retail comparison. The number "8" on the replica has unequal hoops. The upper "o" of the "8" is smaller than the bottom "O" of the number "8". However on the retail pair, the upper and lower "o" are equal in size.
Denoted by the red box. On the replica, notice that the font ink is slightly faded on some letters such as on "BRIC" and "DO".
Family Embroidery
Next, let's move onto the Family Embroidery on the interior of the Air Jordan 1 Patent Bred.

Denoted by the yellow circle. Notice the density of the embroidery on the replica. It is much too thick and condensed within that small area, and it sticks out like a sore thumb. The authentic one is consistent throughout the entire word.
Denoted by the blue oval. Take a look at the lower area on the letters in this area. The cursive flows from one letter to the next seamlessly on the authentic Patent Bred. However on the fake, the embroidery is messy and has scrappy edges.
Denoted by the orange circle. Notice that on the replica, the loop is squiggly and and much too thin compared to the authentic shoe.
Denoted by the green circle. Here we see a similar issue arise, in which the tip of the letter "y" on the replica is squiggly and too thin compared to the retail shoe.
Box Label
Next, let's take a look at box label on the Air Jordan 1 Patent Bred, where we'll look out for any font or general discrepancies.

Denoted by the red box. The replica box displays "BLACK/WHITE-VARSITY RED" and "NOIRROUGE VARSITYBLANC". However, the authentic box should display "BLACK/VARSITY RED-WHITE" and "NOIR/BLANC/VARSITY ROUGE".
Shoe Tree
Next, we'll take a look at the cardboard shoe tree inside the Air Jordan 1 Patent Bred. This is for deadstock or new condition pairs, where maybe you'd still have it laying around.
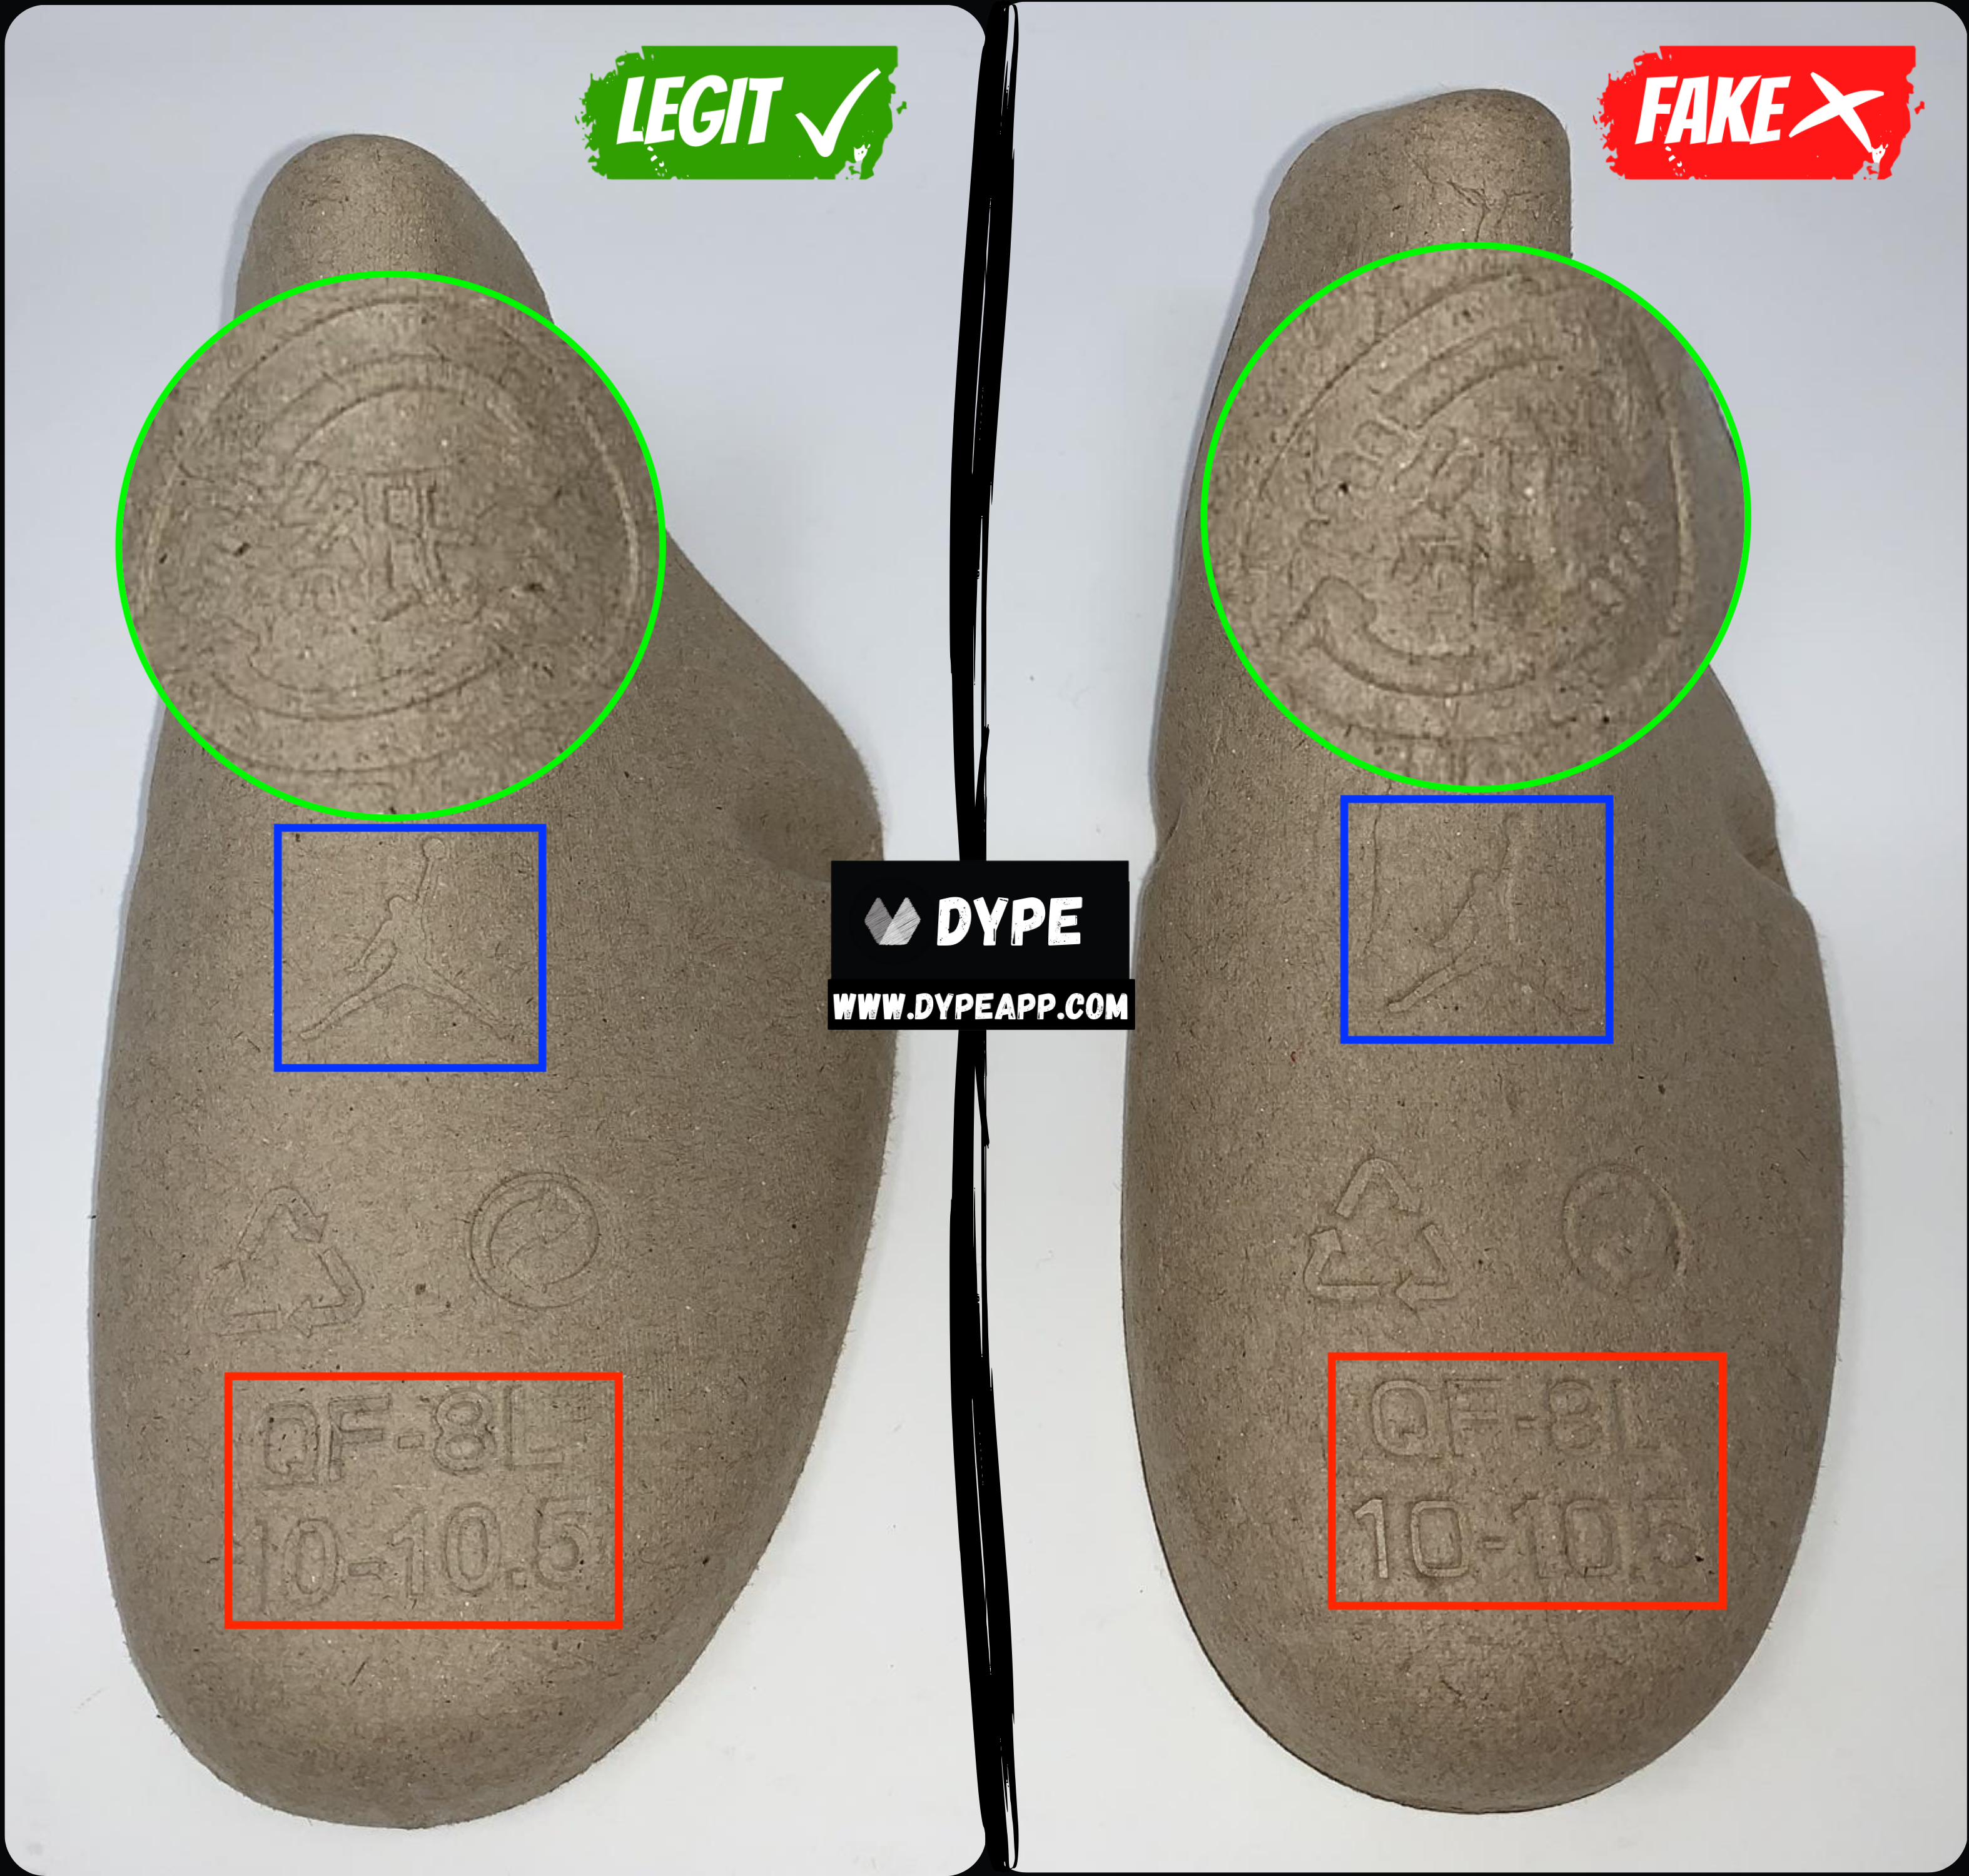
The first obvious flaw we can point out is the difference in the width of the shoe tree on the authentic and the replica. The authentic one is clearly wider, whereas the fakes are more narrow.
Denoted by the green circle. We can see on the legit shoe tree that the imprint made on the cardboard is completely different than on the fakes.
Denoted by the blue box. The Air Jordan logo imprinted on the legit shoe tree is much sharper and also thinner than the replica imprint.
Denoted by the red box. You can notice the difference in the font being used on the retail versus the fake. The legit one has a thicker font. It's more prominent in the differences if you look at the number "0". The authentic one is round and circular, while the fake is angular and boxy. This can also be said for the other letters.
UV Light
Finally, to tie it all up. This final step is optional only for people who have a UV light source. Turn off all external lights, and shine your UV light on the Air Jordan 1 and the box itself. Your goal is to look for any marks, stamps, or liquid/glue stains.
NOTE: Some very bad quality retail Air Jordan 1s will have noticeable glue stains at times. However, stamps/marks should NEVER be on the authentic pairs.
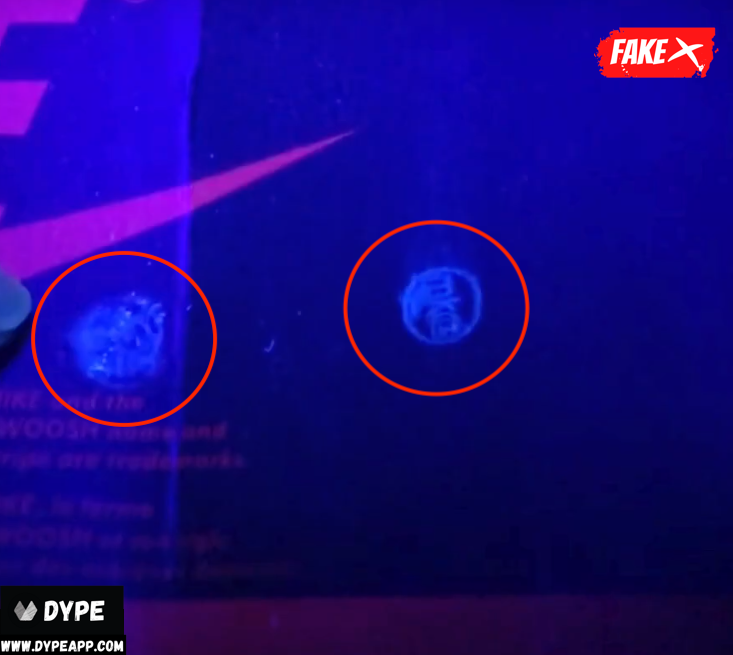
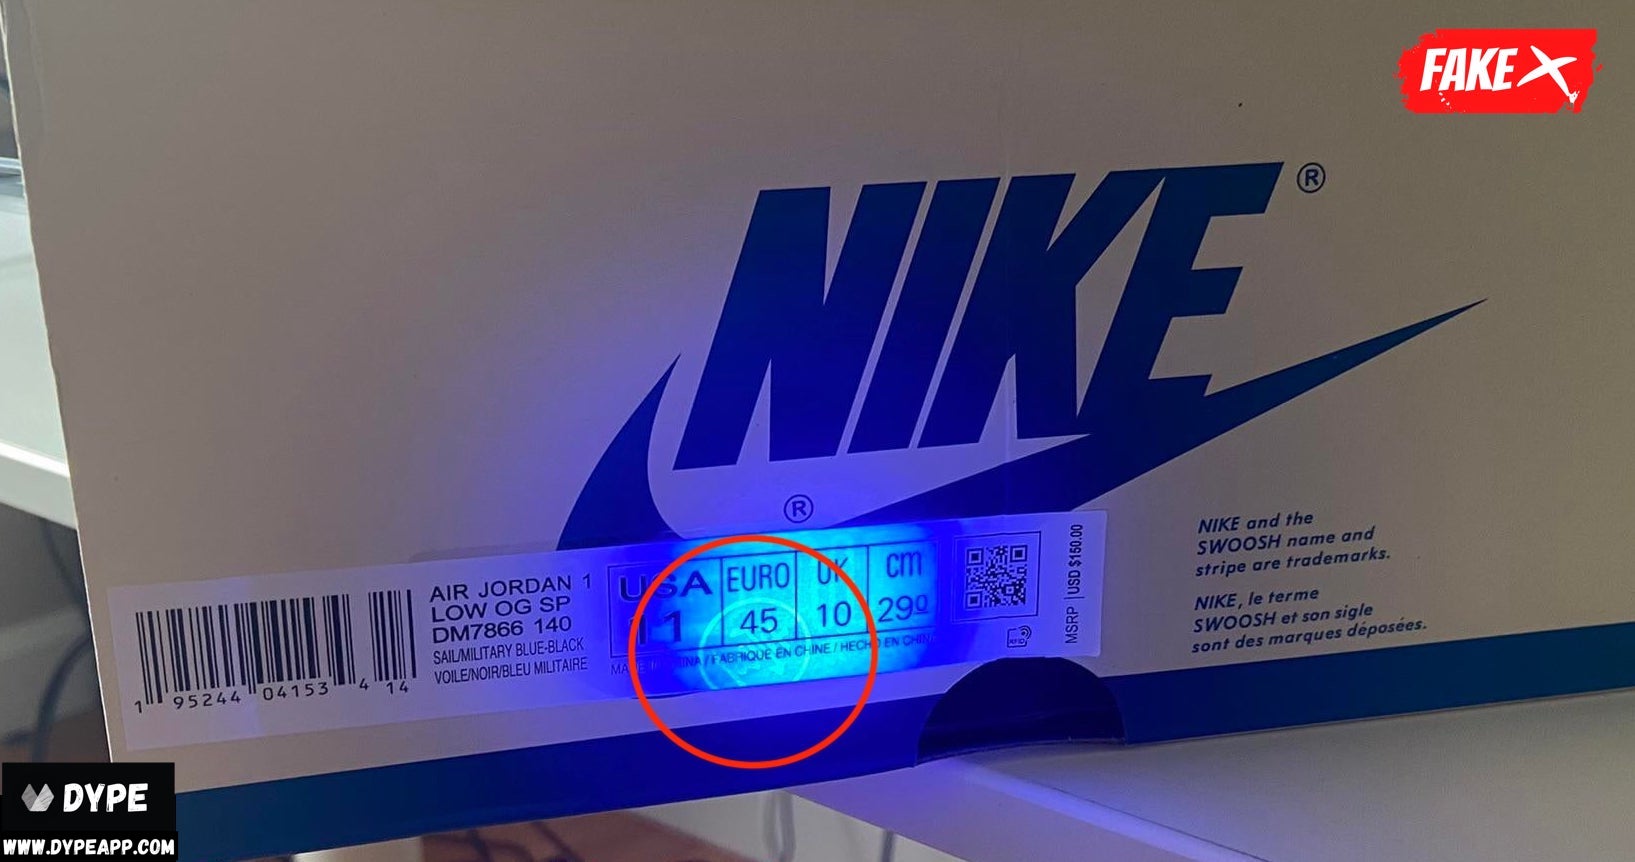
Above are some examples and indicators you're trying to look for. Authentic Air Jordan 1s should be completely mark or stamp free on the shoe itself and the box as well.
The marks shown in the above images are stamps from counterfeit manufacturers.