SNEAKER • AIR JORDAN • AIR JORDAN 1
How To Spot FAKE Air Jordan 1 in 2023 (All Colorways)

The most complete and up to date legit check guide for ALL Air Jordan 1 Colorways in 2023. See comparisons between Real Vs Fake shoes.
"We're creating a reliable and up-to-date guide for authenticating sneakers, streetwear, and luxury items. Our team of experts use multiple references during the authentication process for the most accurate results."
- Dype Team
Here's How You Can Legit Check This Item
- •Rear View
- •Toe Box
- •Wing Logo
- •Swoosh Logo
- •Corner Stitching
- •Soles
- •Tongue
- •Footbed/Insole Stitching
- •Insoles
- •Size Tag
- •Box Label
- •Shoe Tree
- •UV Light
Rear View
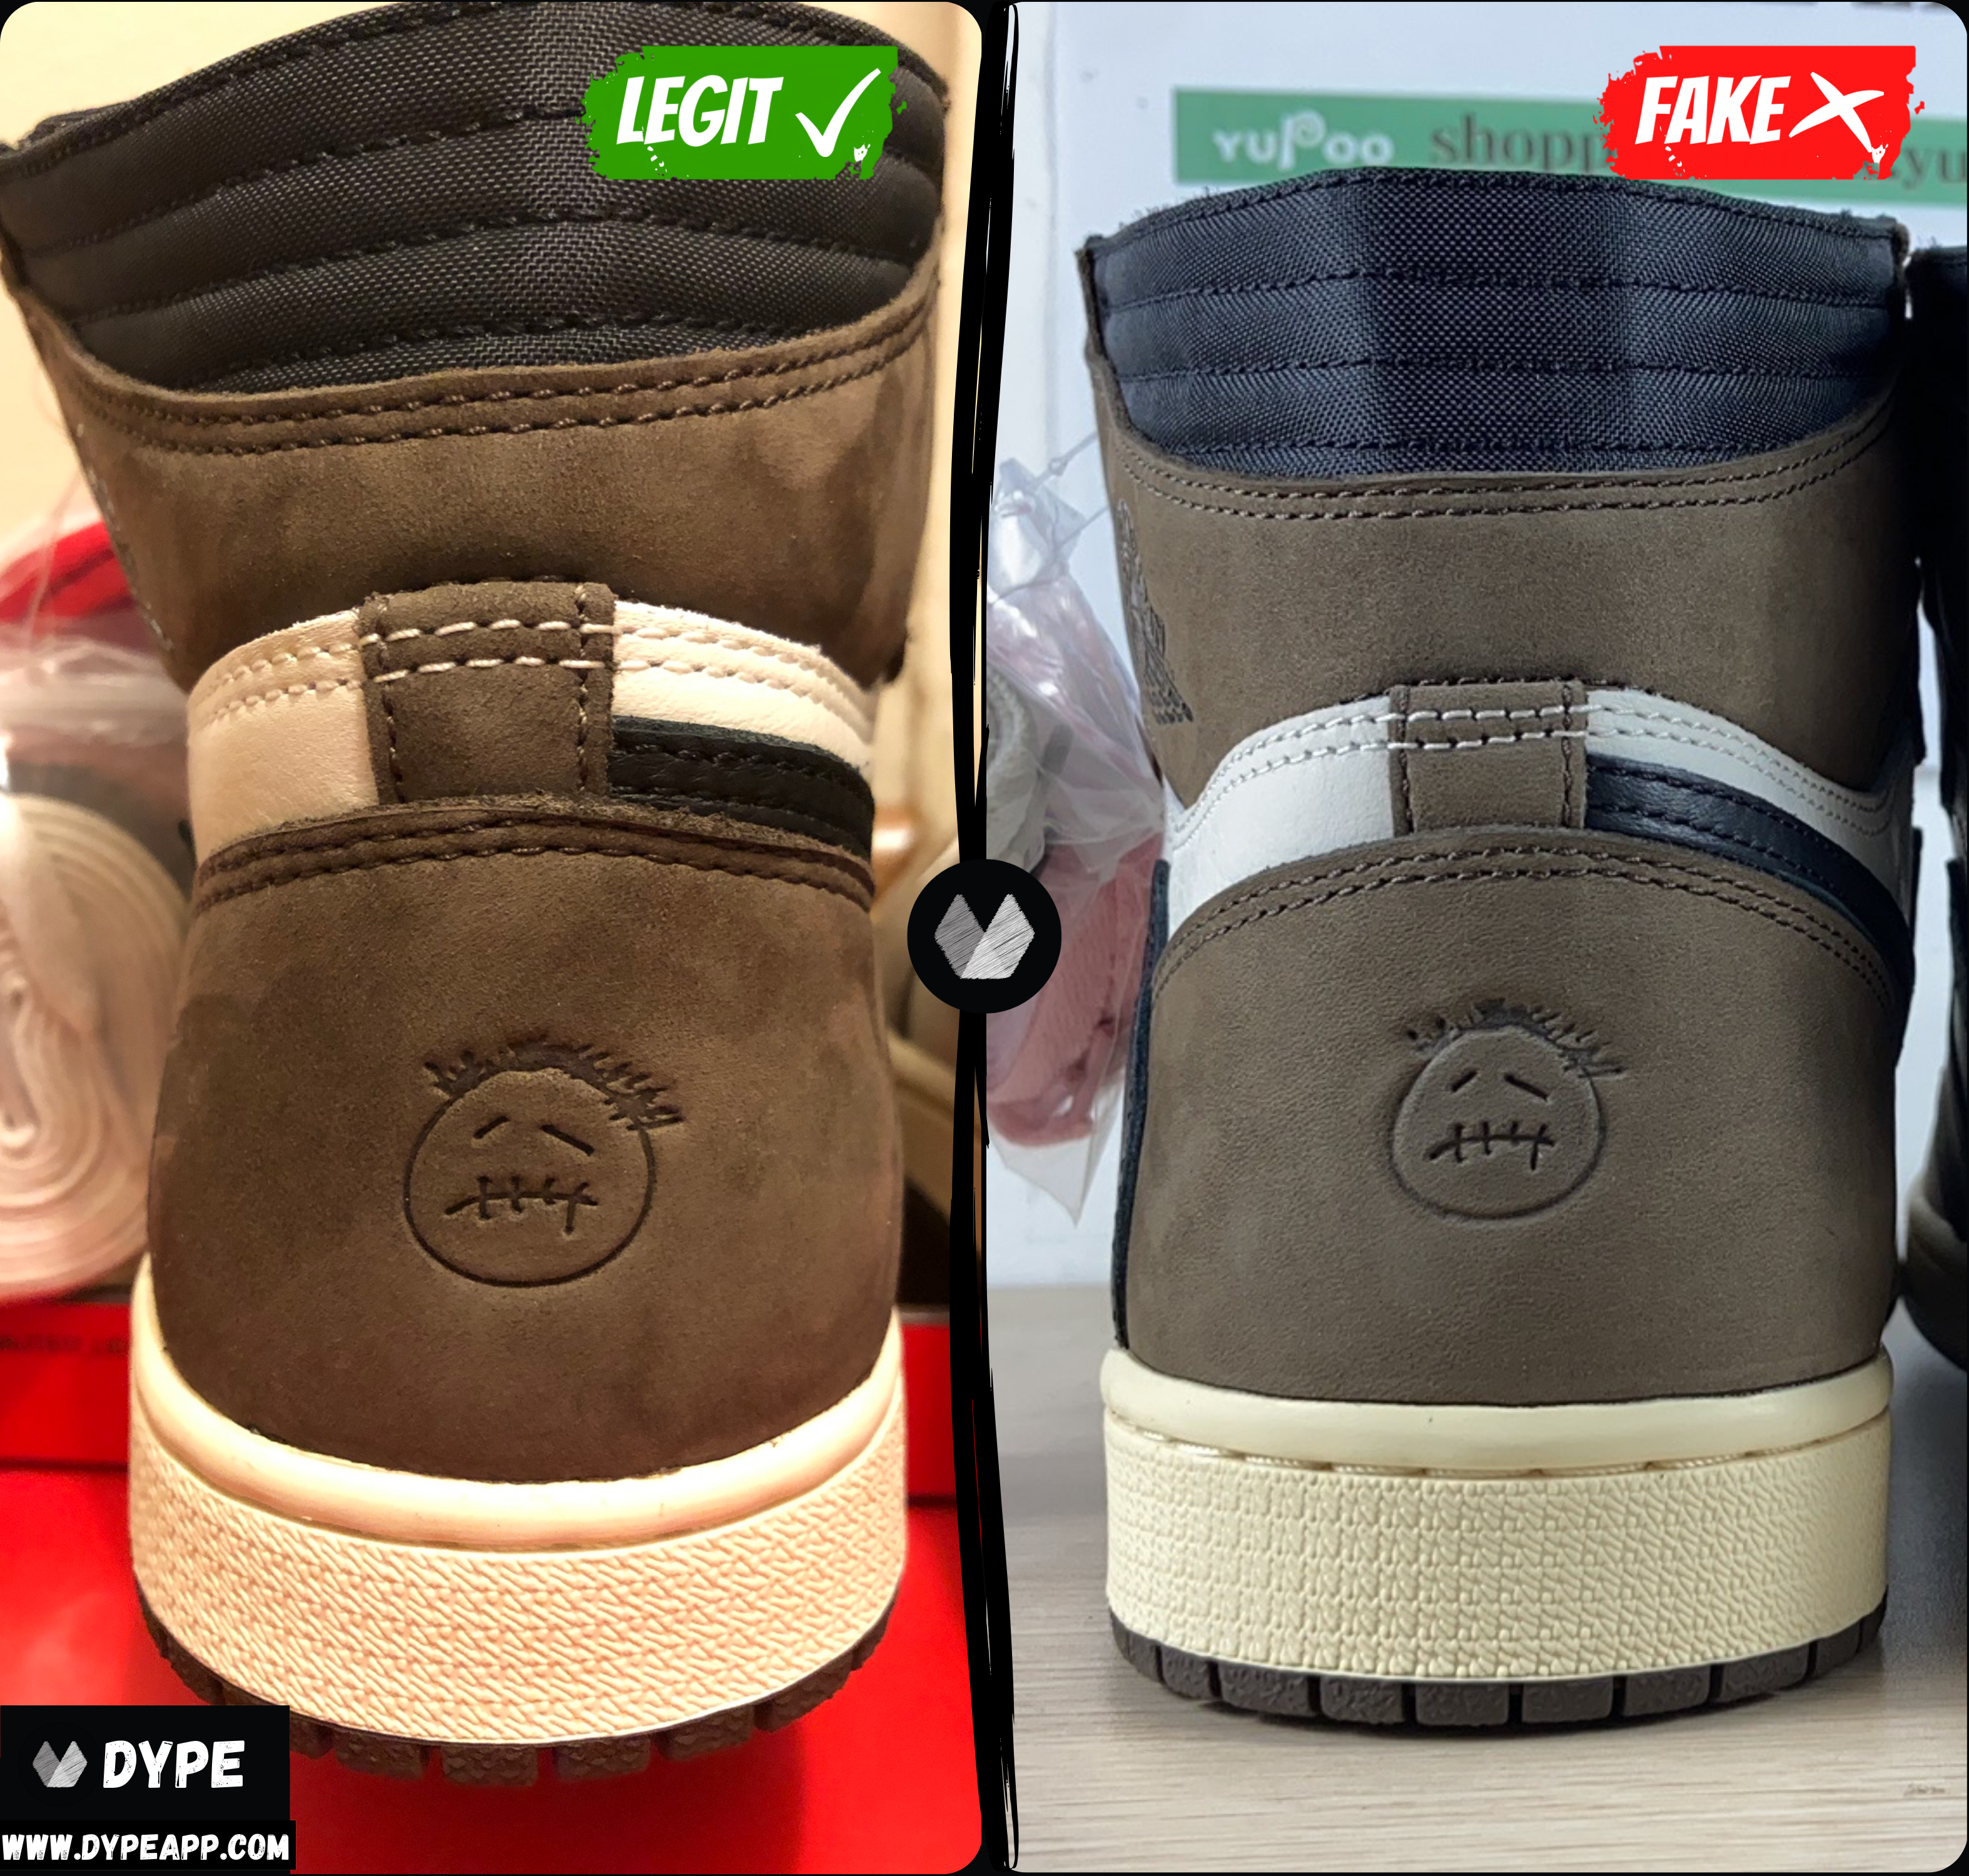
Let's begin by taking a look at the rear view of the Air Jordan 1. A couple flaws we will examine between the authentic and replicas will be: [1] Hourglass Shape and [2] Middle Patch.
Hourglass Shape
Take a look at the authentic Air Jordan 1 High, and you'll be able to see a prominent and iconic shape that the Jordan 1 is known for - the "Hourglass". This shape is most prominent on Air Jordan 1s released after 2015, and less on pairs such as the 2013 Shadow 1s and 2013 Royals. Also keep in mind that the Hourglass shape will deteriorate as it's worn more and more, so it's more significant for "New" or "Like New" shoes.
Top tier replicas have this Hourglass shape as well, so it is not a 100% fool-proof indicator, but it's good to know that if the Air Jordan 1 doesn't have it, then it is most likely fake.
To dive deeper into what we're actually talking about, here's an outline that explains the unique property of this shape in the image below.

We've taken the time to show and describe this property for you in the authentic Air Jordan 1 and the replica. An "Hourglass" shape should have the following: [1] Curvature [2] Heavy Upper [3] Skinny Center [4] Heavy Lower
If one of these properties fail, then you're most likely dealing with a replica.
Curvature
Denoted by the blue outline. In the authentic shoe, you can see how the outline of the rear view in the Air Jordan 1 curves in the upper and lower section of the "Hourglass". Whereas, if you take a look at the replica pair, you can barely visualize the curvature. Instead it looks almost like a straight edge outline. The overall shape of the fake is rather rectangular.
Heavy Upper
Take a look at the upper section of the Hourglass on the authentic Jordan 1s. You can see the significance of the curvature from start to end. On top of that, the distance created by the shape - denoted by the upper red dotted line - is greater than the middle and lower section. Keep in mind the extent to which the upper section flares out will change depending on whether the laces are tied tightly or not. However, it should be greater than the middle, and greater or equal to the lower section.
Skinny Center
Now move down and take a look at the center and how it's much slimmer relative to the upper and lower on the authentic Air Jordan 1s. Whereas, in the fake the distance - denoted by the dotted red line - between the upper, center, and lower sections are extremely close to each other. The distance in the center should be the less than the upper and lower sections.
Heavy Lower
Finally, let's move down to the lower base section of the Air Jordan 1. Notice on the authentic the curvature creates "plumped" look at the bottom - like it's been blown up with air. The fakes have no such visual to it, and it looks deflated/flat. The replicas are also straight as denoted by the blue lines.
Middle Patch
Another common indicator on the Air Jordan 1 from the rear view is the middle patch. The flaw usually derives from the stitching in this patch. The patch size itself varies even on retail shoes.
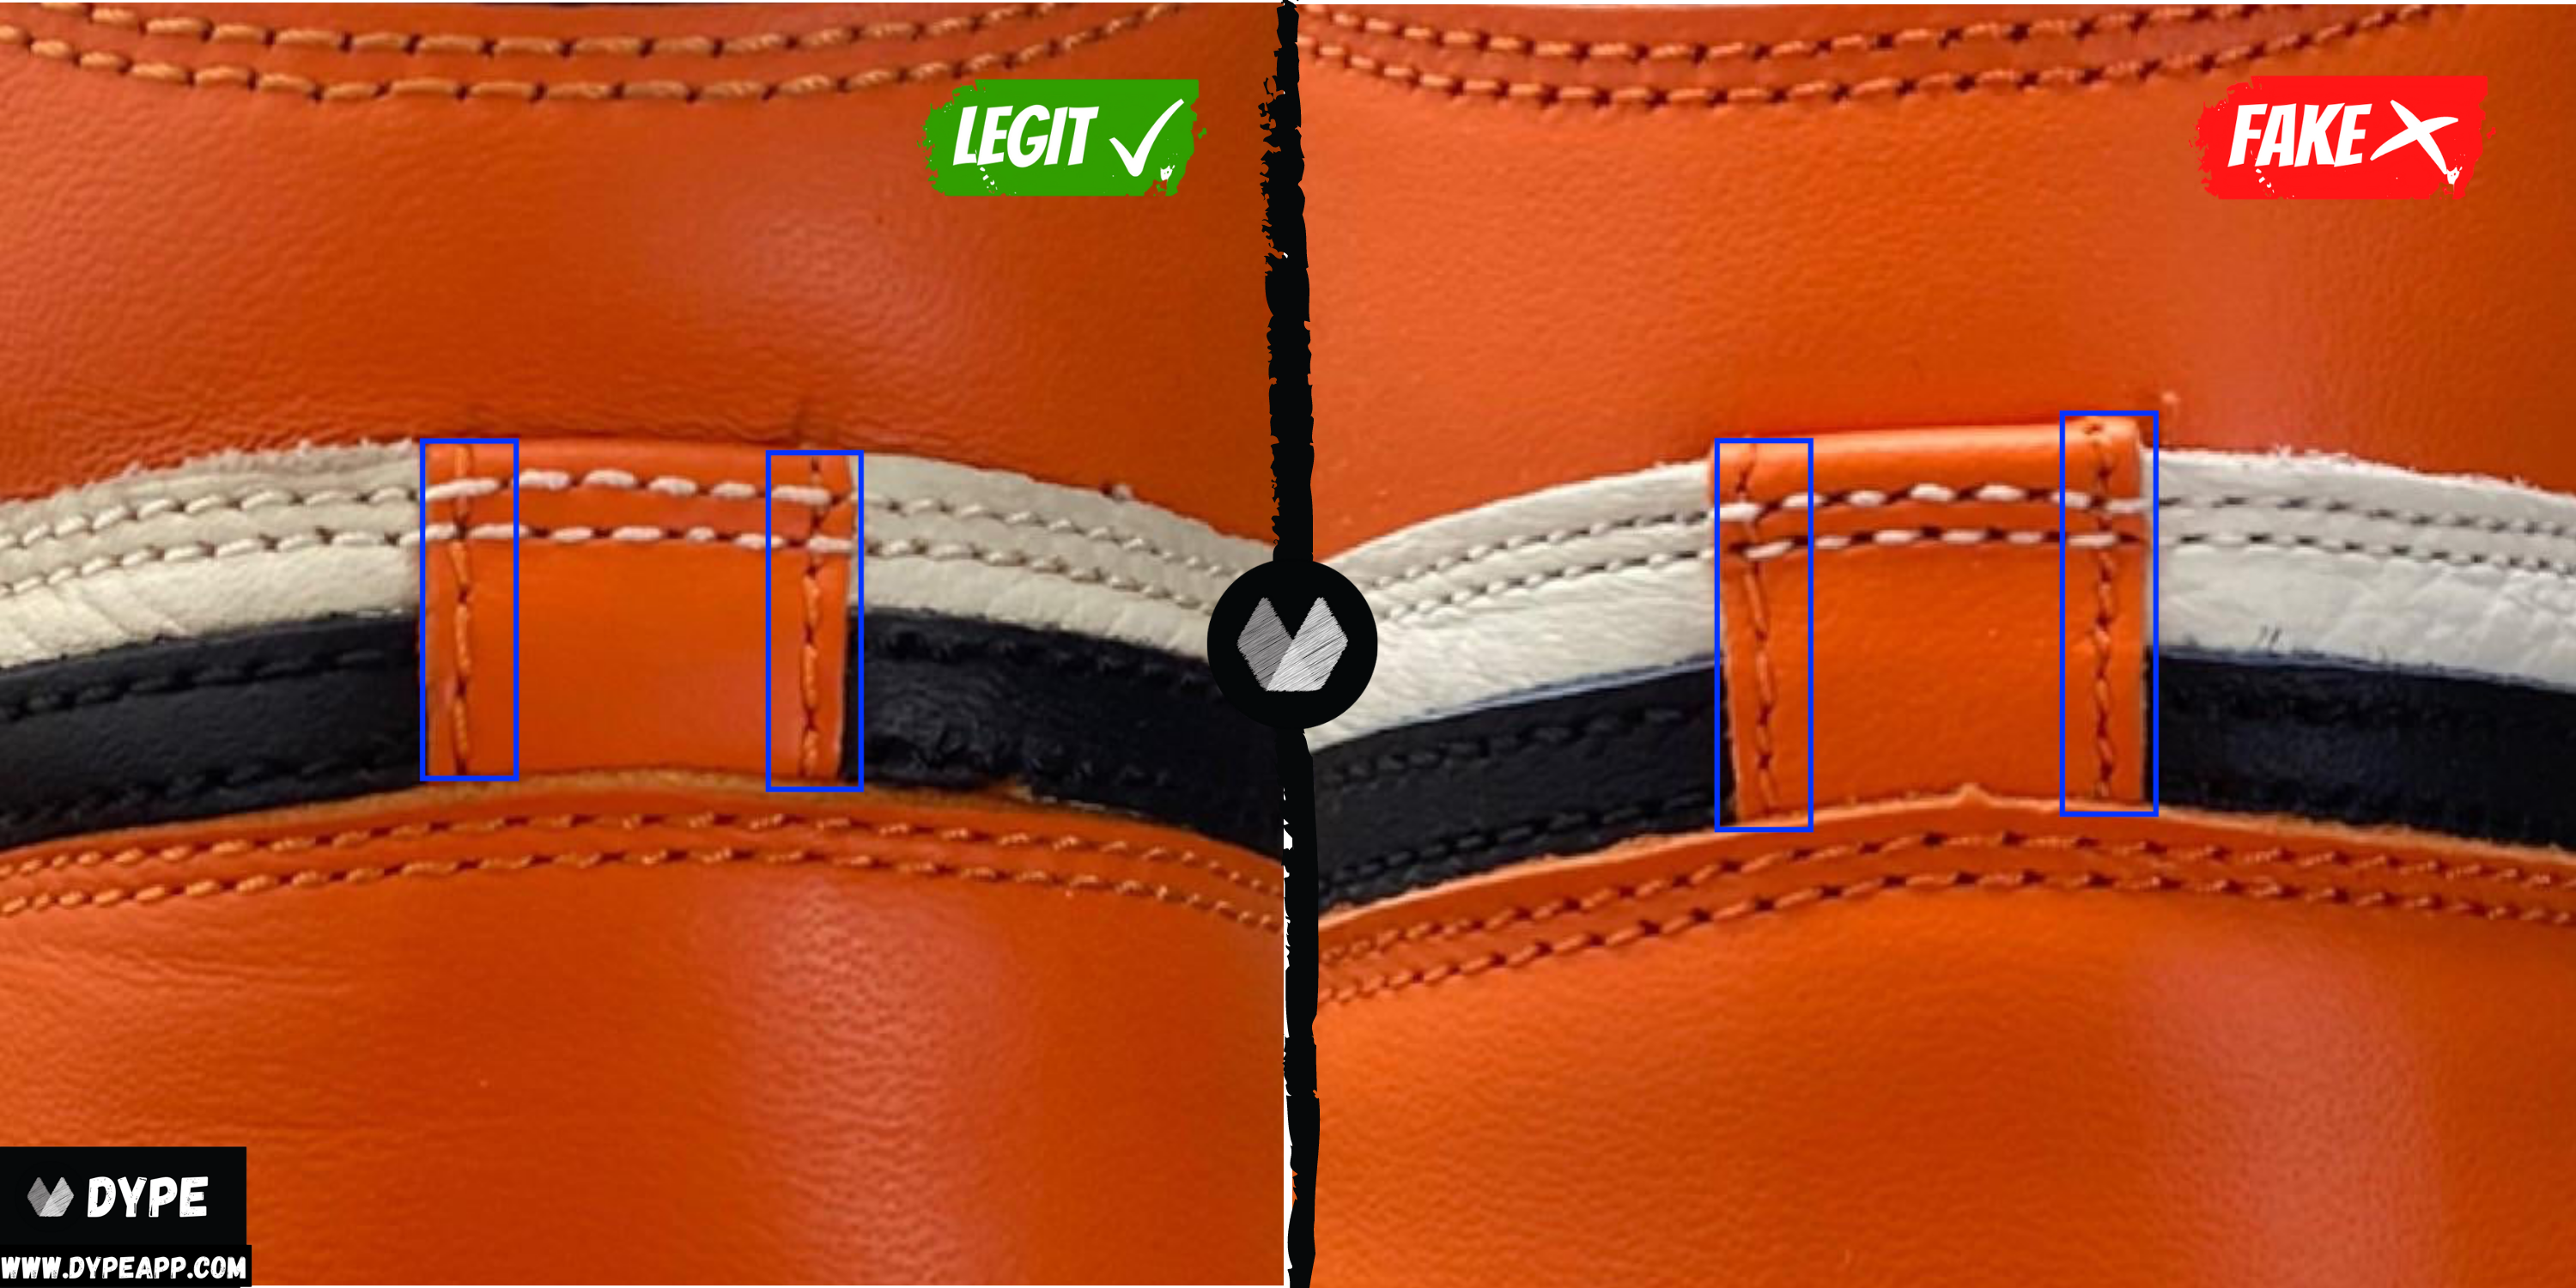
Denoted by the blue boxes. Take a look at the authentic middle patch stitching. They're consistent in the thread size and number of threads. However, if you look at the fakes, you can clearly see that the number of threads and the thread size is drastically different. The stitching on the replica is also crooked and not straight.
Toe Box
Next, let's take a look at the toe box. We will focus on a couple areas: [1] Toe Box Bulkiness [2] Perforation Holes.

Bulkiness
Here we can see a couple distinctions between the authentic Air Jordan 1 and replica. You can see the toe box bulkiness and straight/flatness of the replica.
Denoted by the dotted red lines. You can visually see the curvature of the midsole and the toe box on the real pair. This curvature lifts the tip of the shoe slightly upwards. On the replica, you don't see this being as prominent, hence the entire sole of the sneaker lays flat on the surface it's on.
Denoted by the green circle, you can see the sole on the tip touching the surface on the replica, where the retail doesn't. Keep in mind that the extent of the curvature will vary even on retails themselves, however the soles should never be completely flat.
Denoted by the blue outline. The blue line is identical in length on the top and bottom images, but notice how much bigger the replica pair is, which makes makes it "bulky". On the authentic pair, this bulkiness isn't as prominent. This aspect will vary on retails as well, however the difference should be minute.
Perforation Holes
Now take a look at the toe box from the top view, where the perforation holes are visible.
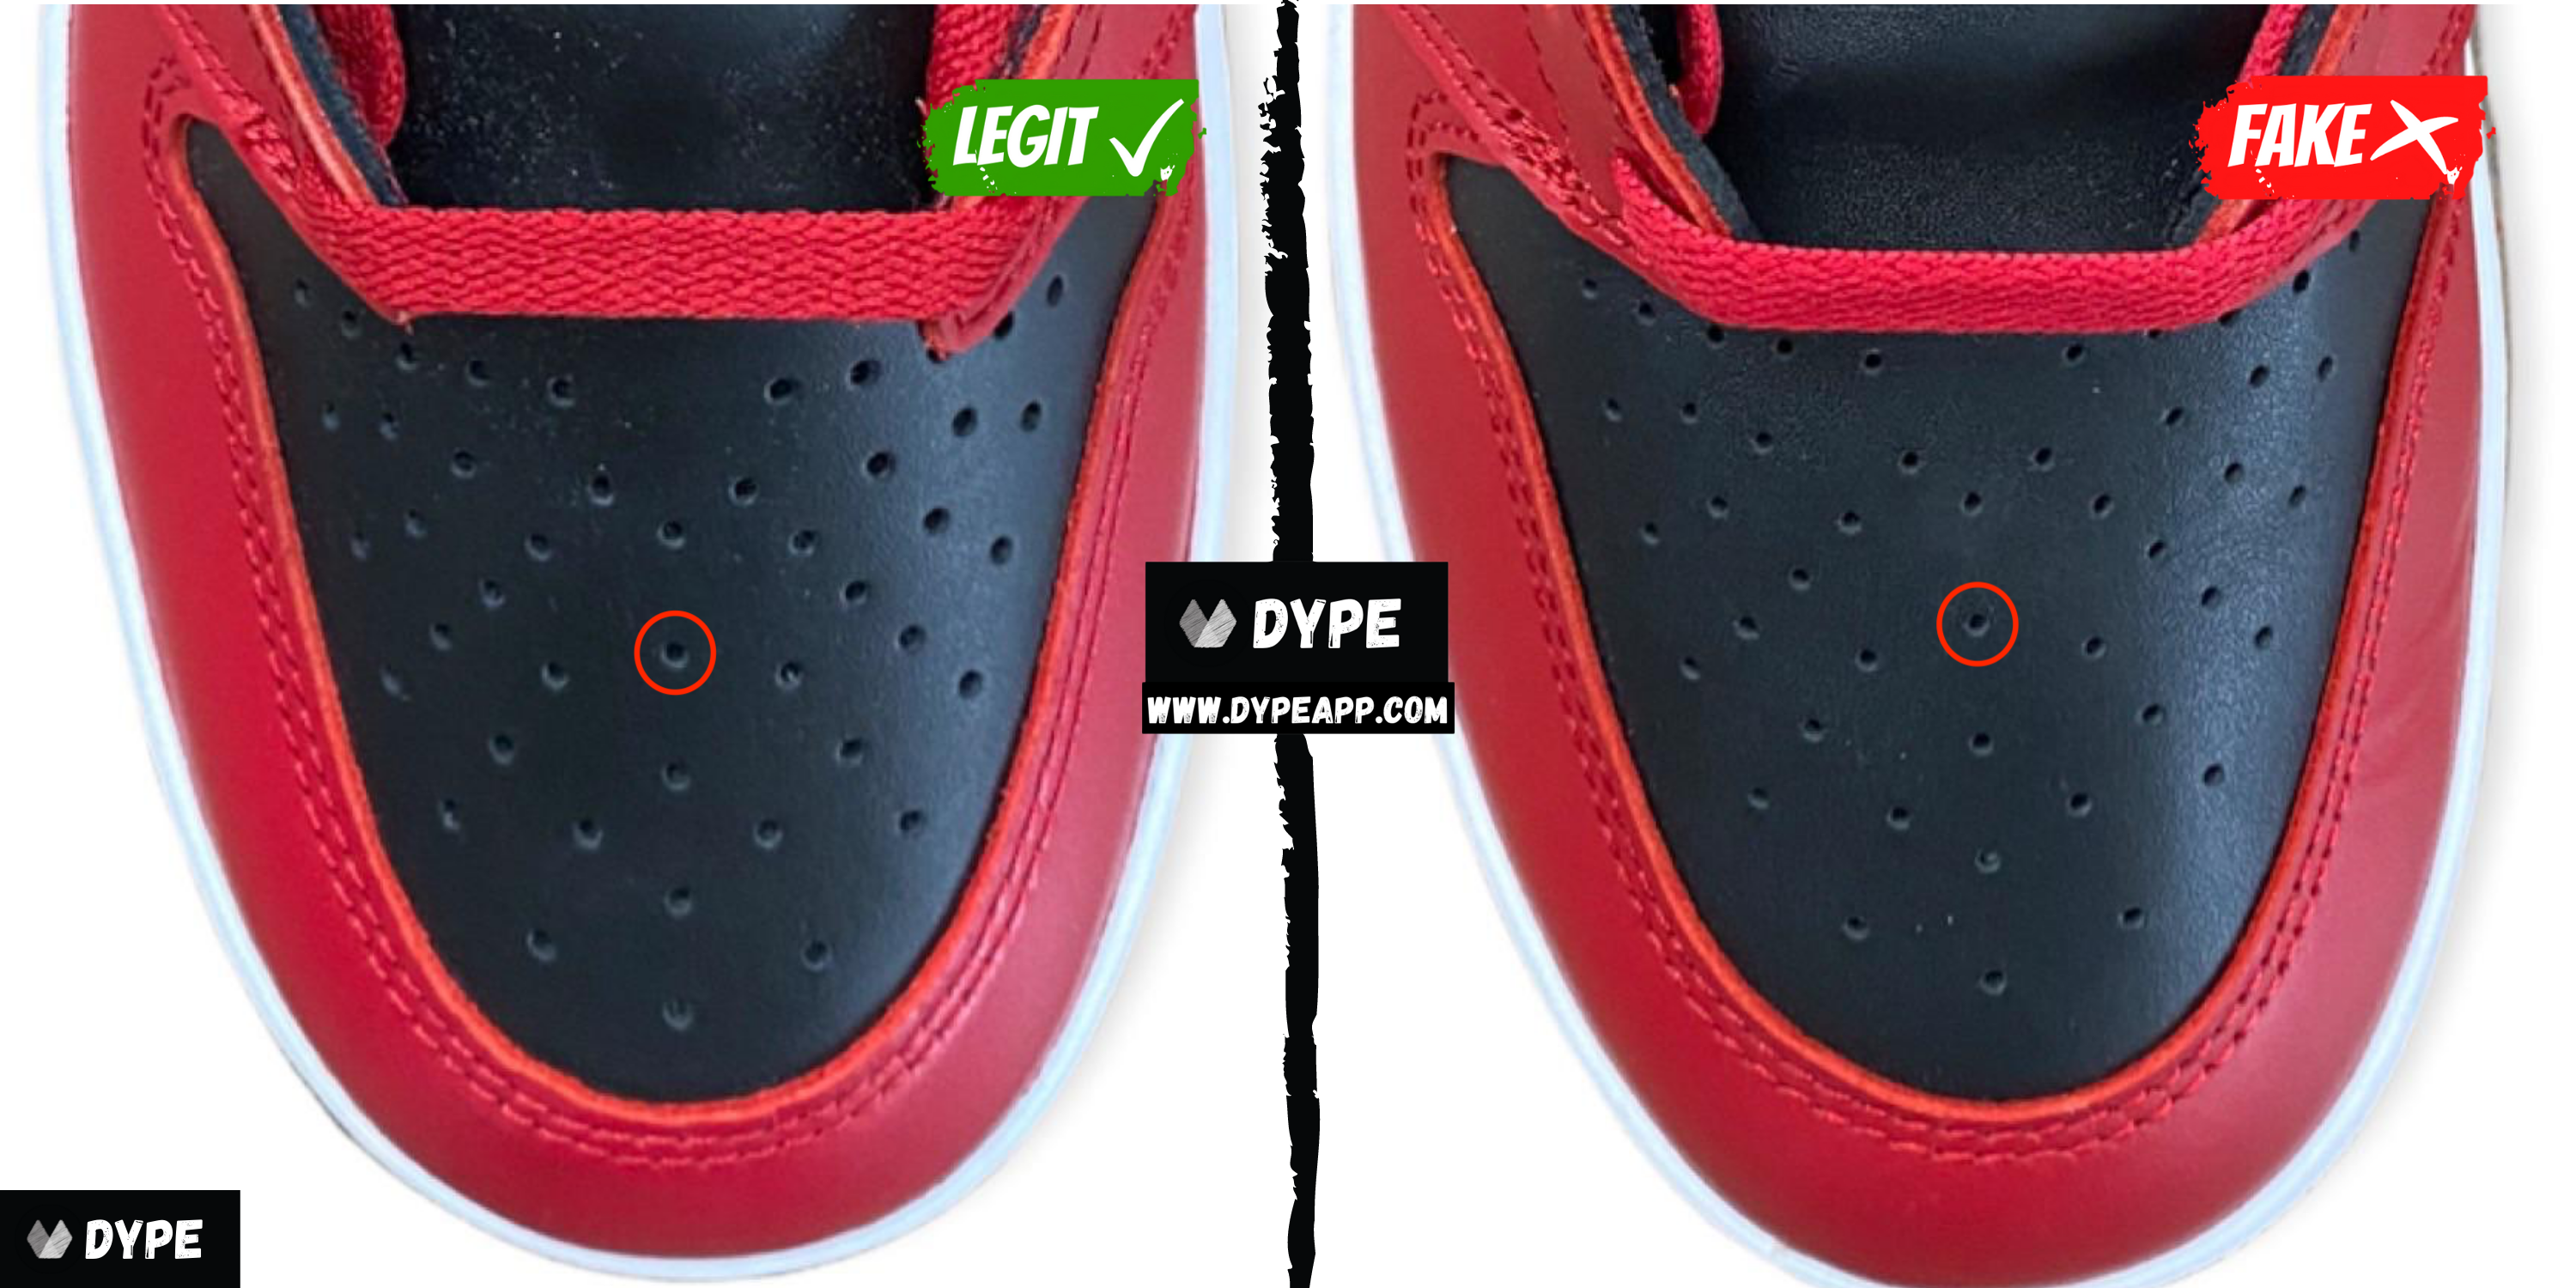
Here we can see the difference in the size of the perforation holes between the authentic and fakes. On the retails, the holes are clearly more punched in and wider compared to the replica.
Wing Logo
Next, let's take a look at the iconic wing logos of the Air Jordan 1s. We will go over multiple examples because the wing logos vary depending on the sneakers.
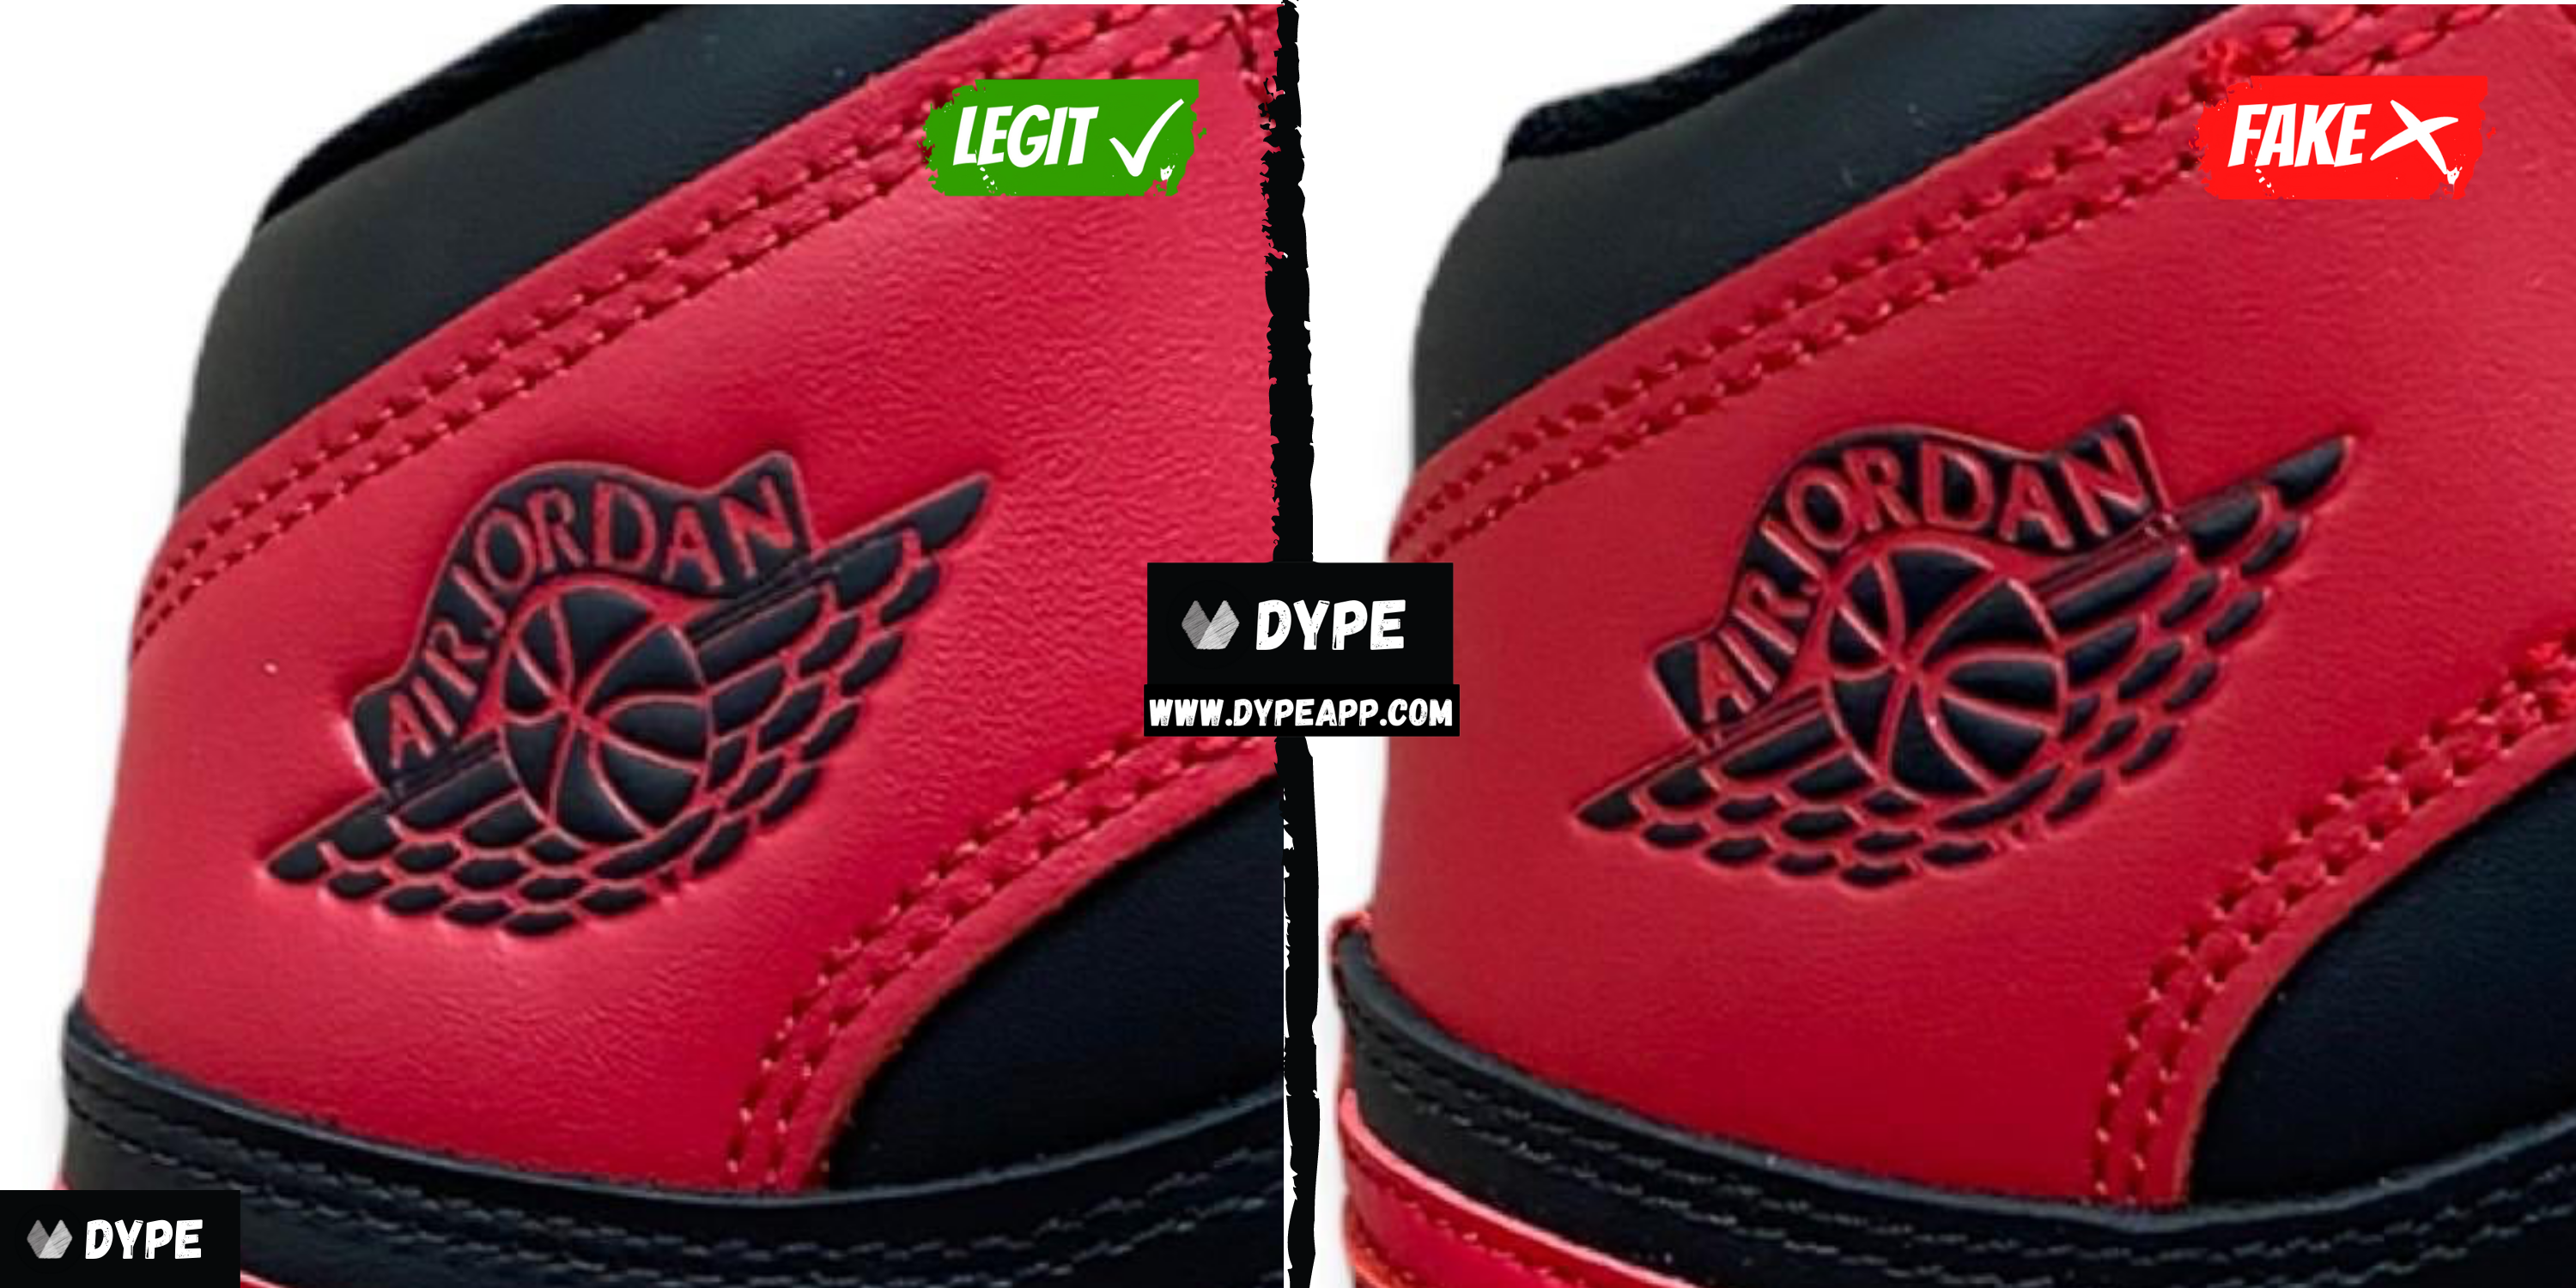
The flaws in the replica Air Jordan 1 wing logos are usually either [1] "AIR JORDAN" Text [2] Design Thickness/Spacing [3] "TM" Text
Let's go highlight the flaws on the fakes with visuals in the image below...

Denoted by the blue circle. At a closer look on the authentic and fake Air Jordan 1s, we can clearly see the difference in font thickness of the "AIR JORDAN" Text. The replicas have a much thicker font on the letters, this makes it so that the "OR" is touching each other. Whereas, the retail pair, they're separated.
Now have a look at the letter "J" - particuarly at the bottom of the letter. On the authentic Jordan 1s, you can see that it's still within the black borders. Whereas, on the replicas you can clearly see that there's an opening where the "J" opens up.
Denoted by the green circle. Another obvious cue is that the shape of the logo marks are too thin with too much space between them.

The easily noticeable flaw is with the font size and thickness. The "AIR JORDAN" text on the authentic logo is much thinner and looks more elegant compared to the replica. The replica font weight makes it seem more clumsy.
Take a look at the "TM" text on the authentic, where it's much smaller relative to the other letters. Whereas, on the fake you can clearly see that the font size is unnaturally big.

Denoted by the red circles. On the replica wing logo, you can see how noticeably thin the letters are near the top. The "R"s and "D" are barely visible, whereas on the authentic it is filled in completely.
Denoted by the green circle. Here we can see the letters "R" and "D" coming into contact on the retail pair. However, the replica has them completely separate.

Denoted by the green outline. We immediately notice the difference in font thickness and sharpness. The retails have a consistent font and letter spacing, whereas in the fake it's thicker and display sloppy edges on the lettering.
Denoted by the red circle. On the replicas, you can see just how shapeless the logo marks are with no angularity. They look more like ovals like the original marks.
Swoosh Logo
Next, let's move onto the iconic swoosh of the Air Jordan 1s. We'll go over multiple examples of the authentic and the replicas as well. The 3 main type of flaws you'll find on the swooshes will come from either [1] Thickness [2] Tip [3] Stitching
You may find high tier fake Air Jordan 1s with all of these flaws spot on, however most pairs are not top tier fakes. Let's continue...
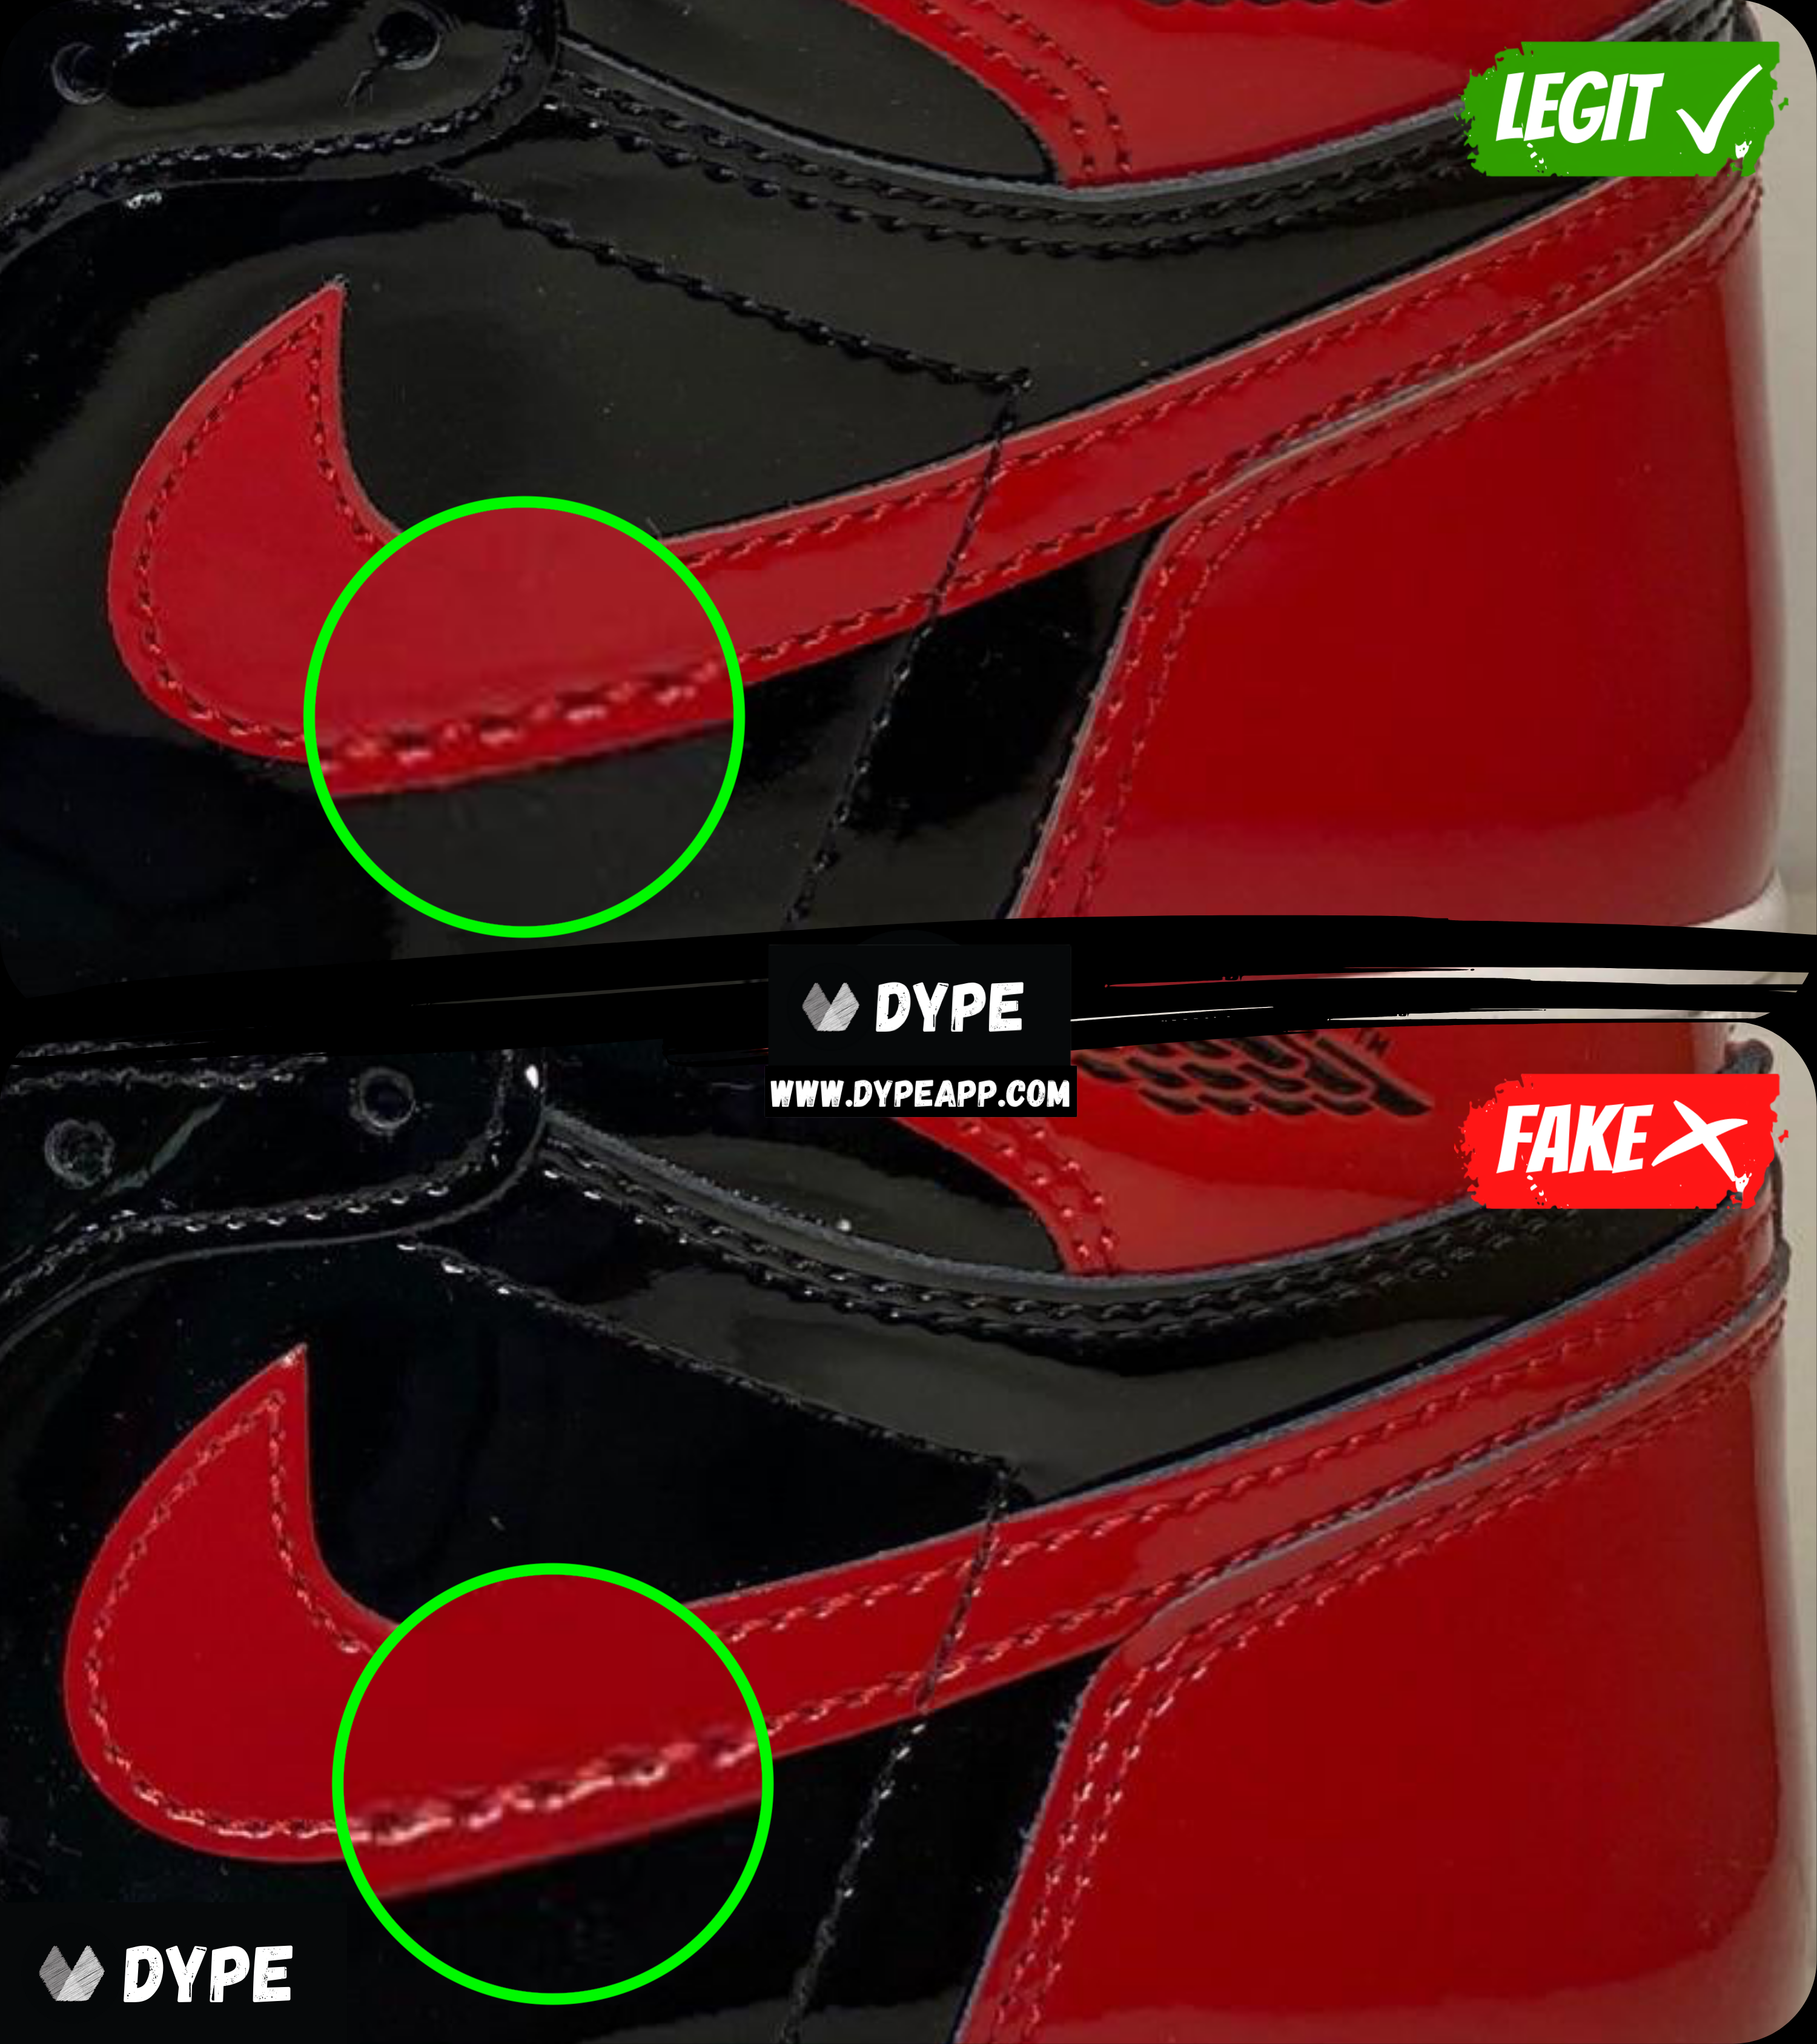
Denoted by the green circle. On the replica swoosh stitching, you can see the difference in coloring of the stitches. In addition to that you can notice lower quality stitching that is inconsistent for each thread on the fakes.
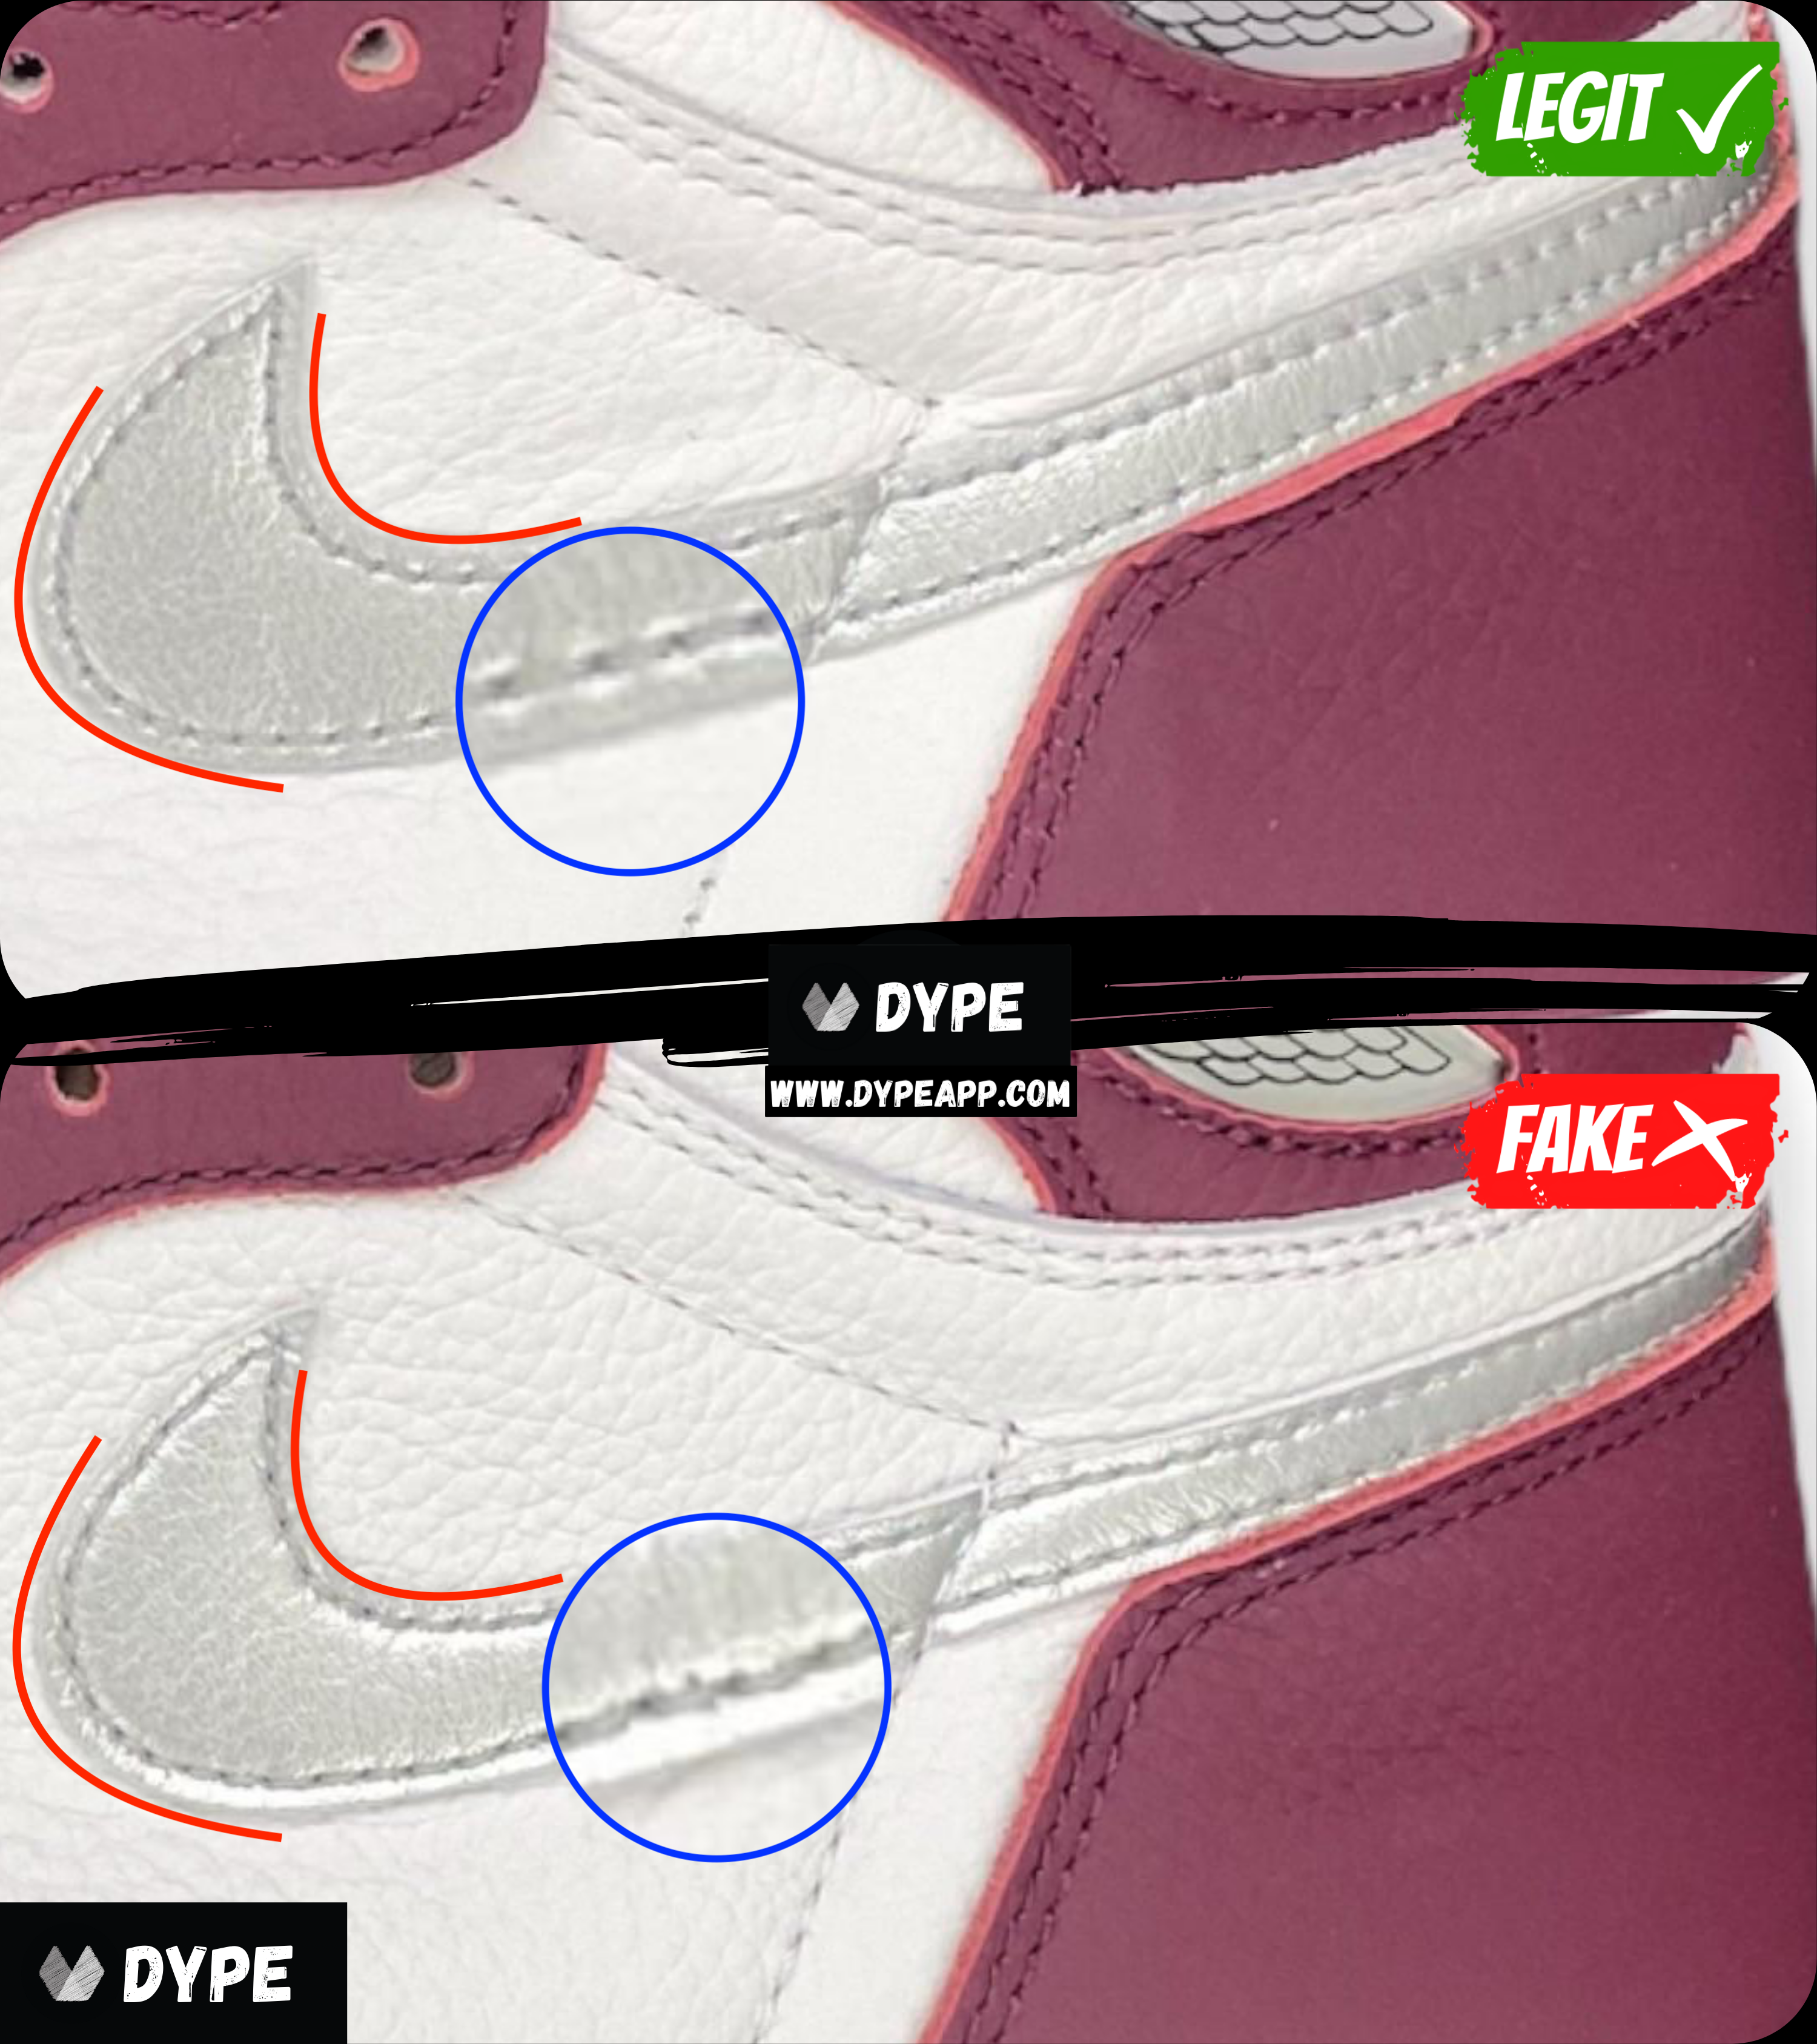
Denoted by the red lines (both identical red lines). Take look at the difference in Air Jordan swoosh thickness on the retail compared to the fake. You can notice a gap and empty space in the swoosh on the fake. It's slightly difficult to notice in the image because lower color contrast.
Denoted by the blue circle. Notice the same issue with the stitching arises in the replicas similar to the previous swoosh. This occurs due to threads not being sewn deep enough compared to the legit threads. The threads become a lot more visible and inconsistent on the surface.
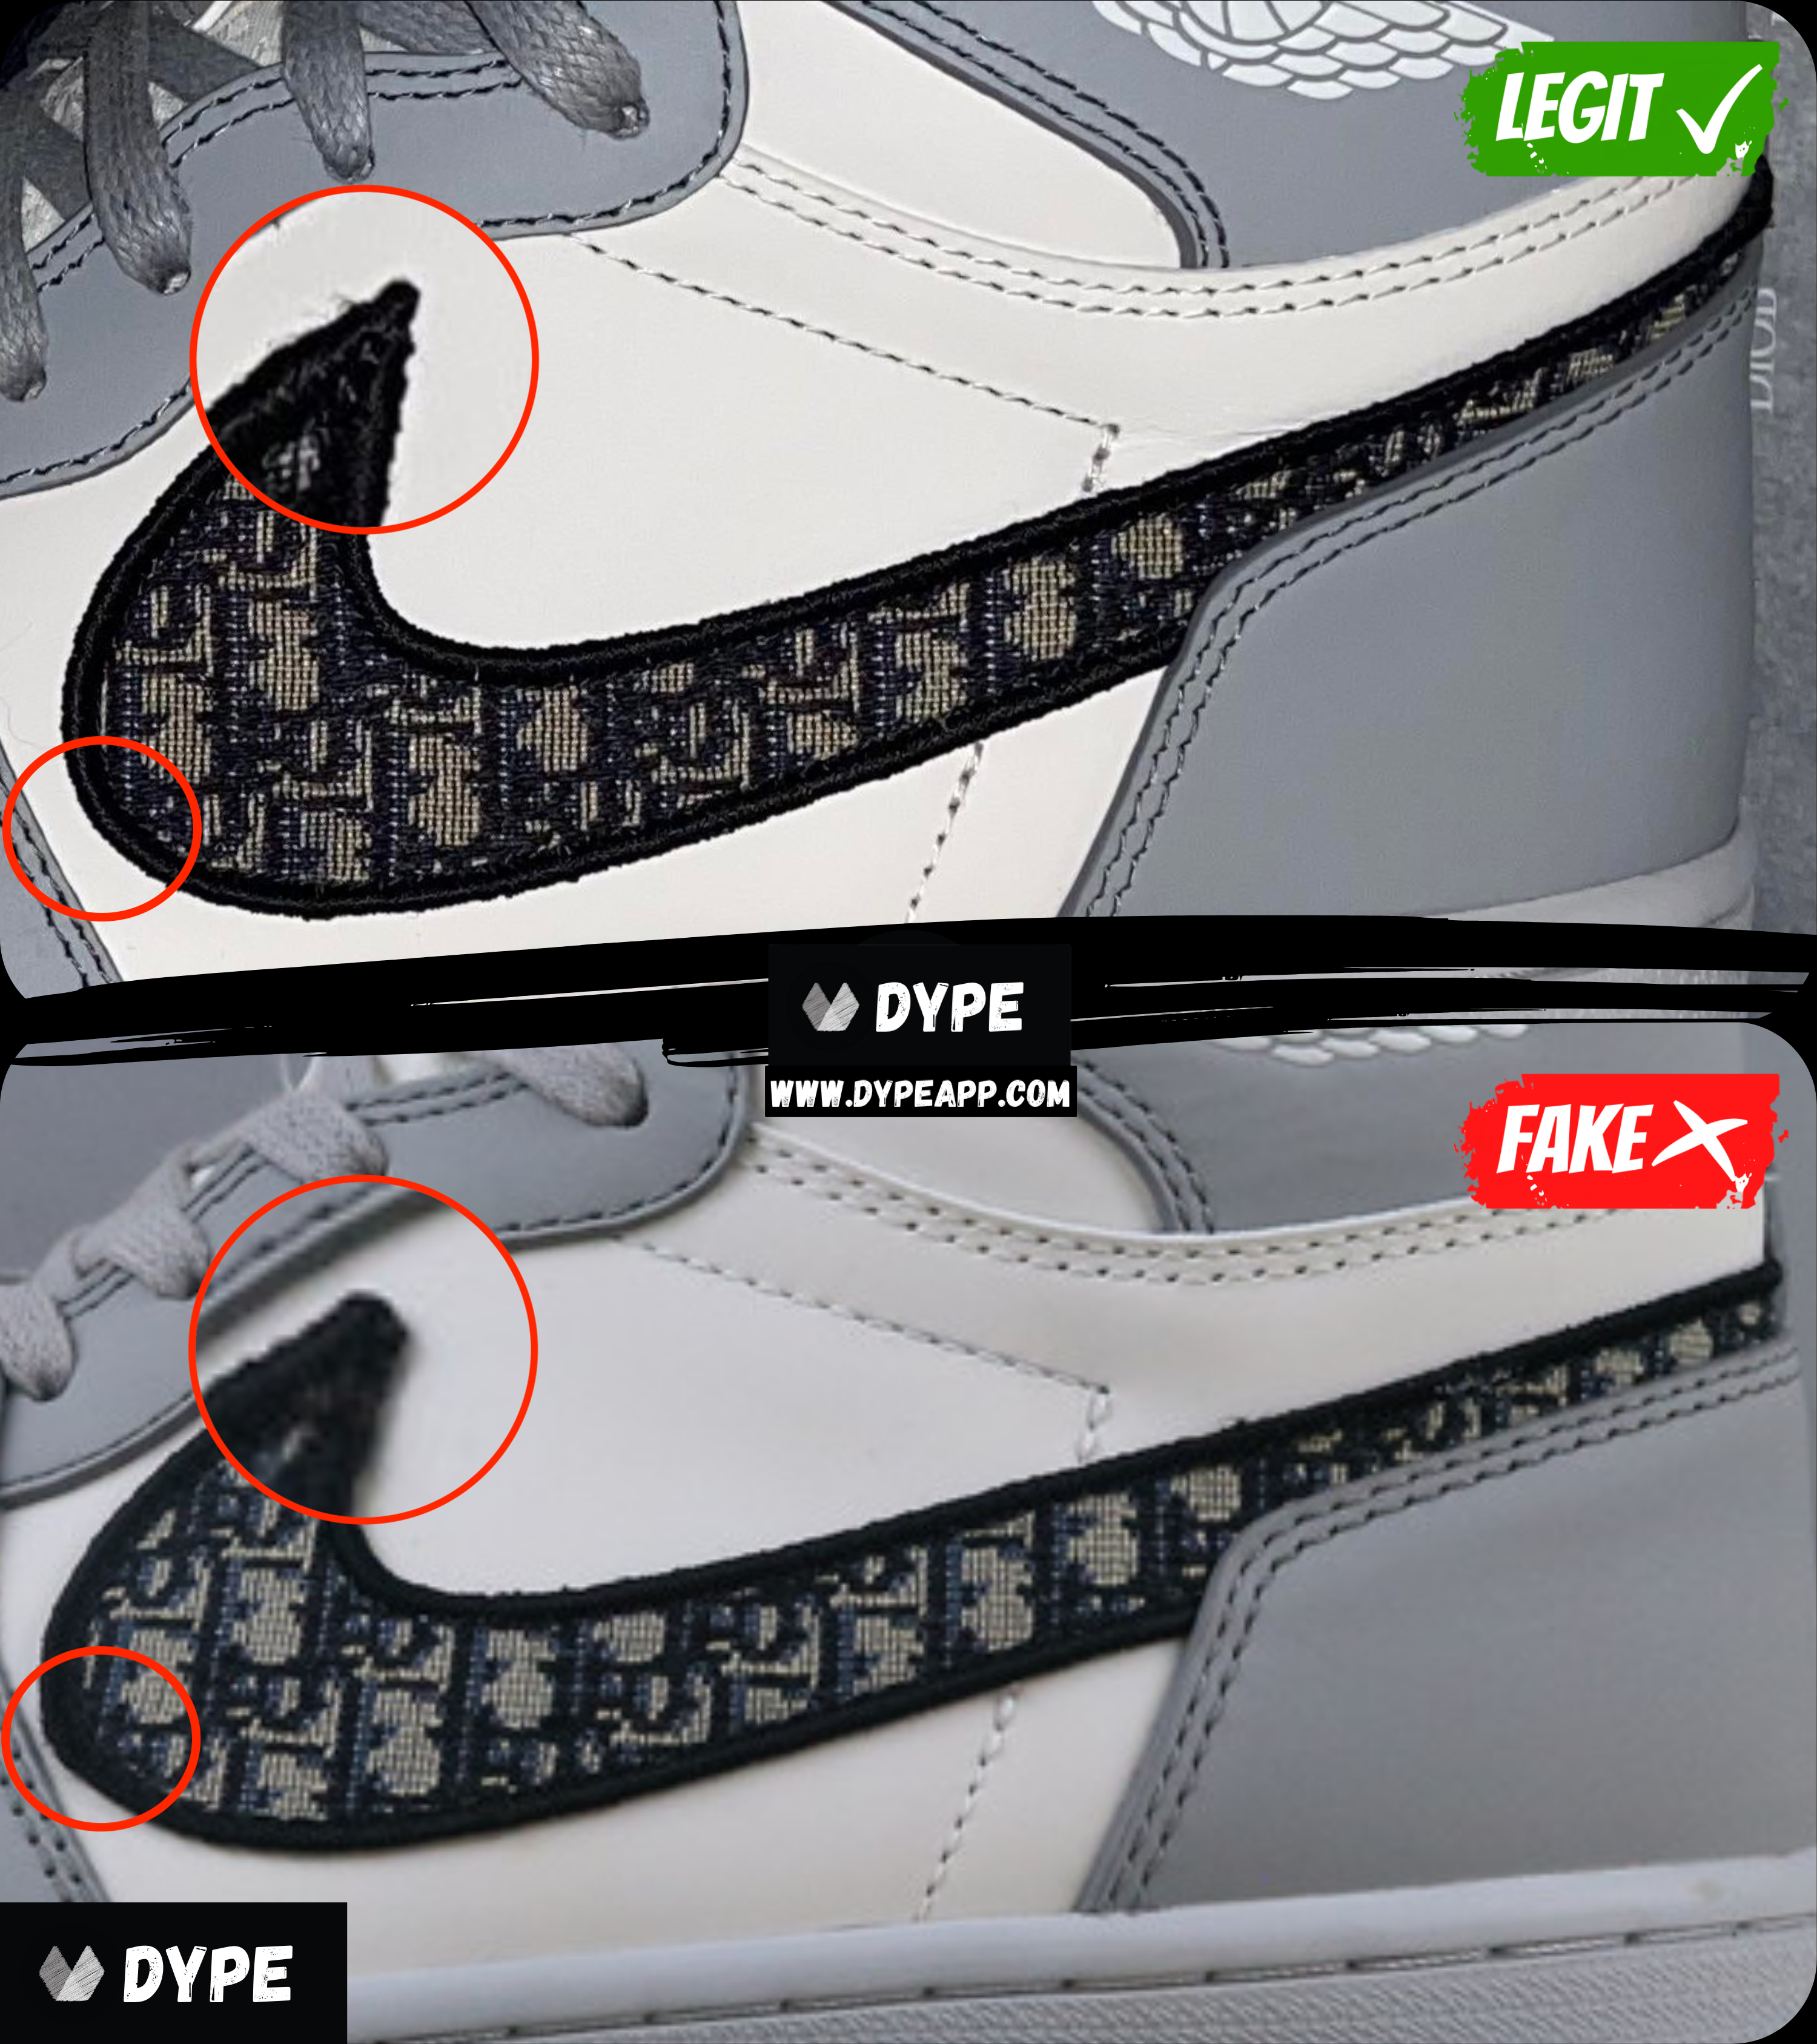
Take a look at the tip of the swoosh on the Air Jordan 1 Diors. On the fakes, you can clearly see a dull/rounded tip. Whereas on the authentic pair, you can see the sharpness of the tip. Most counterfeits will have the tip correct, however keep in mind that the tip should be sharp and not dull.
Take a look at the other area highlighted by the other red circle. We can notice the gap between the swoosh and the stitching. On the authentic pair, it won't come nearly as close. However on this fake, the swoosh is clearly overextended and too big.
Corner Stitching
Now let's move onto a particular area of stitching, which we'll call the corner stitching.
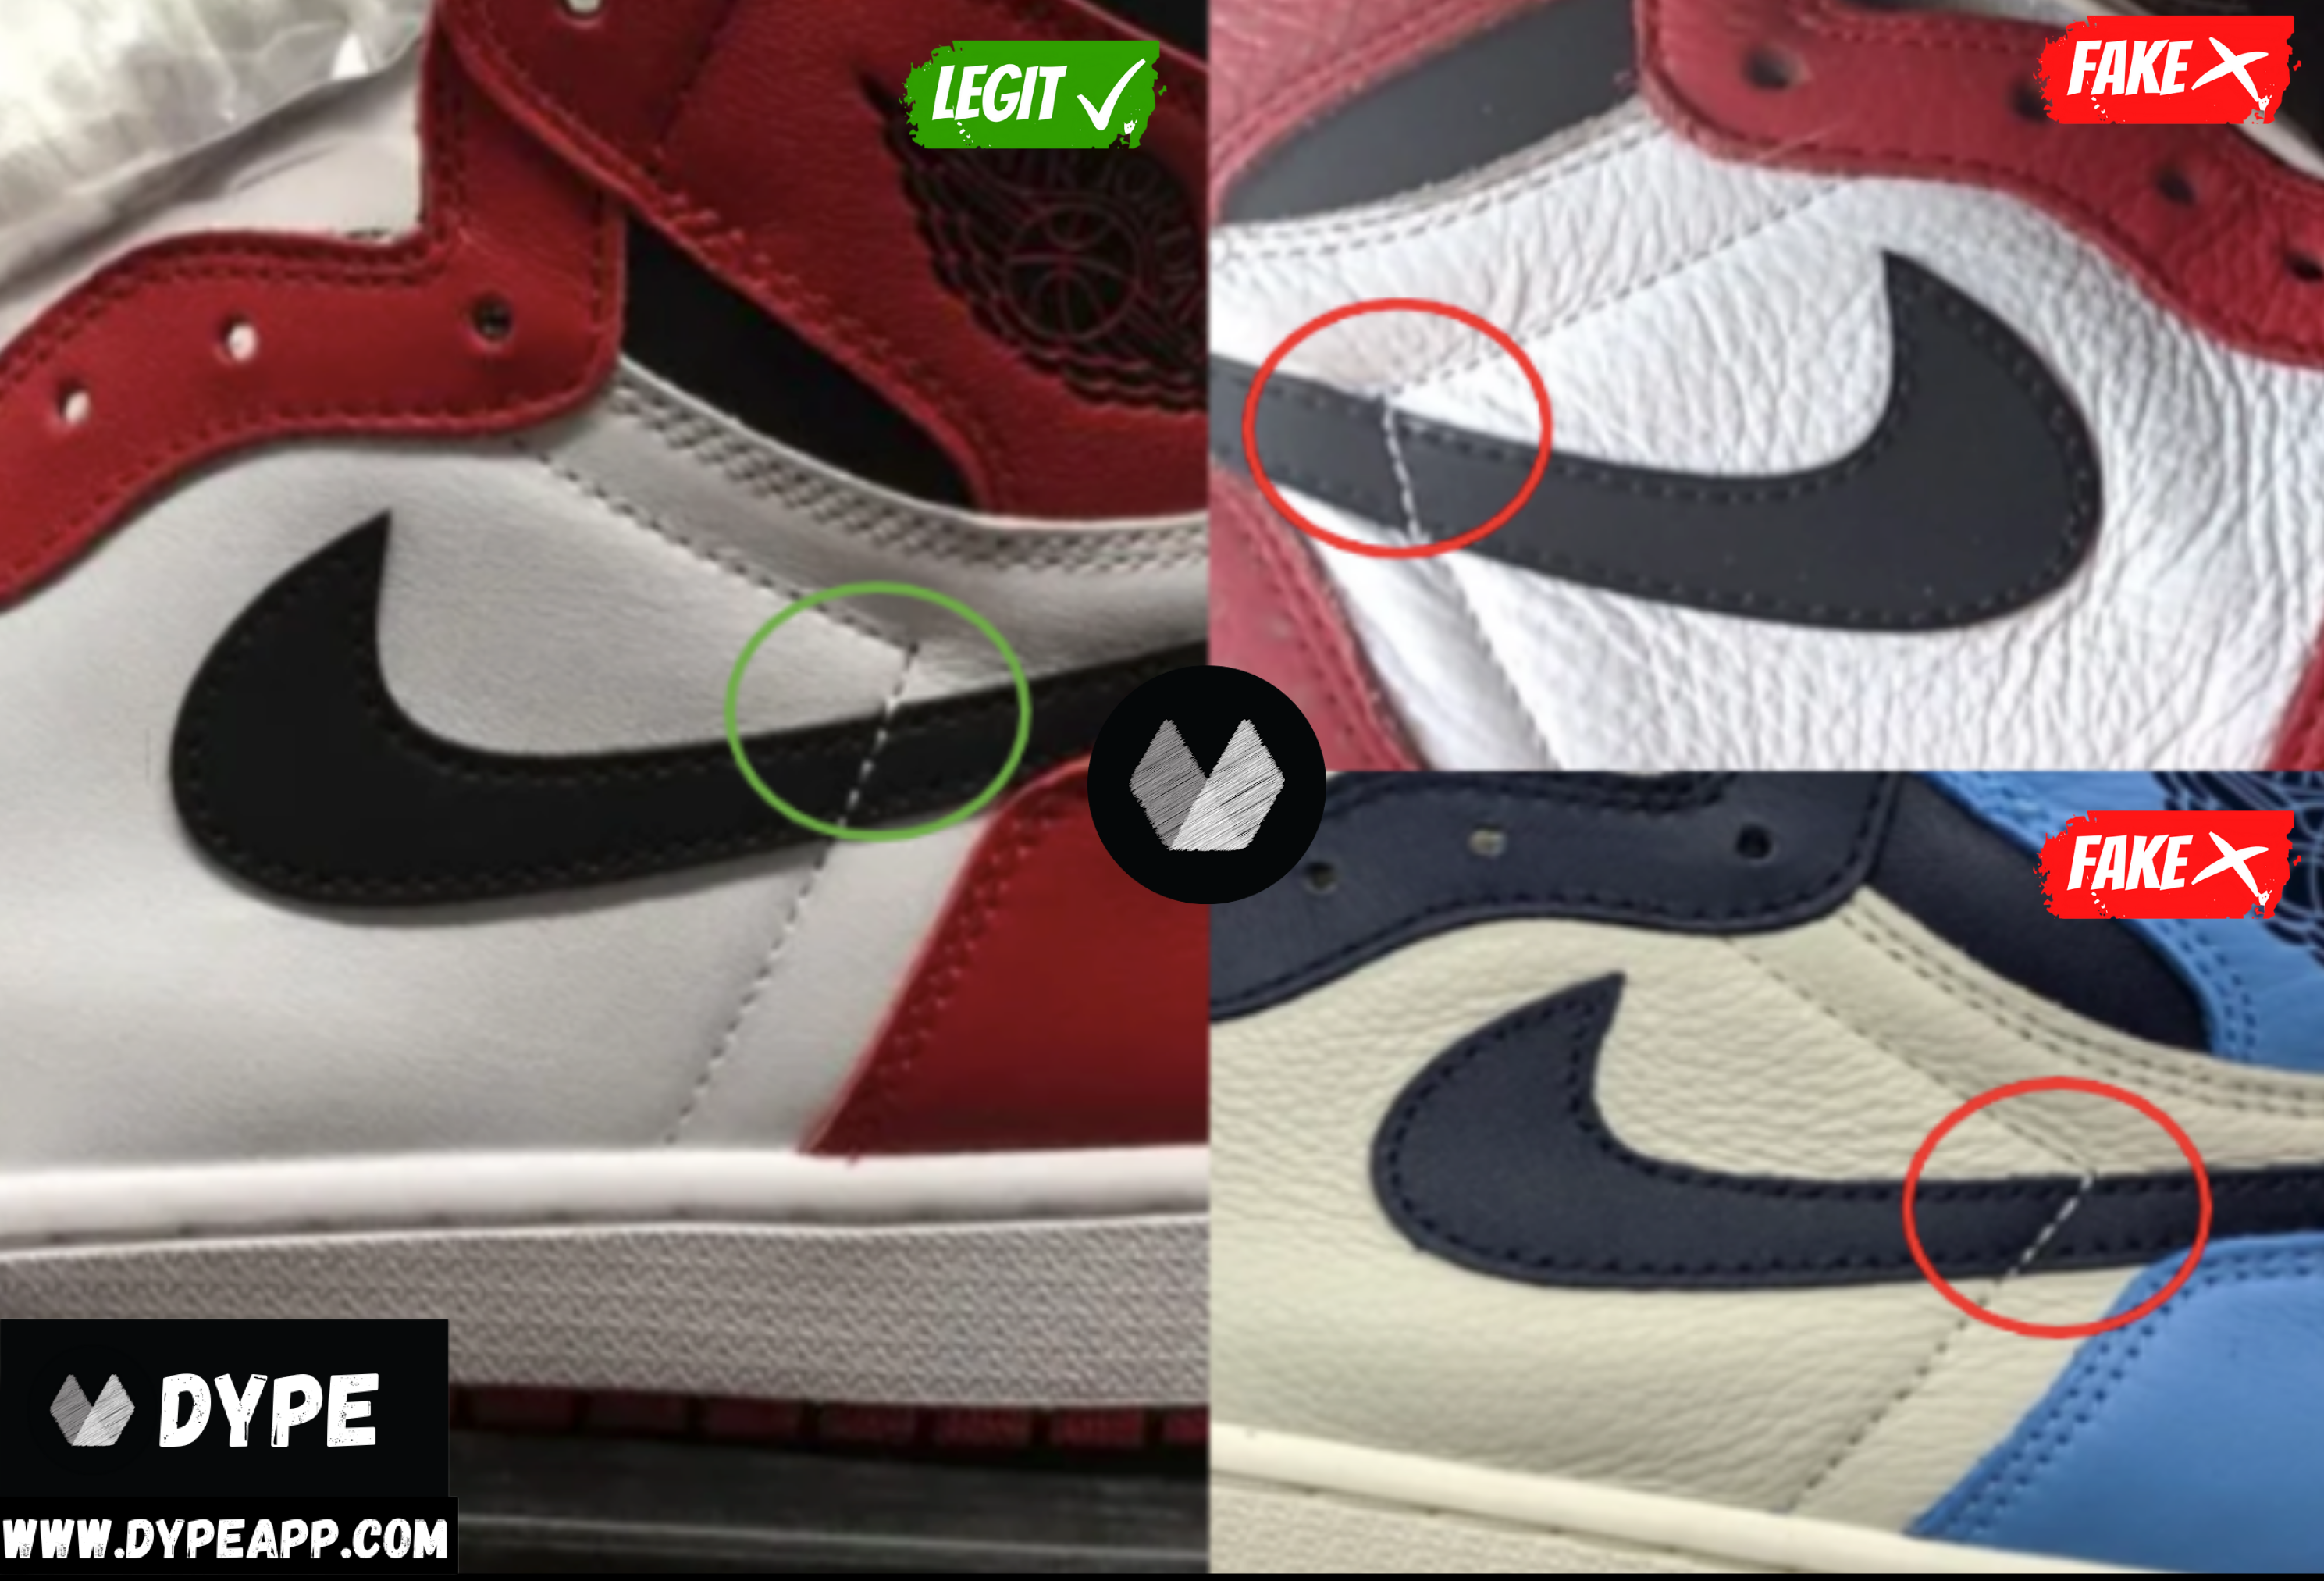
This flaw may be slightly inconsistent, where some colorways are more prone to having it, such as the Shadow Jordan 1’s and sizes lower than 8.5. Watch the 90 degree stitching at the middle of the swoosh, if the ápex/corner hits the middle of the swoosh, or crosses it entirely, then you may be dealing with a replica. Retail pairs seldom have this flaw, whereas replicas will have this more often. This is not a 100% fool proof indicator, simply a reference point.
Soles
Next, let's take a look at the outer soles of the Air Jordan 1s. We will focus on 2 common reference indicators: [1] Nike Logo and [2] Texture Details. The Nike Logo on counterfeits are usually extremely close to the retails, but when they're not - the "R" is usually the flaw.
Nike Logo
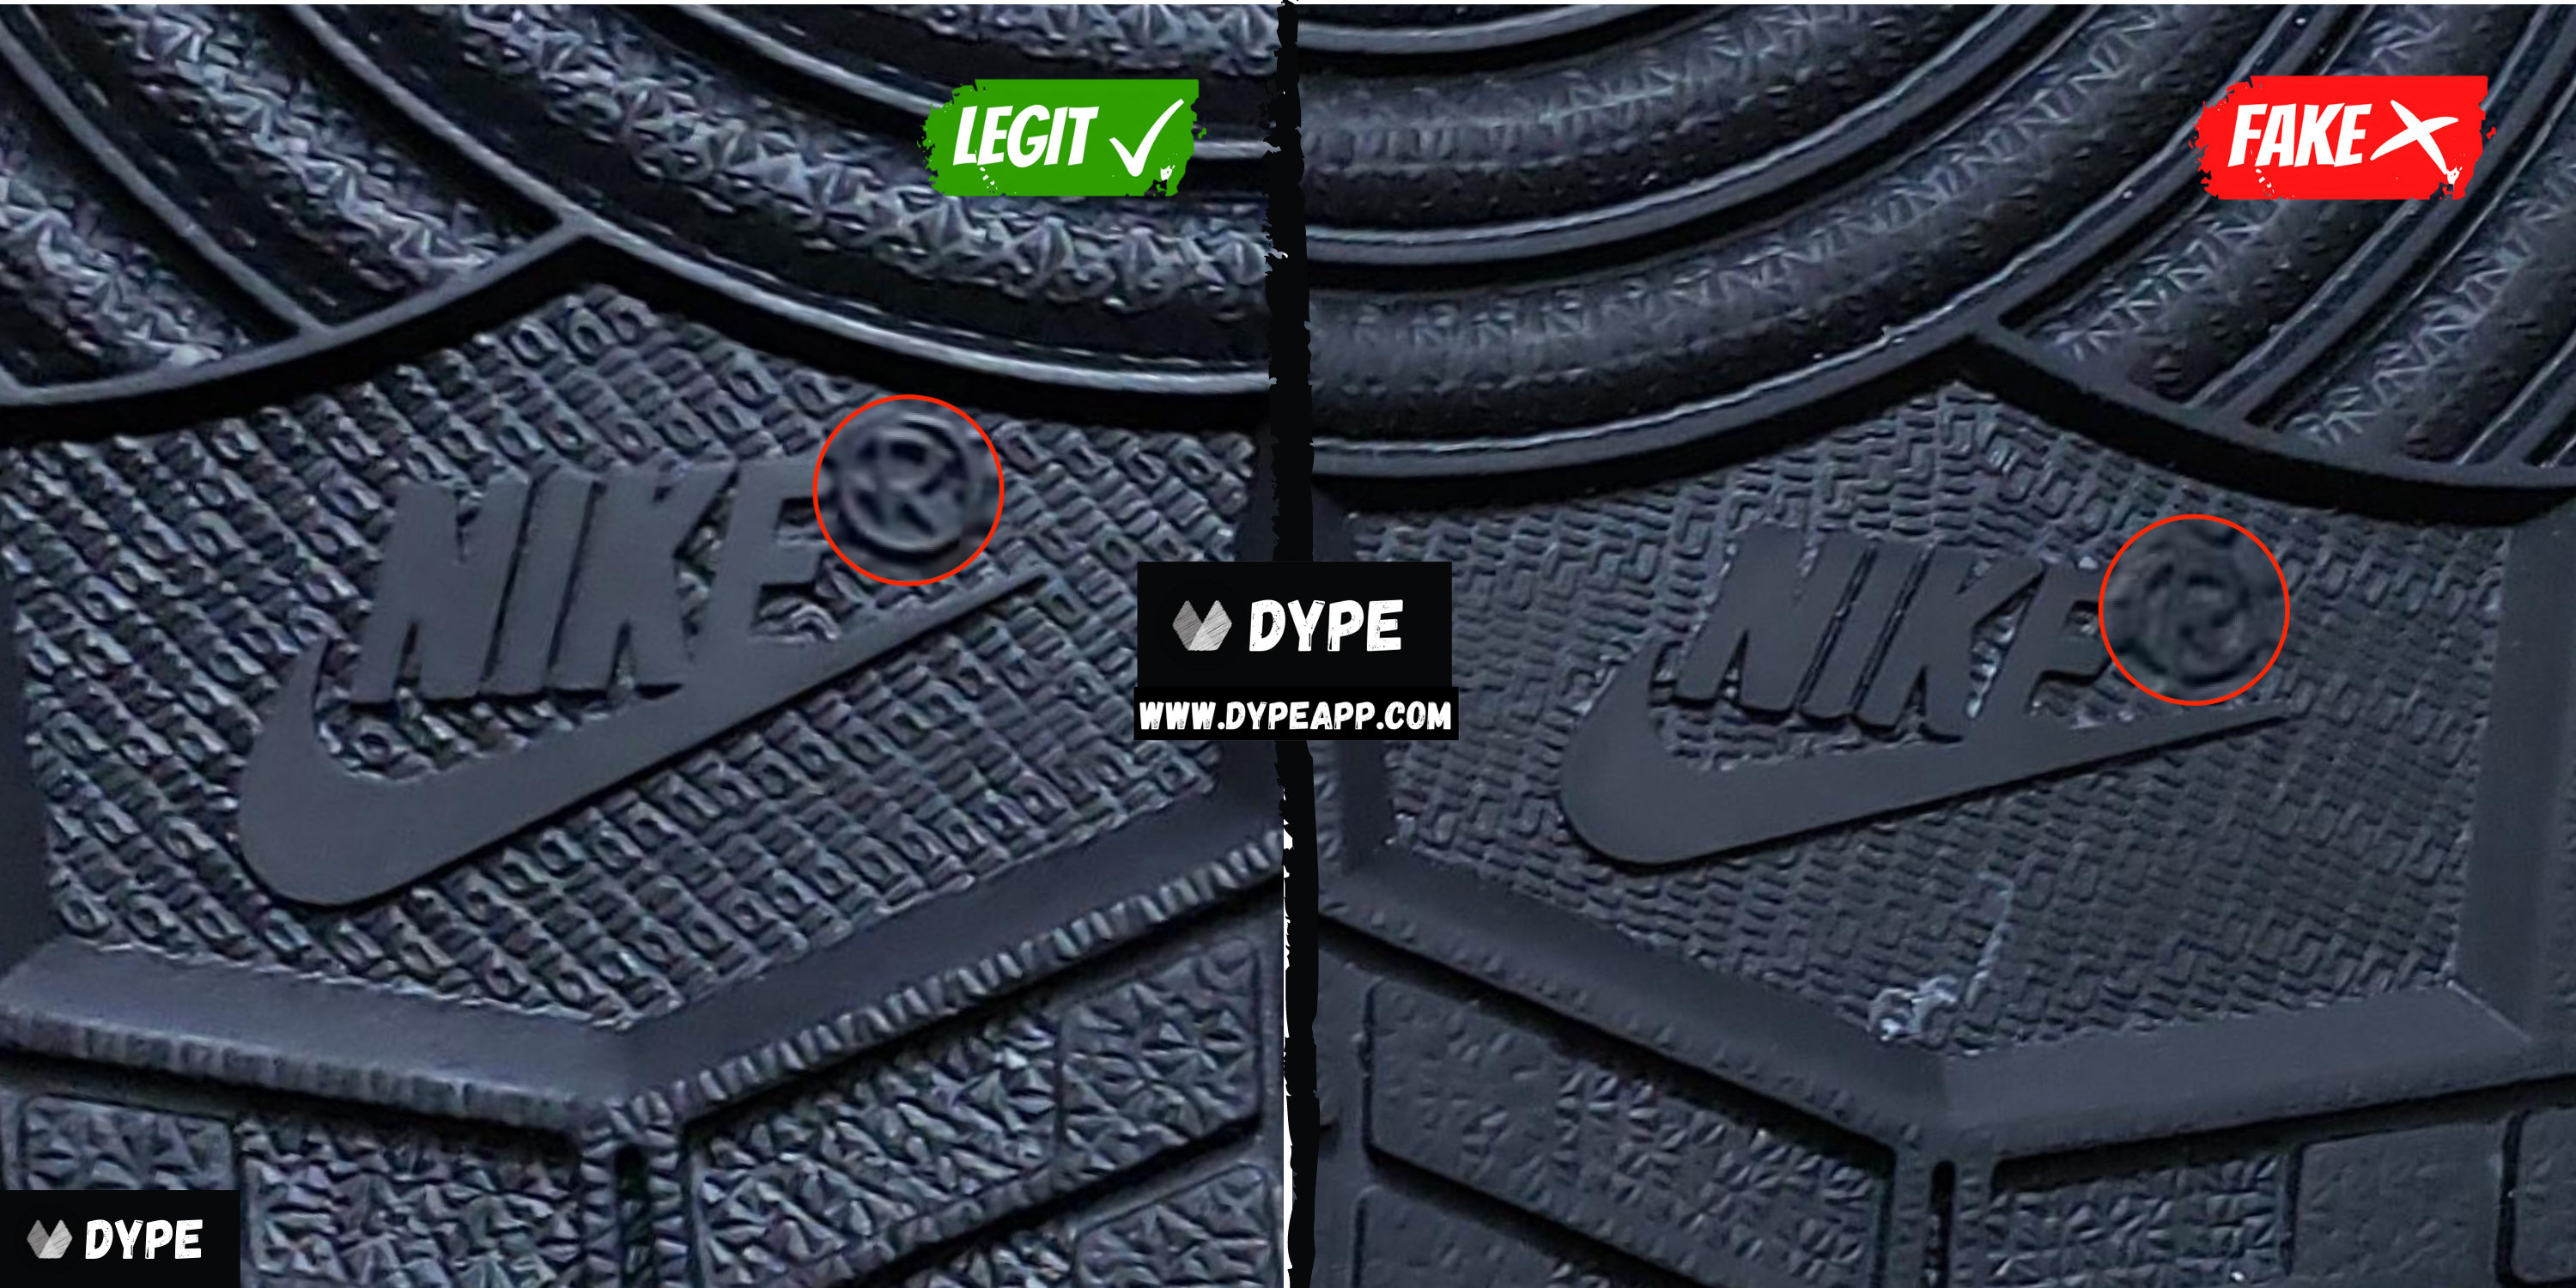
Denoted by the red circle. Take a look at the slight difference in the "R" between the authentic and the fakes. It's very slight, but the "R" is thicker and it touches the circumference of the circle. The authentic one doesn't ever come into contact with the circle.
Texture Details

Denoted by the red circle. Here we can see the size difference in the star decor on the tip of the soles. On the retail Air Jordan 1s, we can clearly see that the stars are much bigger, hence making the overall design more dense. The stars themselves also aren't angular/pointy on the authentic pair (they look like starfishes). Whereas, the fake is pointy and leaves a lot of empty space in the overall design.
Tongue
Next, let's move onto the tongue of the Air Jordan 1s. We'll take a look at the front and back tongue labels. The front tongue label on top tier replicas are usually impeccable. The back tongue label is usually the better indicator, since there's more to go off of.
The flaws in the tongue labels usually include: [1] Coloring [2] Text Defects [3] Spacing. We will take a look at multiple examples, however most Air Jordan 1's share the same/similar tongue labels.
Front Tongue Label
The flaws in the front tongue label usually occur in the letter "R" and sometimes the spacing and swoosh thickness. The "NIKE AIR" text and logo are usually quite comparable in top tier counterfeits.
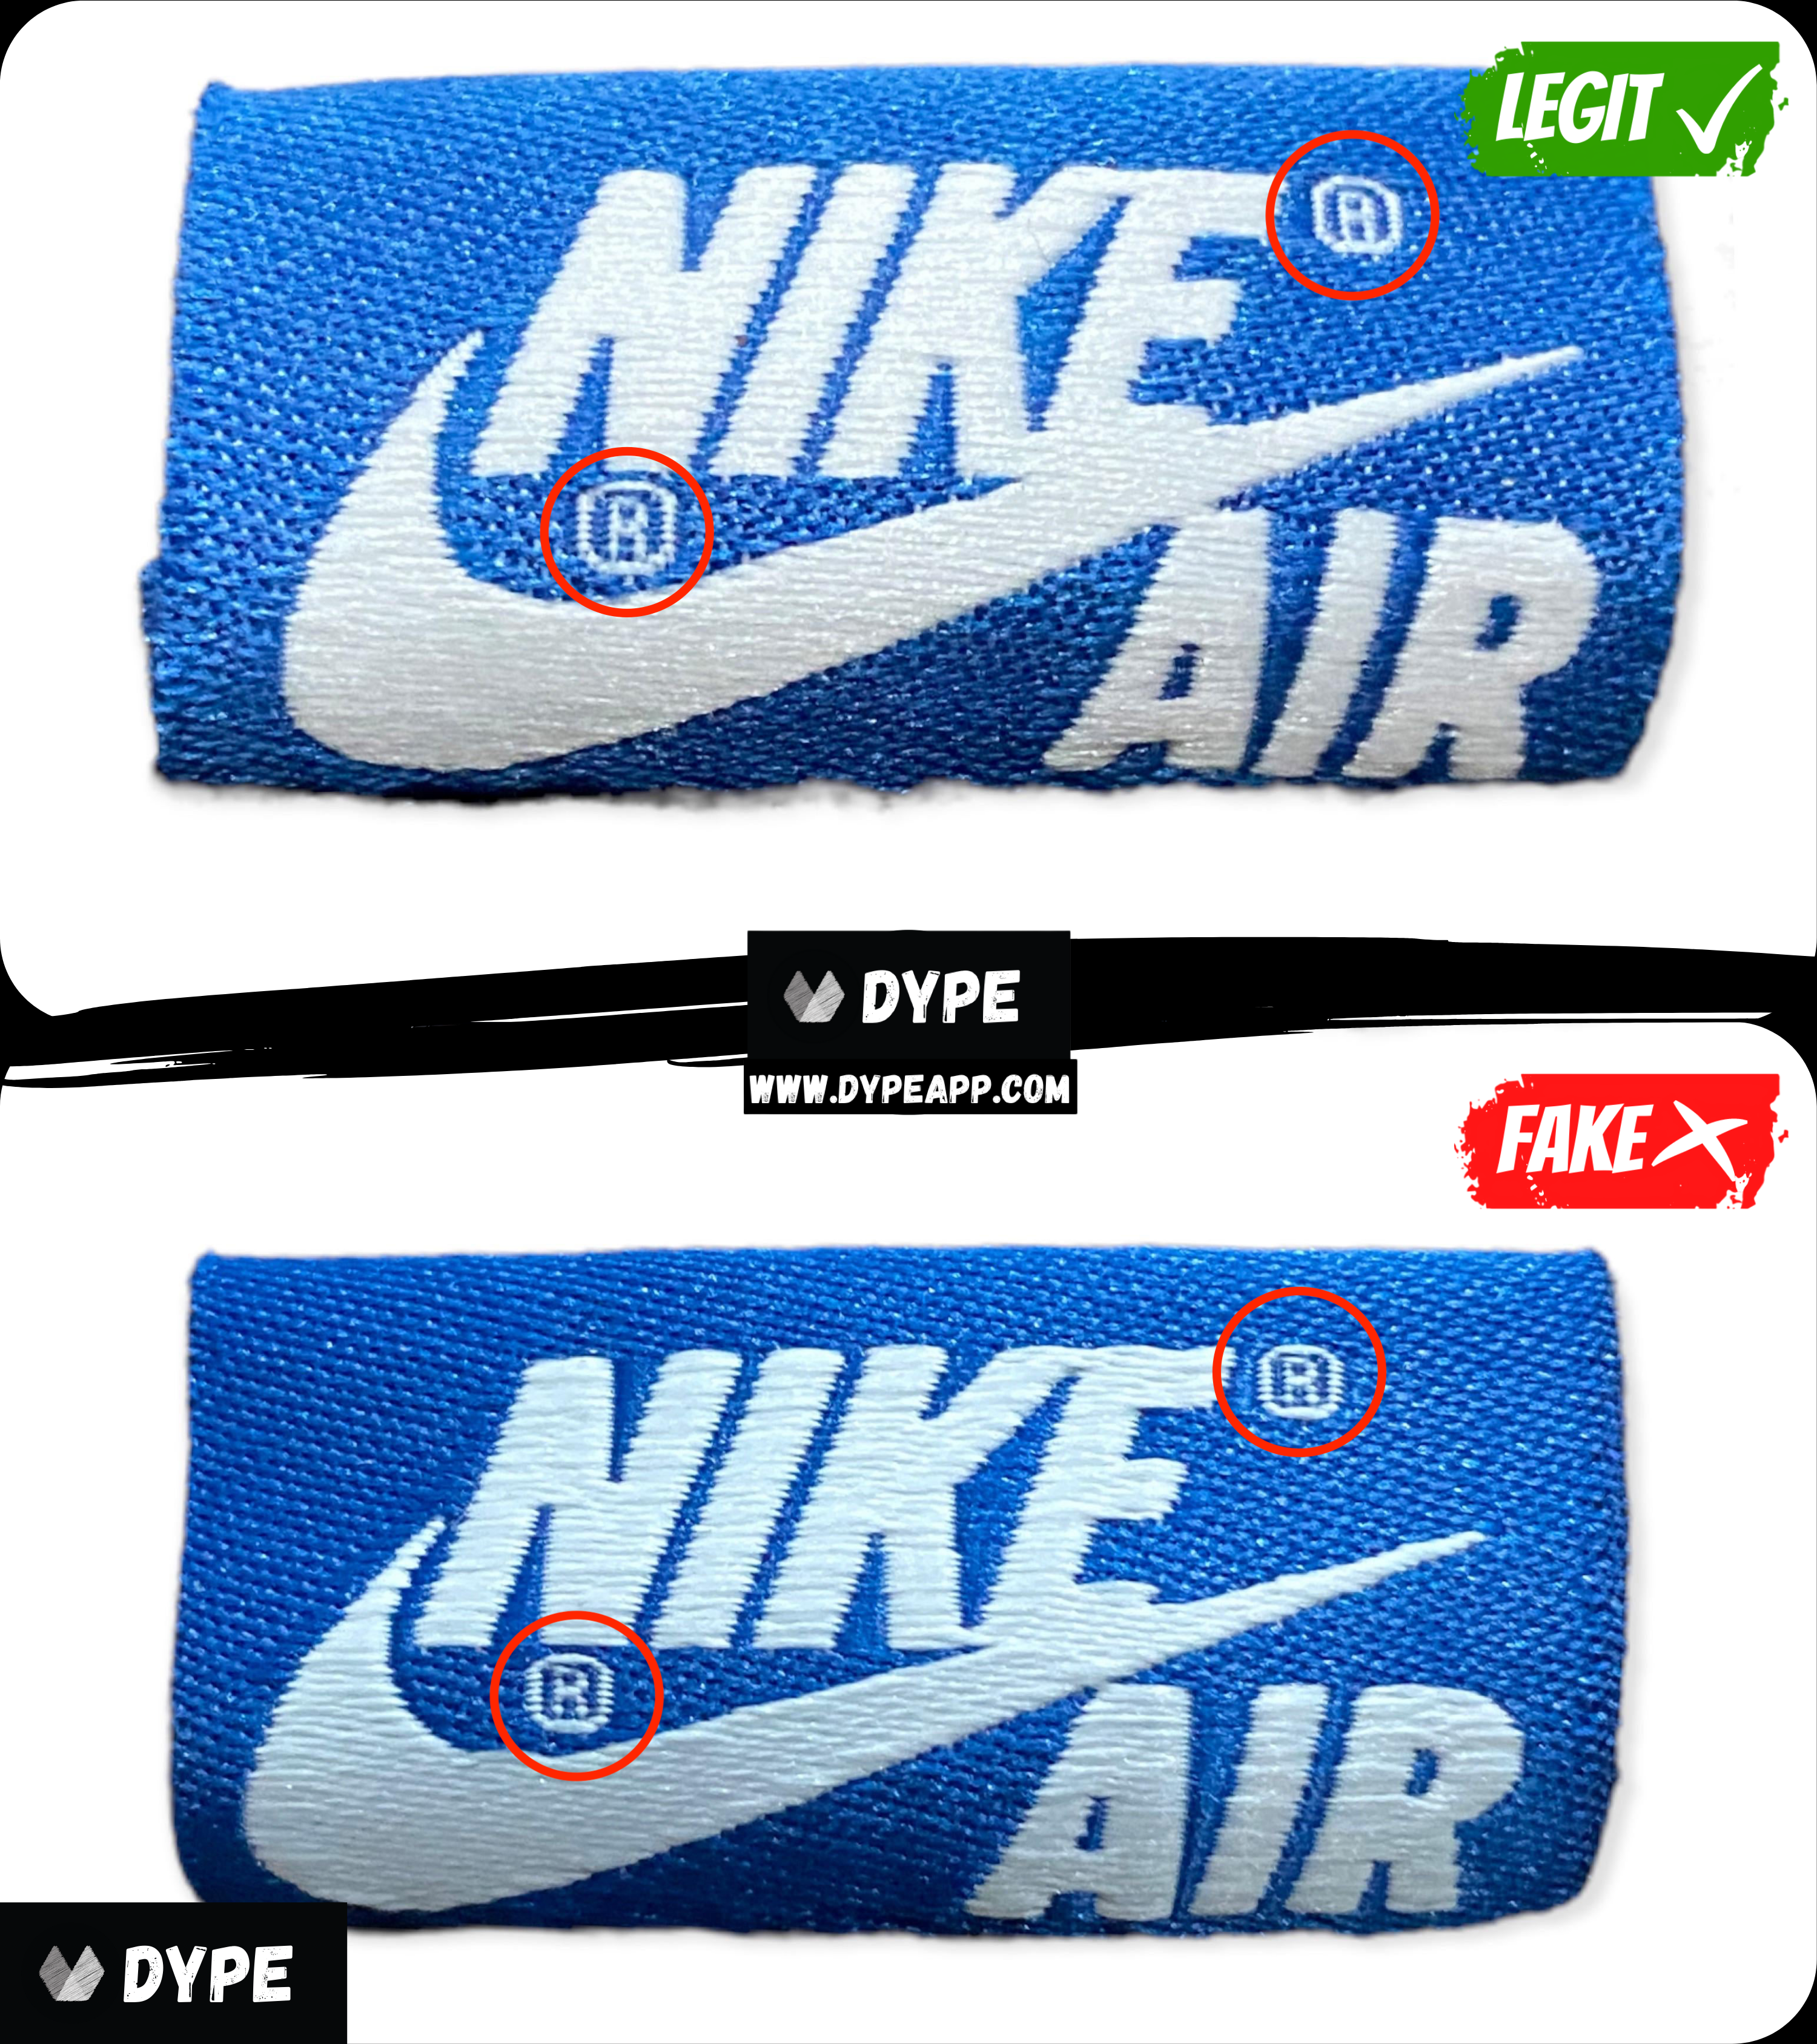
In the image above, we can see that the authentic Air Jordan 1 tongue has a bigger "R" text. In addition to it being bigger, the shape around it has round edges like an oval/circle shape. Whereas, on the fake, you can see the "R" being inside a more square/angular shape with sharper edges.
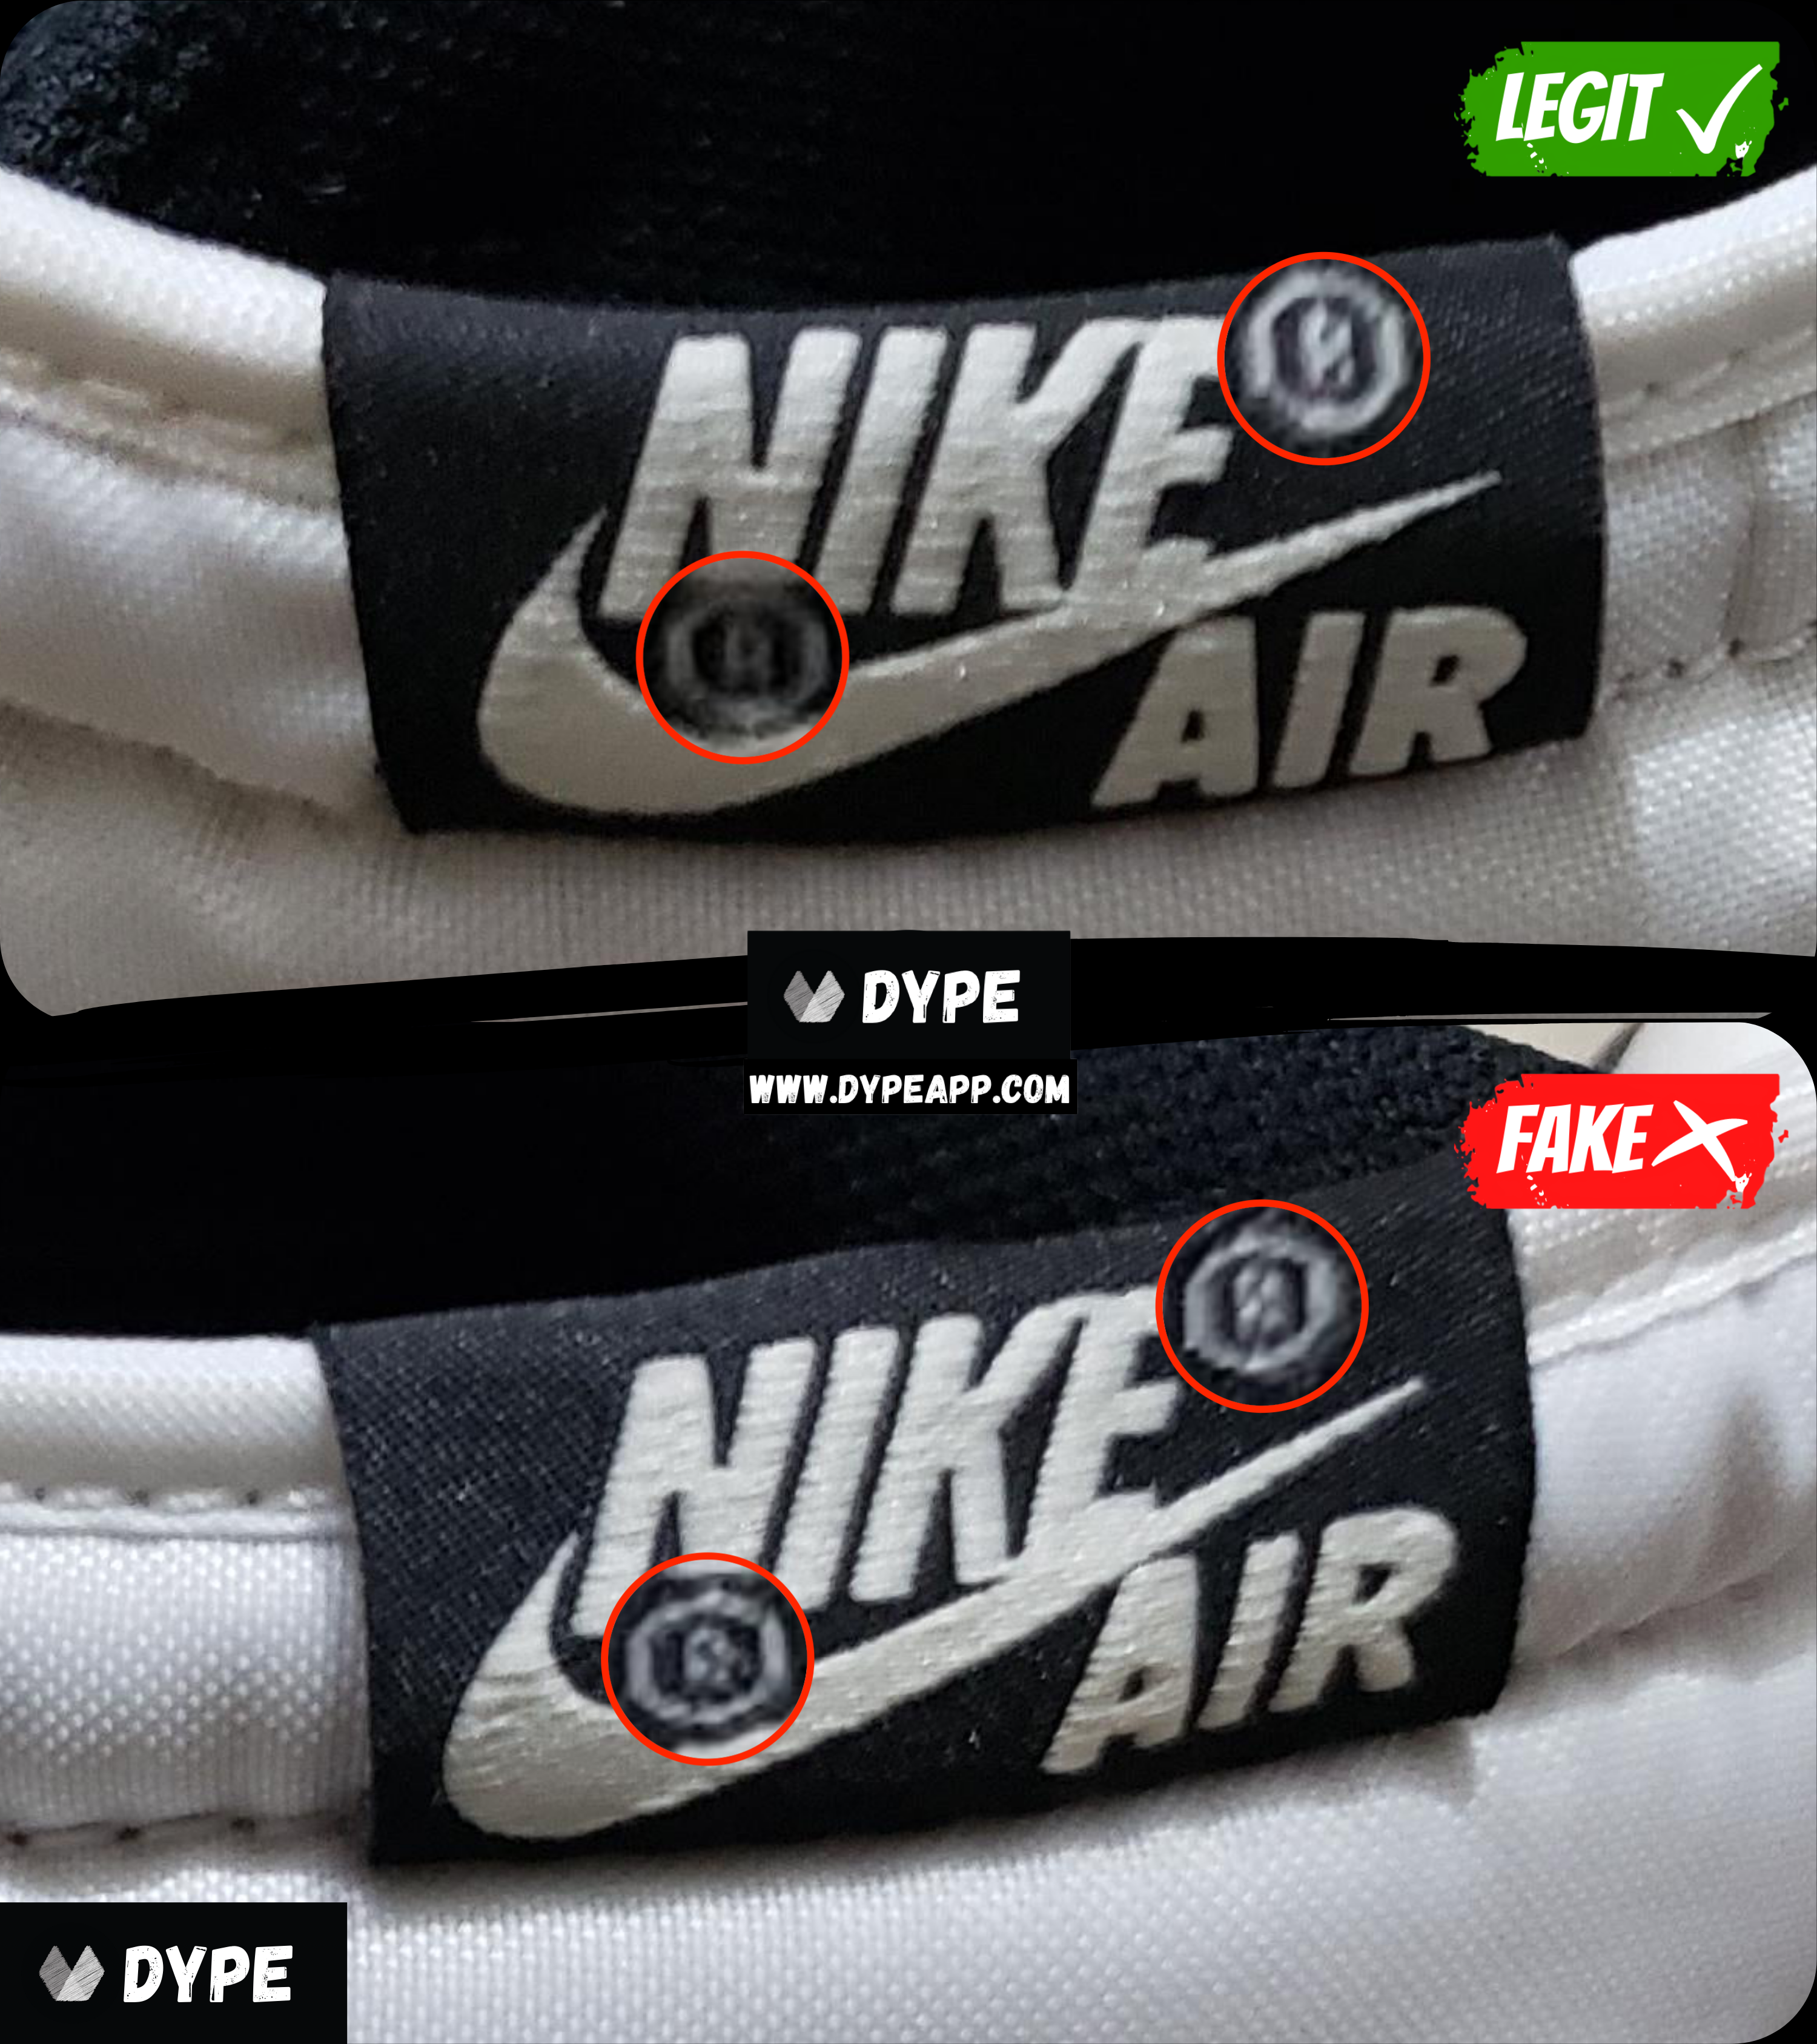
Here in our second example, we can see that the "R" text is less defined on the fake tongue label. The letter is smudged and unclear from the embroidery. In the retail, you can still recognize the "R" letter.
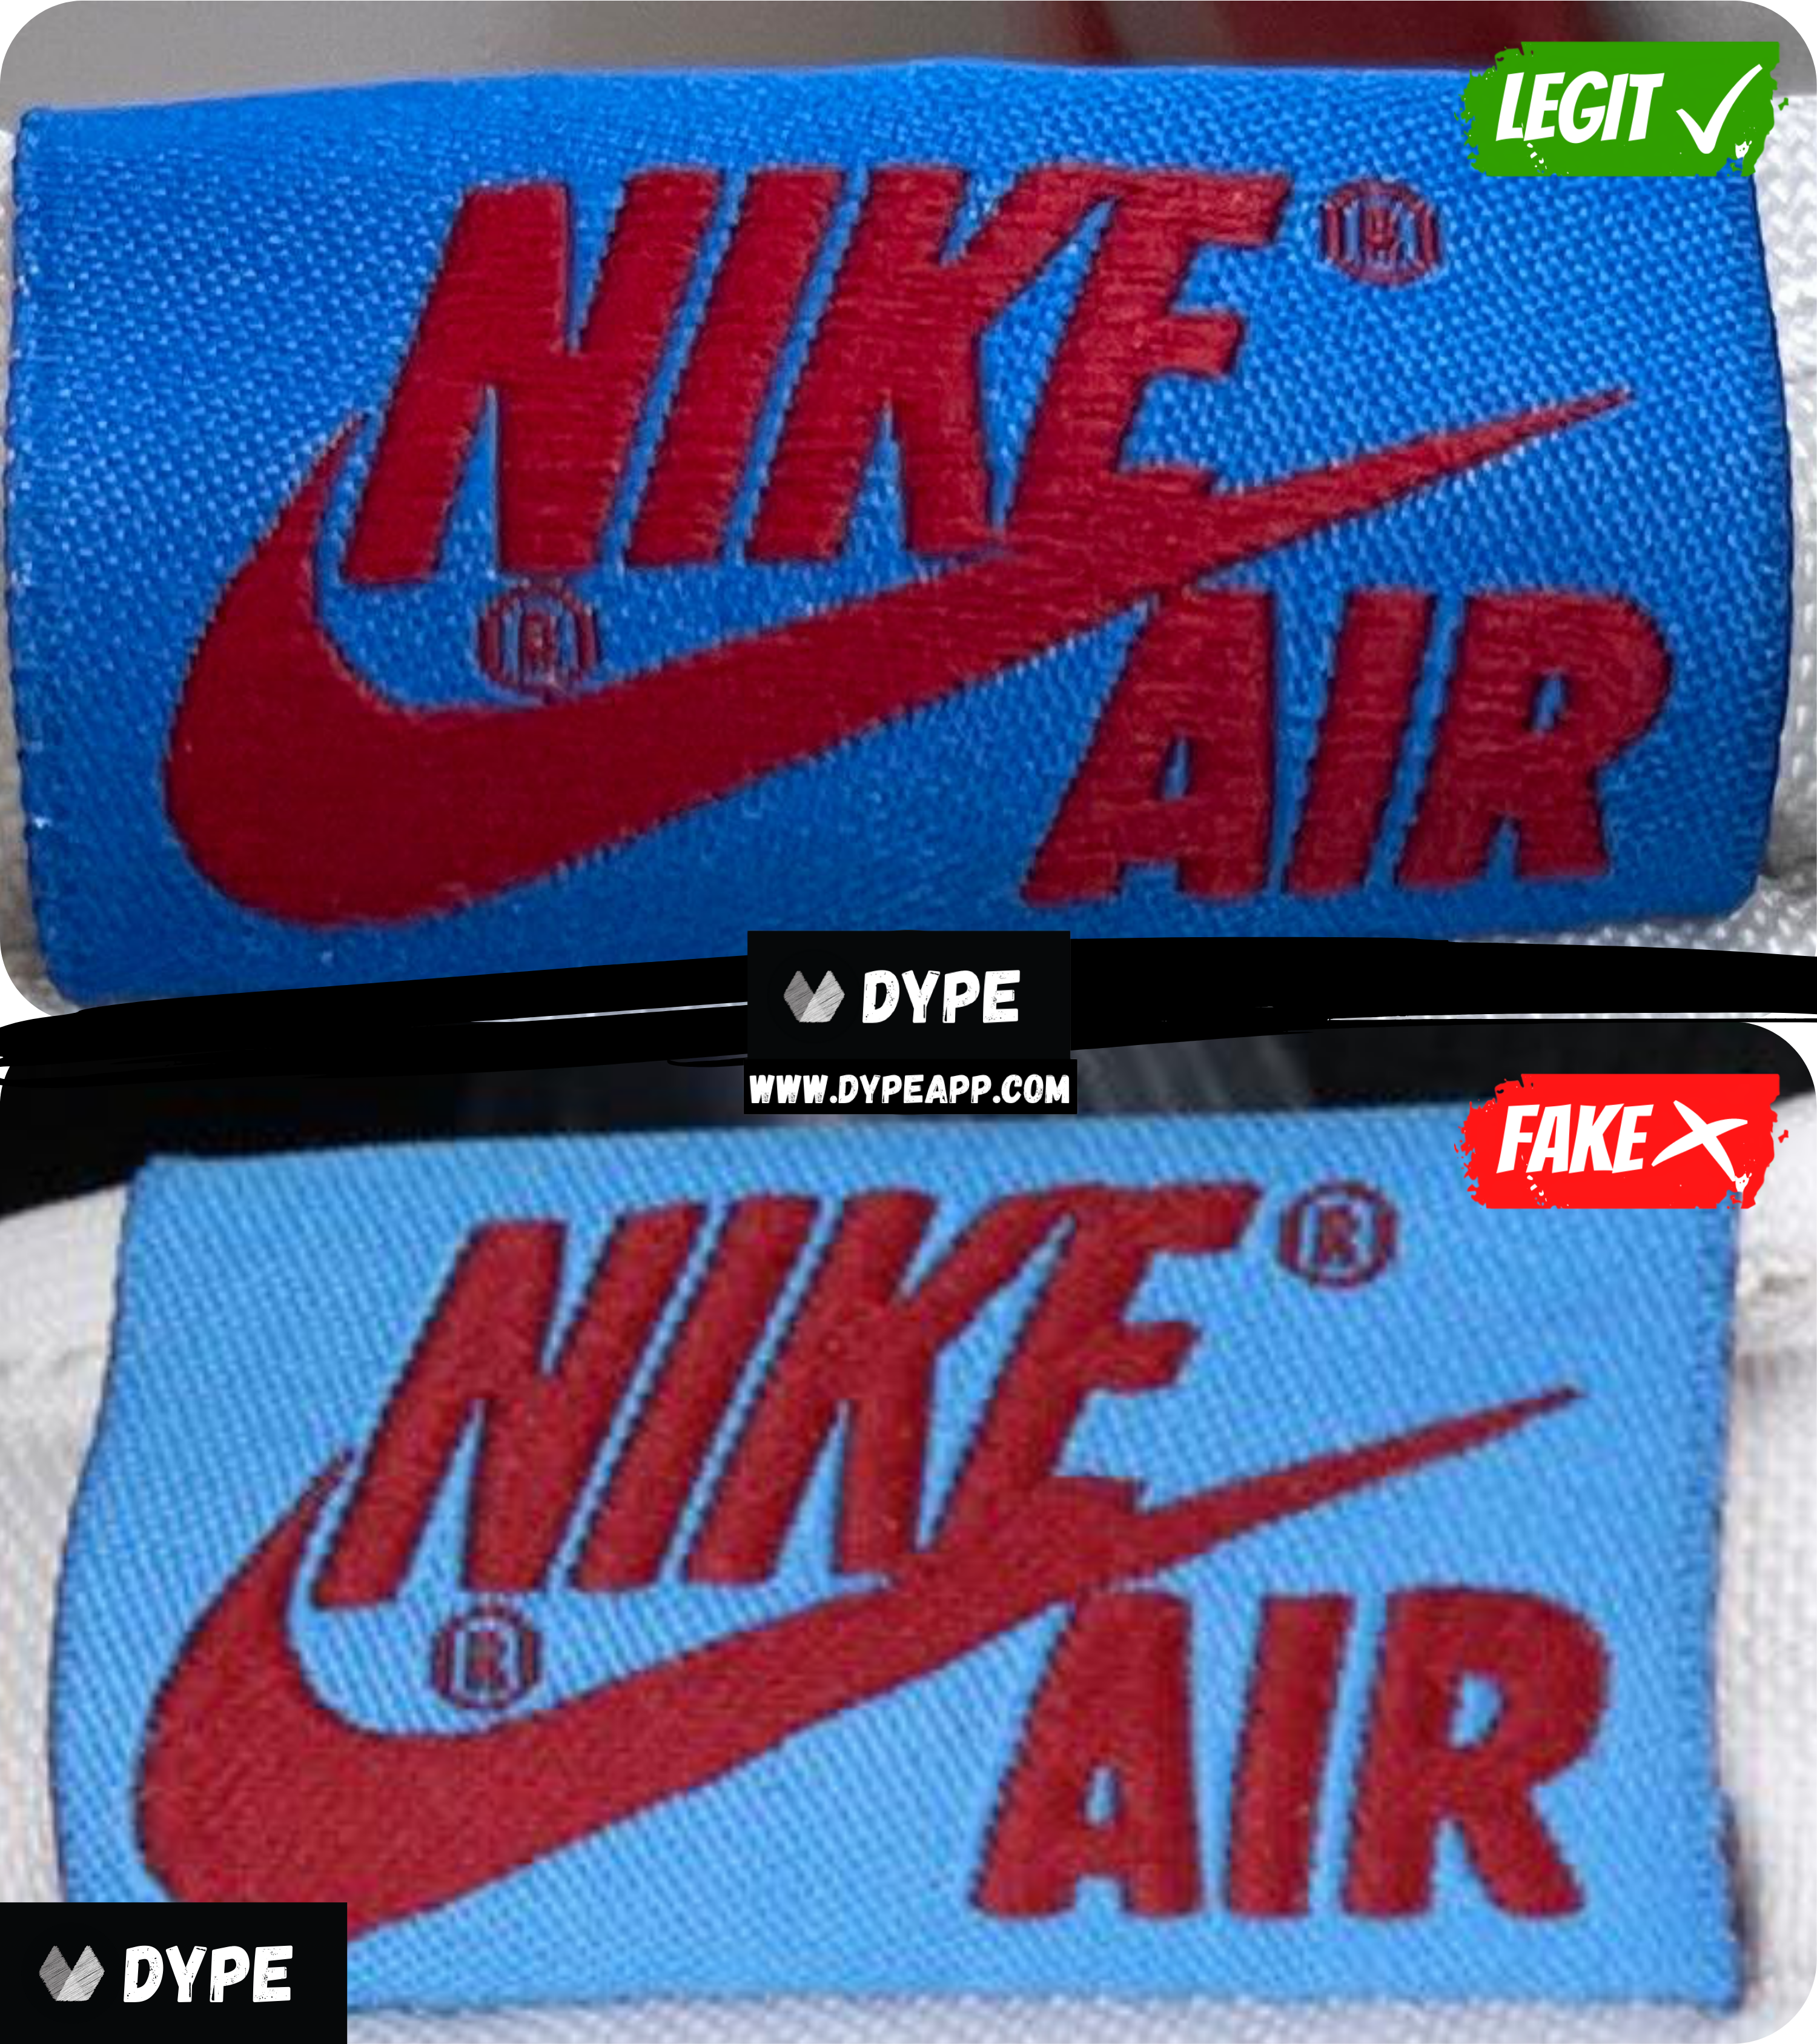
Here in our third example, we can see how similar the authentic and replica tongue labels are. The text look almost identical...
However the easier spot is the color difference in the shade of blue that is used on the authentic versus the fake. If the color being used on the sneaker is peculiar, then fake manufacturers usually compensate with another color.
Now let's move onto the back tongue label. This is usually a better indicator than the front, since there is more text, which means more opportunity for mistakes...
Back Tongue Label
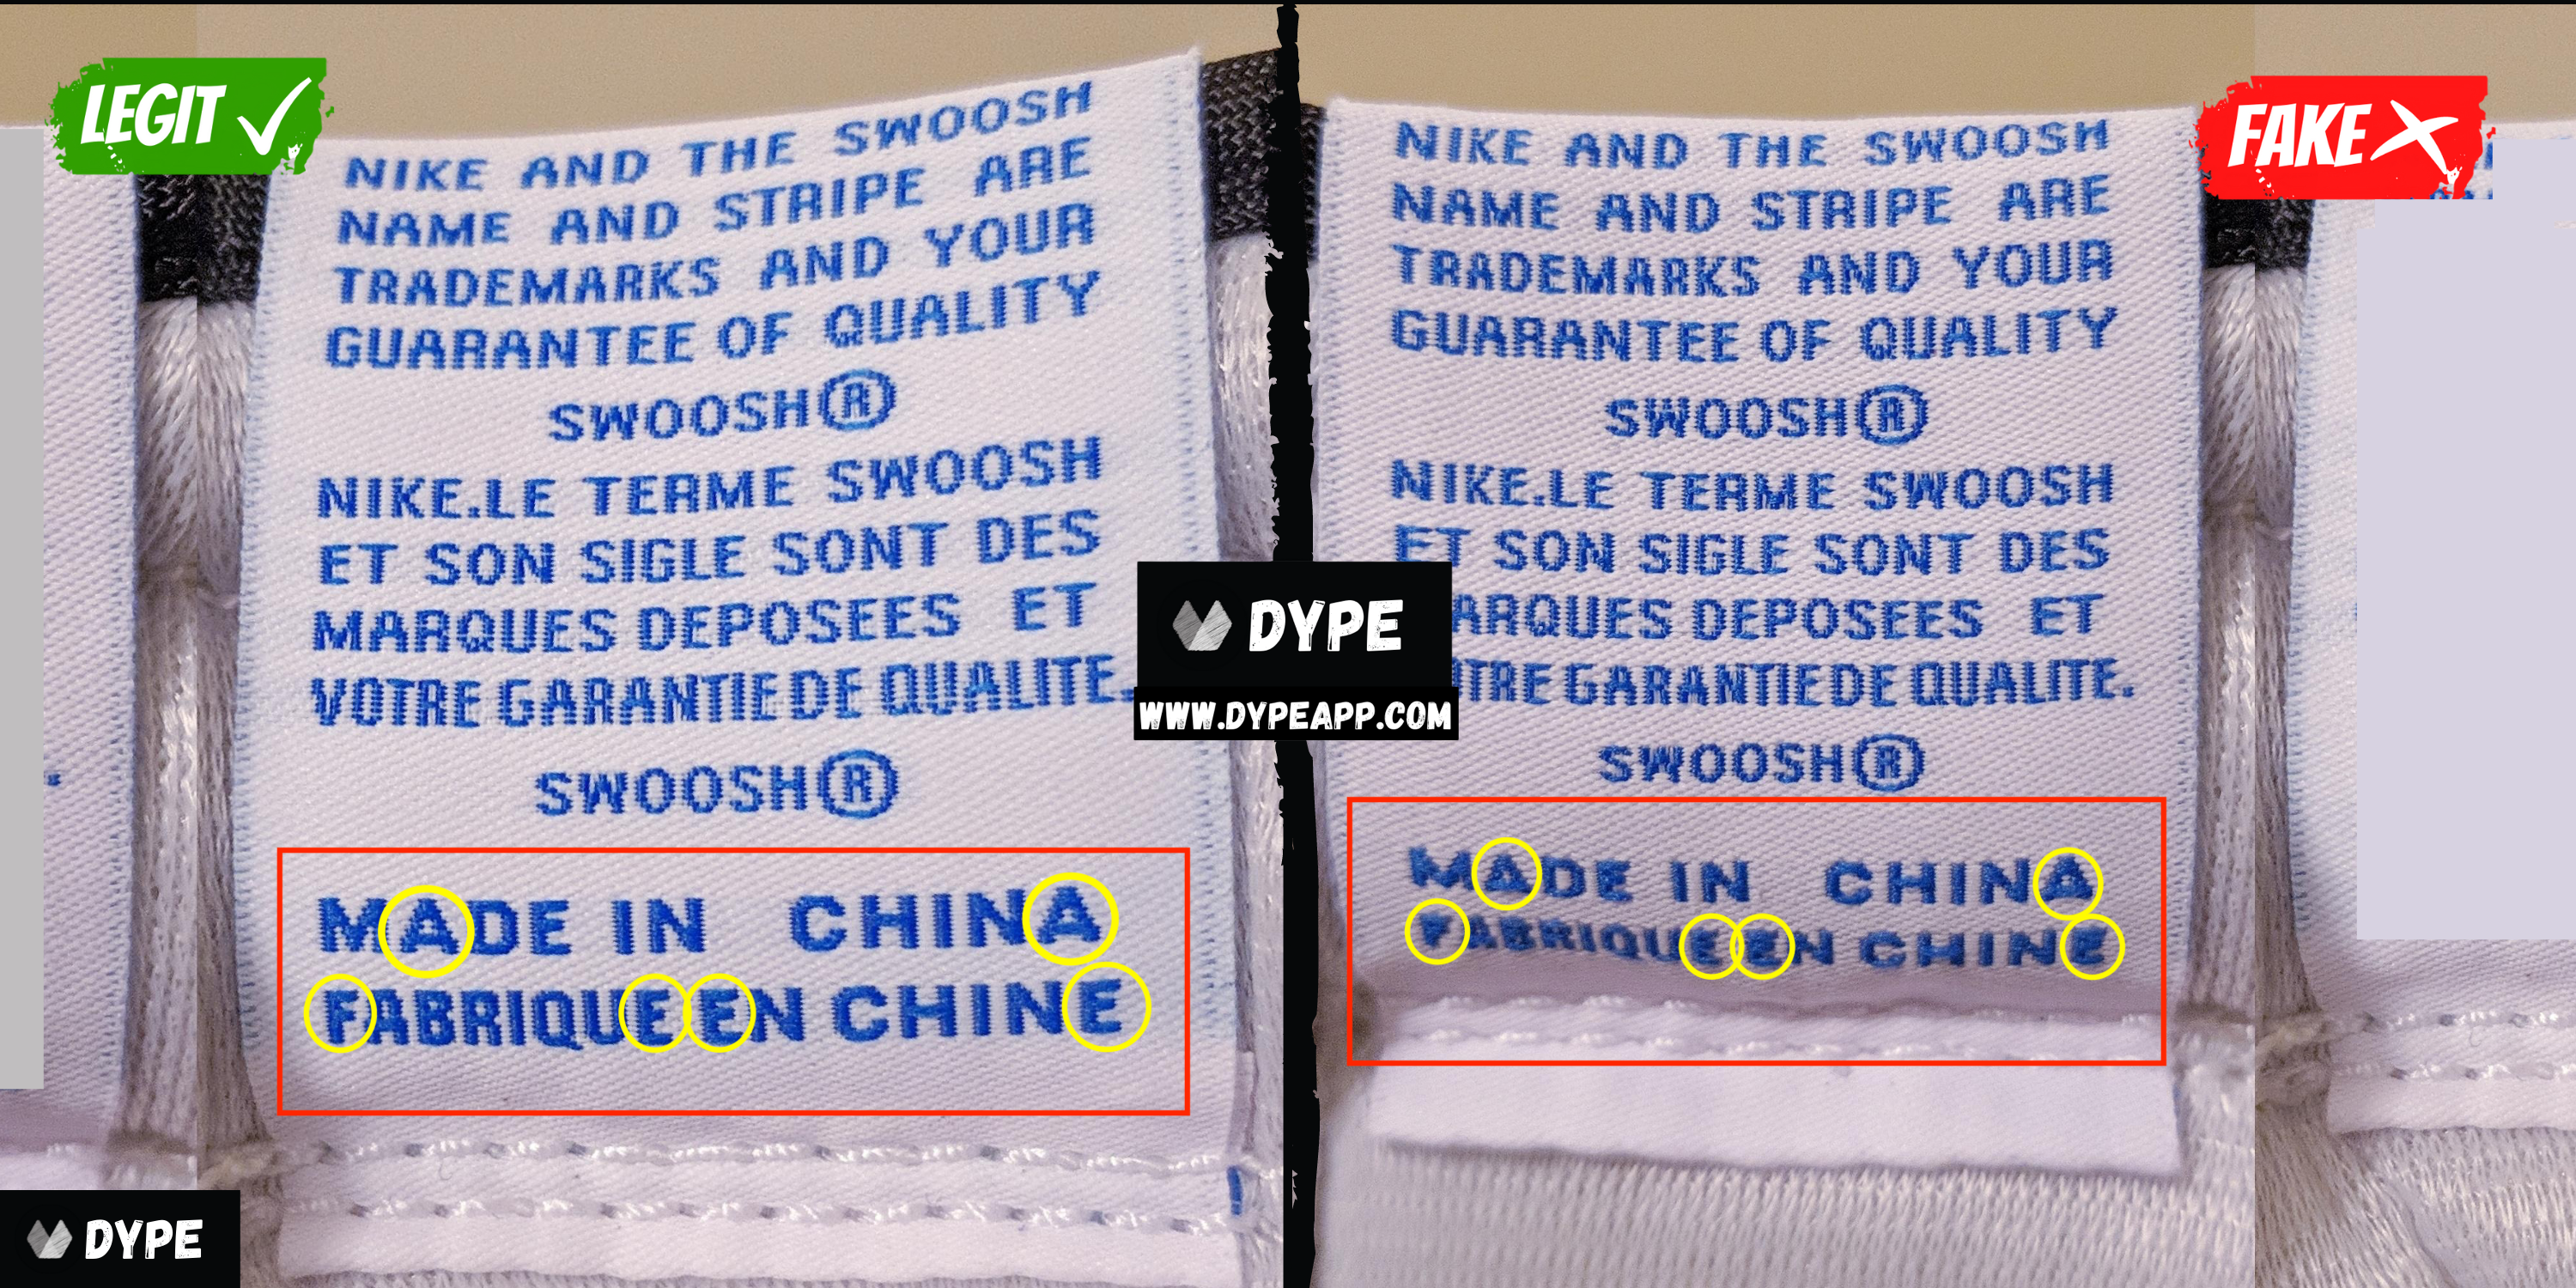
Denoted by the red rectangle, we can see the size difference in the text immediately. We can also notice the embroidery quality on the authentic is higher than the fake. There is separation in the lines of the letters.
Denoted by the yellow circles, we can see some examples of this. All the letter "E"s have their "arms" coming into contact with each other with smudges the letter. This is true for the "F" as well. On the letter "A", you can see the legs are barely visible, which makes it look like a triangle more than the letter "A".
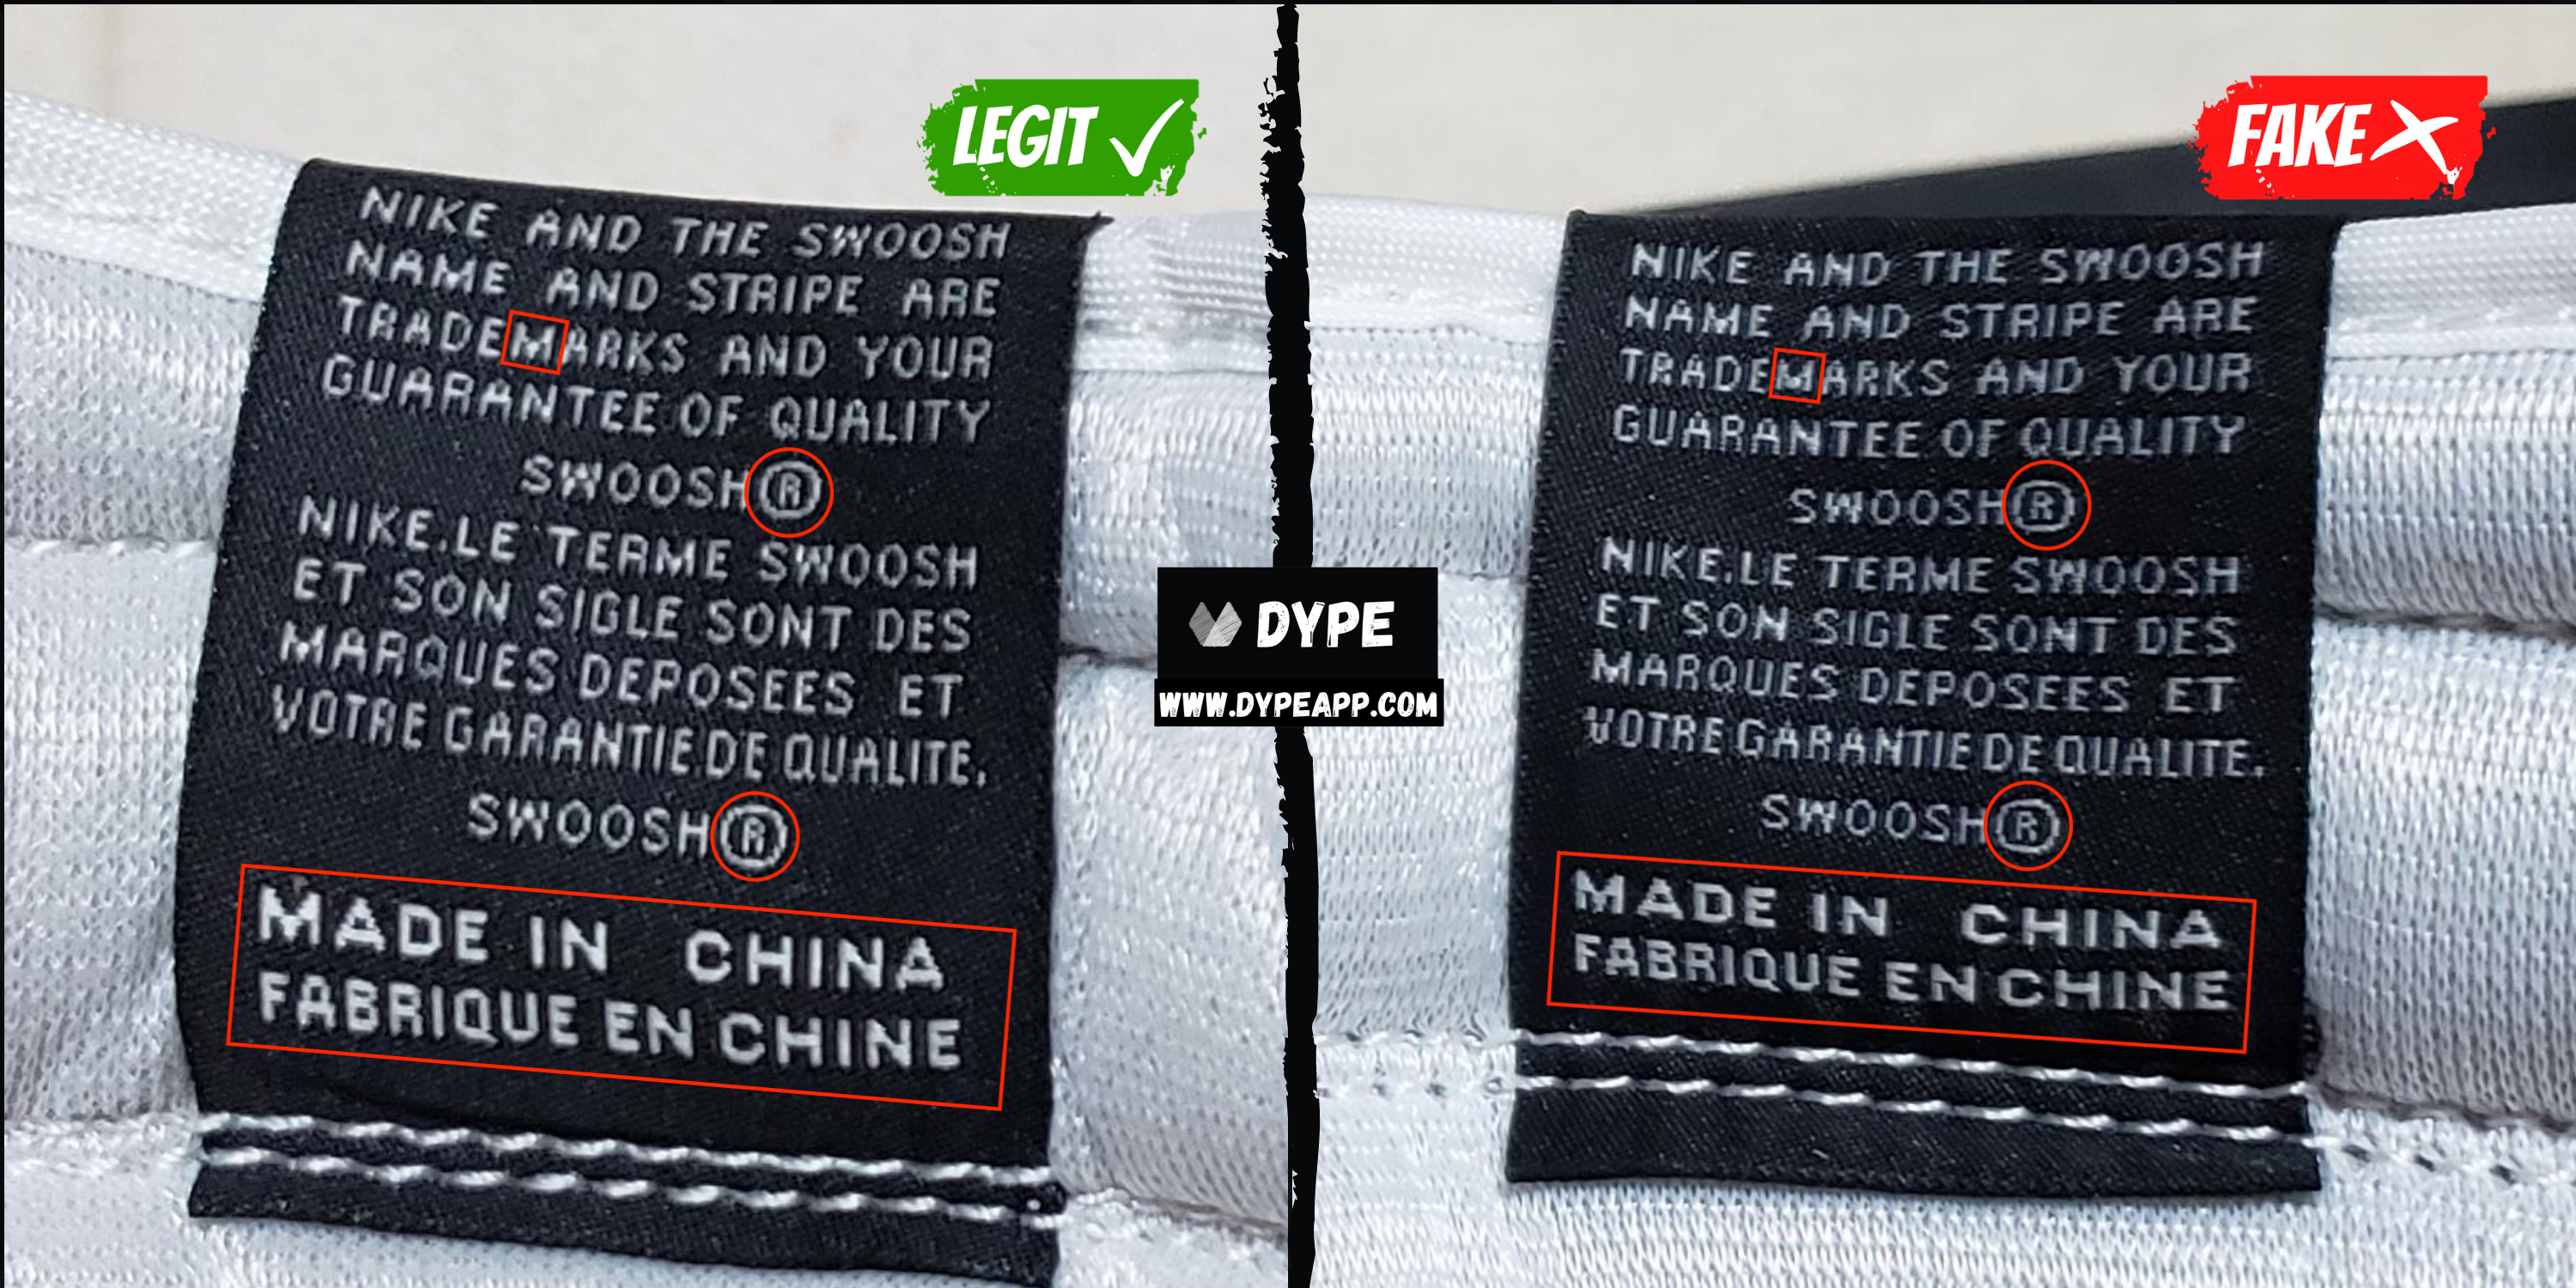
Here in our second example, we can see that the flaws are less noticeable and quite similar at first glance. Overall the text for the authentic tongue label is ever so slightly bigger font than on the fakes. Some areas where this is more noticeable is highlighted by red.
Denoted by the red circles. Take a look at the "R"s, and you can it is ever so slightly bigger on the authentic than the replicas.
Denoted by the red square, you can see how the "M" in "TRADEMARKS" on the retail tag is bigger than on the replicas. Take notice how the legs of the "M" on the fake isn't aligned with the rest of the letters in "TRADEMARKS" and comes short.
Denoted by the red rectangle, you can see this a bit more obvious, where the text is taller on the authenitc than on the fakes.
Footbed/Insole Stitching
Next, let's take a look deep inside the Air Jordan 1s. We'll be taking a look at the footbed of the sneaker, which is underneath the insoles. You'll have to remove the insoles from the sneaker to see this area. If it is glued shut, you may want to use a blow dryer to heat and soften the glue...
We'll be considering multiple indicators on the footbed: [1] Stitching Density [2] Footbed Coloring [3] Upper Stitching [4] Hole Size.
We'll also mention that retail Air Jordan 1s have footbeds that are also inconsistent, and that top tier replicas are at times more consistent. However, retails do follow a pattern of the number of stitching used (the frequency of threads), so if the Air Jordan 1 seems like it has way too few or way too many white threads, then it is most likely a fake.
Reminder that we're not looking at how messy or how short/long each white thread is, but rather the total number of threads. This is important to clarify because no online guides or resources seem to know or even want to mention it and we believe it adds confusion for readers.
NOTE: There are 2 main types of footbeds on the Air Jordan 1s as you'll see in the example images below.
Stitching Density
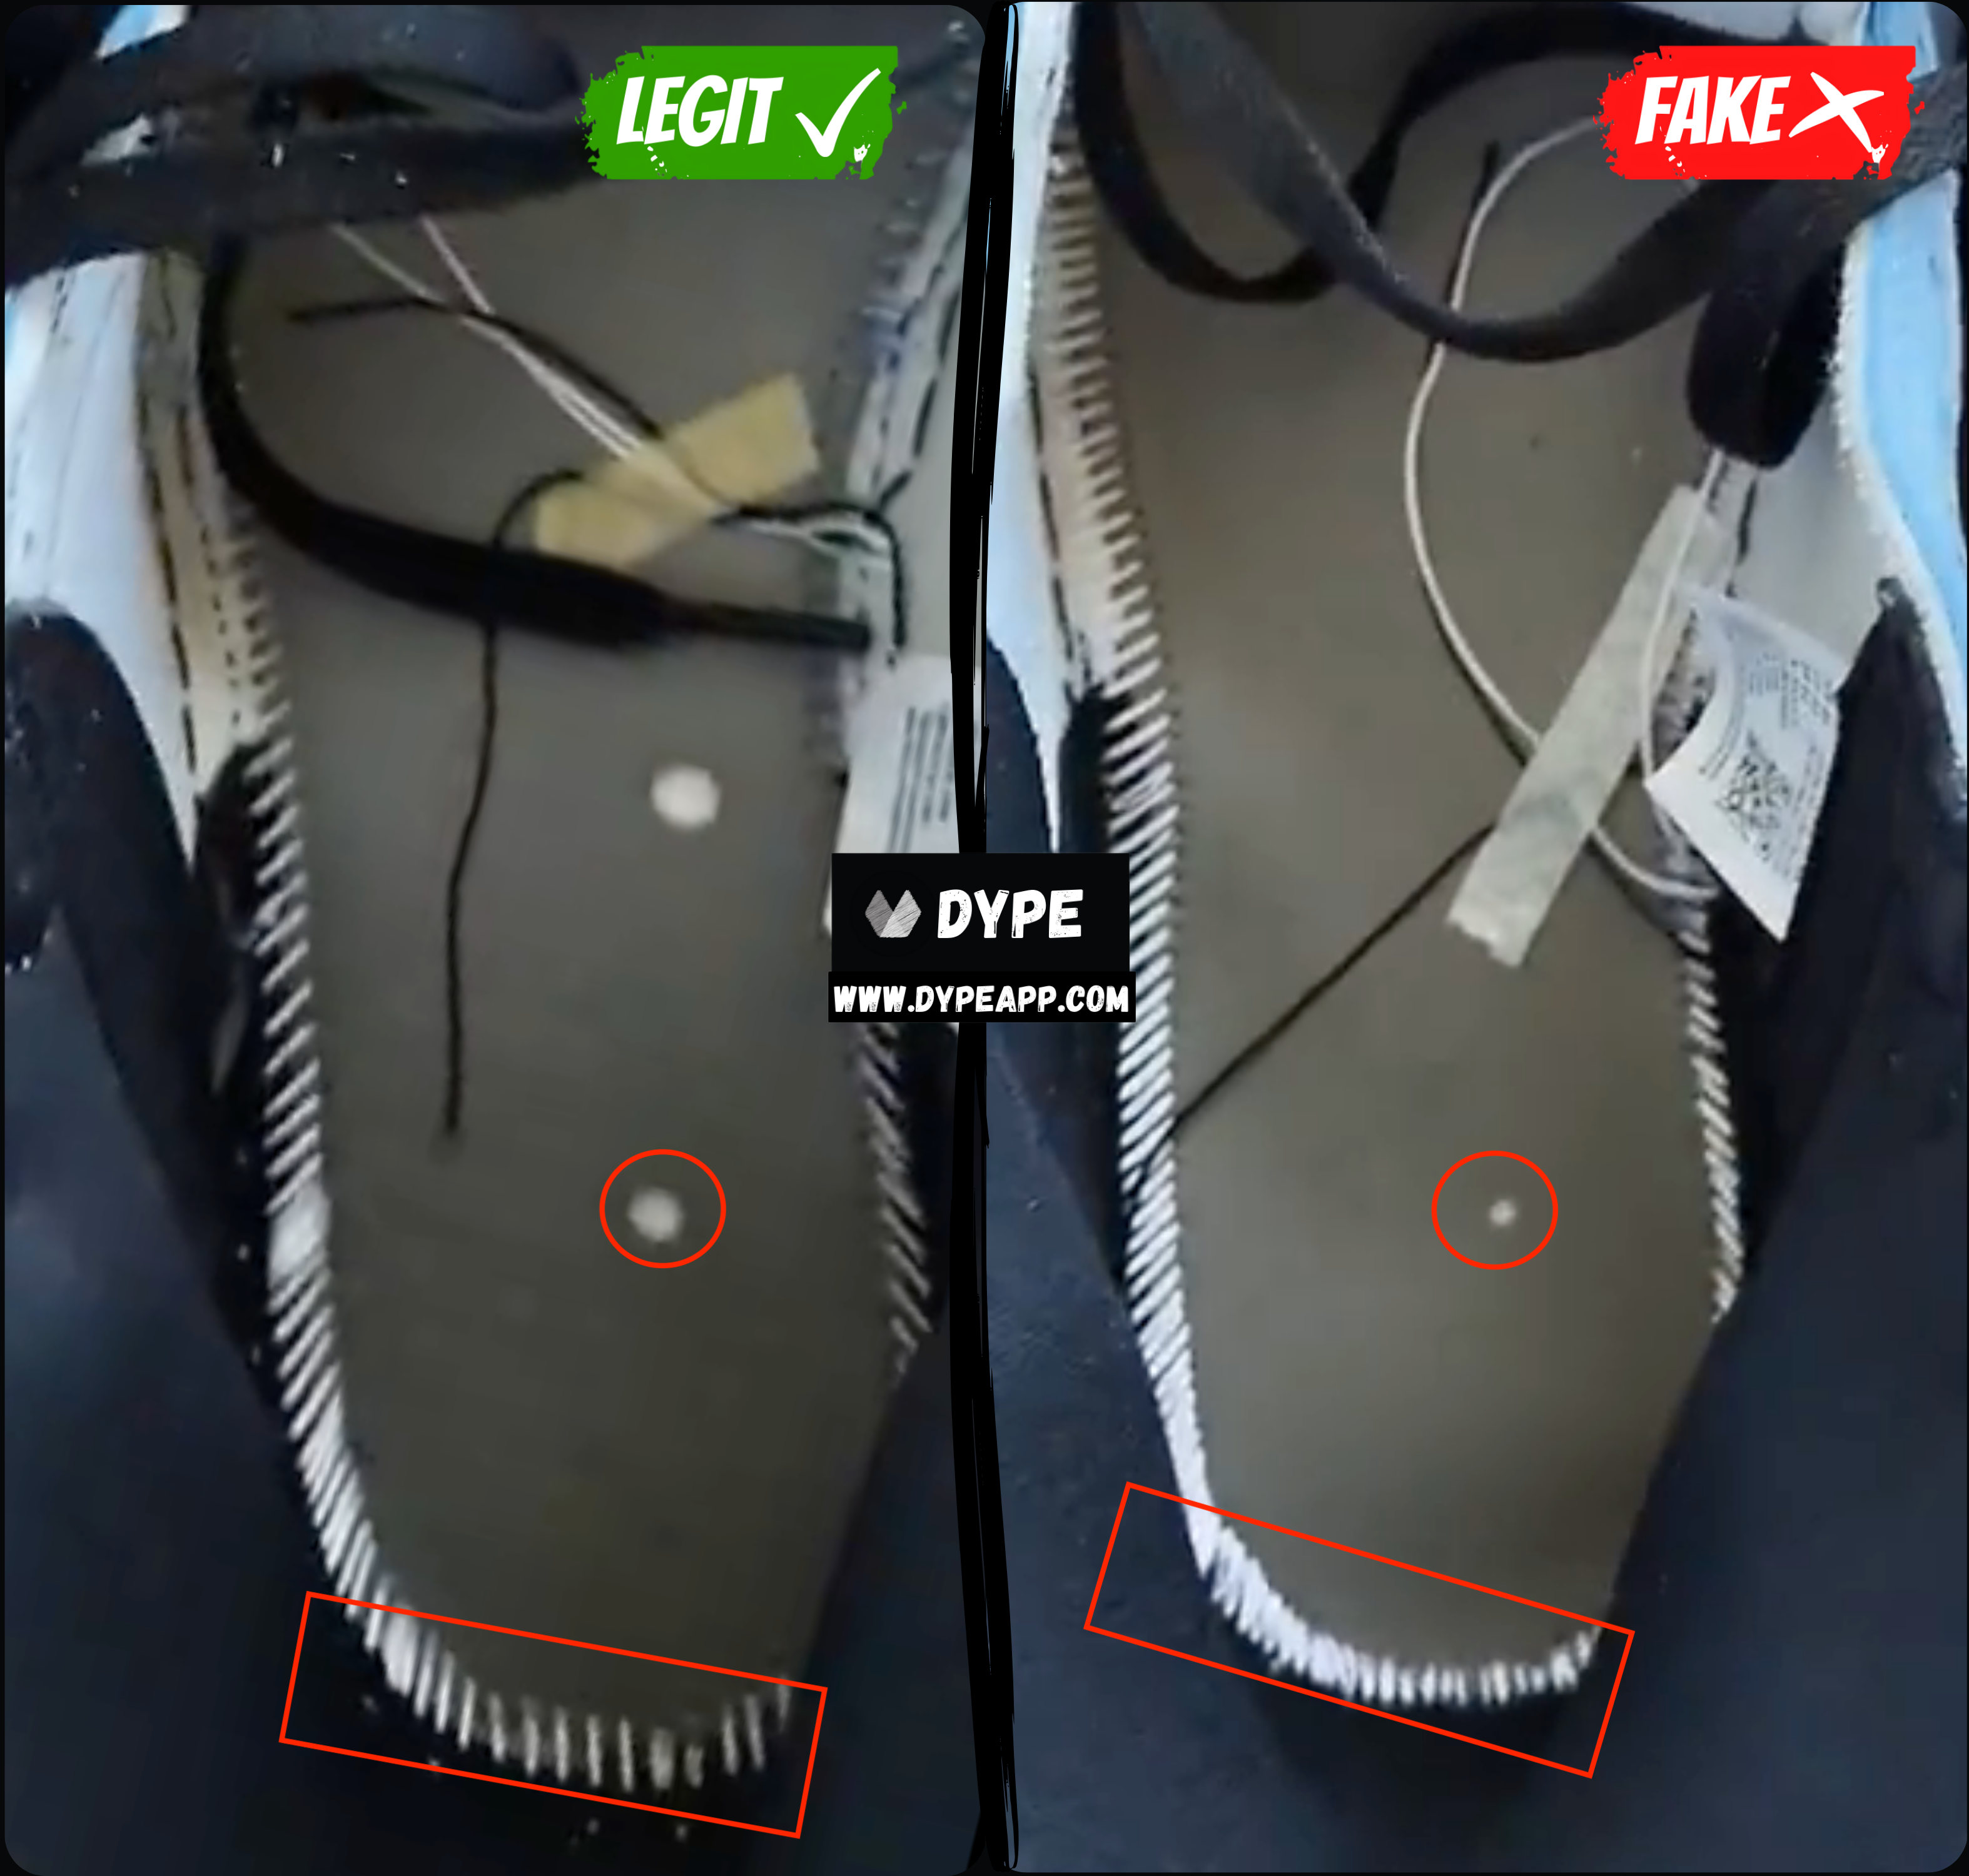
Denoted by the red rectangle. Take a look at the number of white thread stitches on the footbed on the authentic versus the fake. On the image above, you can easily see the difference in the total number of threads used, where it's much more on the replicas than on the authentic. The fake Air Jordan 1s either have too few or too many white threads being used. Top tier fakes are usually consistent with retails...
Hole Size
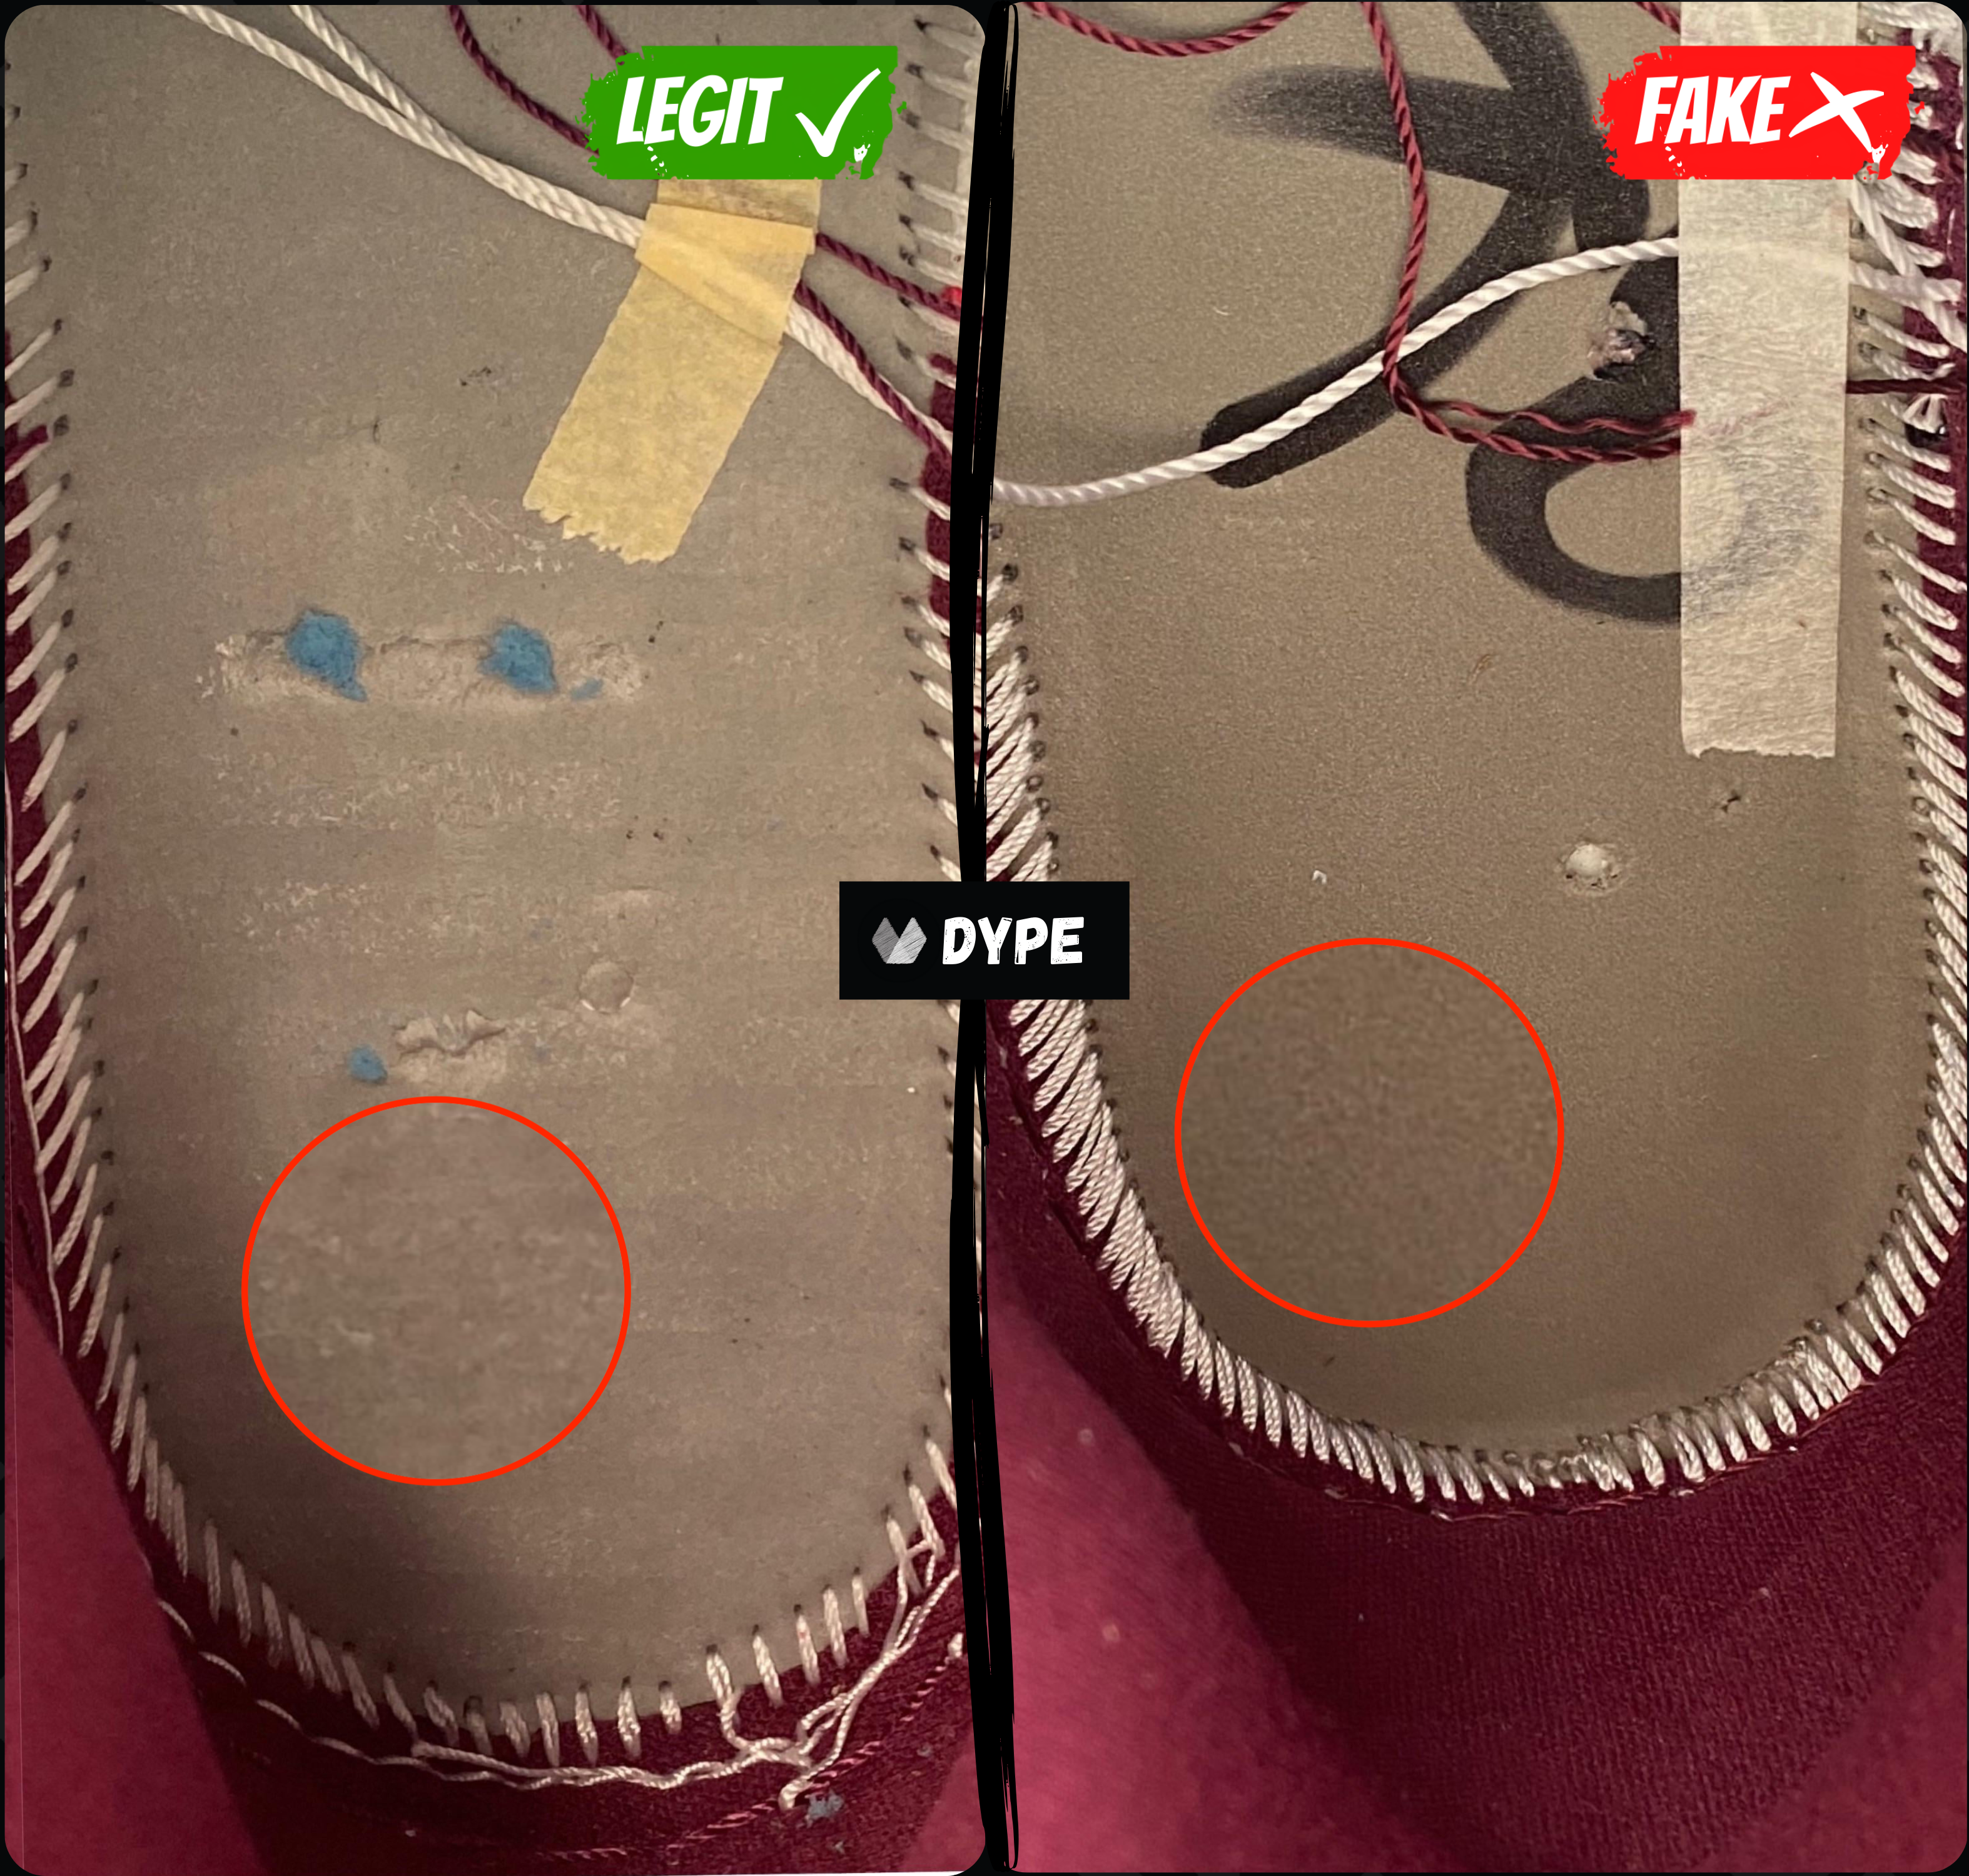
Denoted by the red circle. Also take note at the size difference in the punched out hole. It should be a moderate size hole on retails. Not all Air Jordan 1s will have a hole punched out, but if it does, make sure the size isn't too small or too big. In this case, the fakes have their hole too small.
Upper Stitching
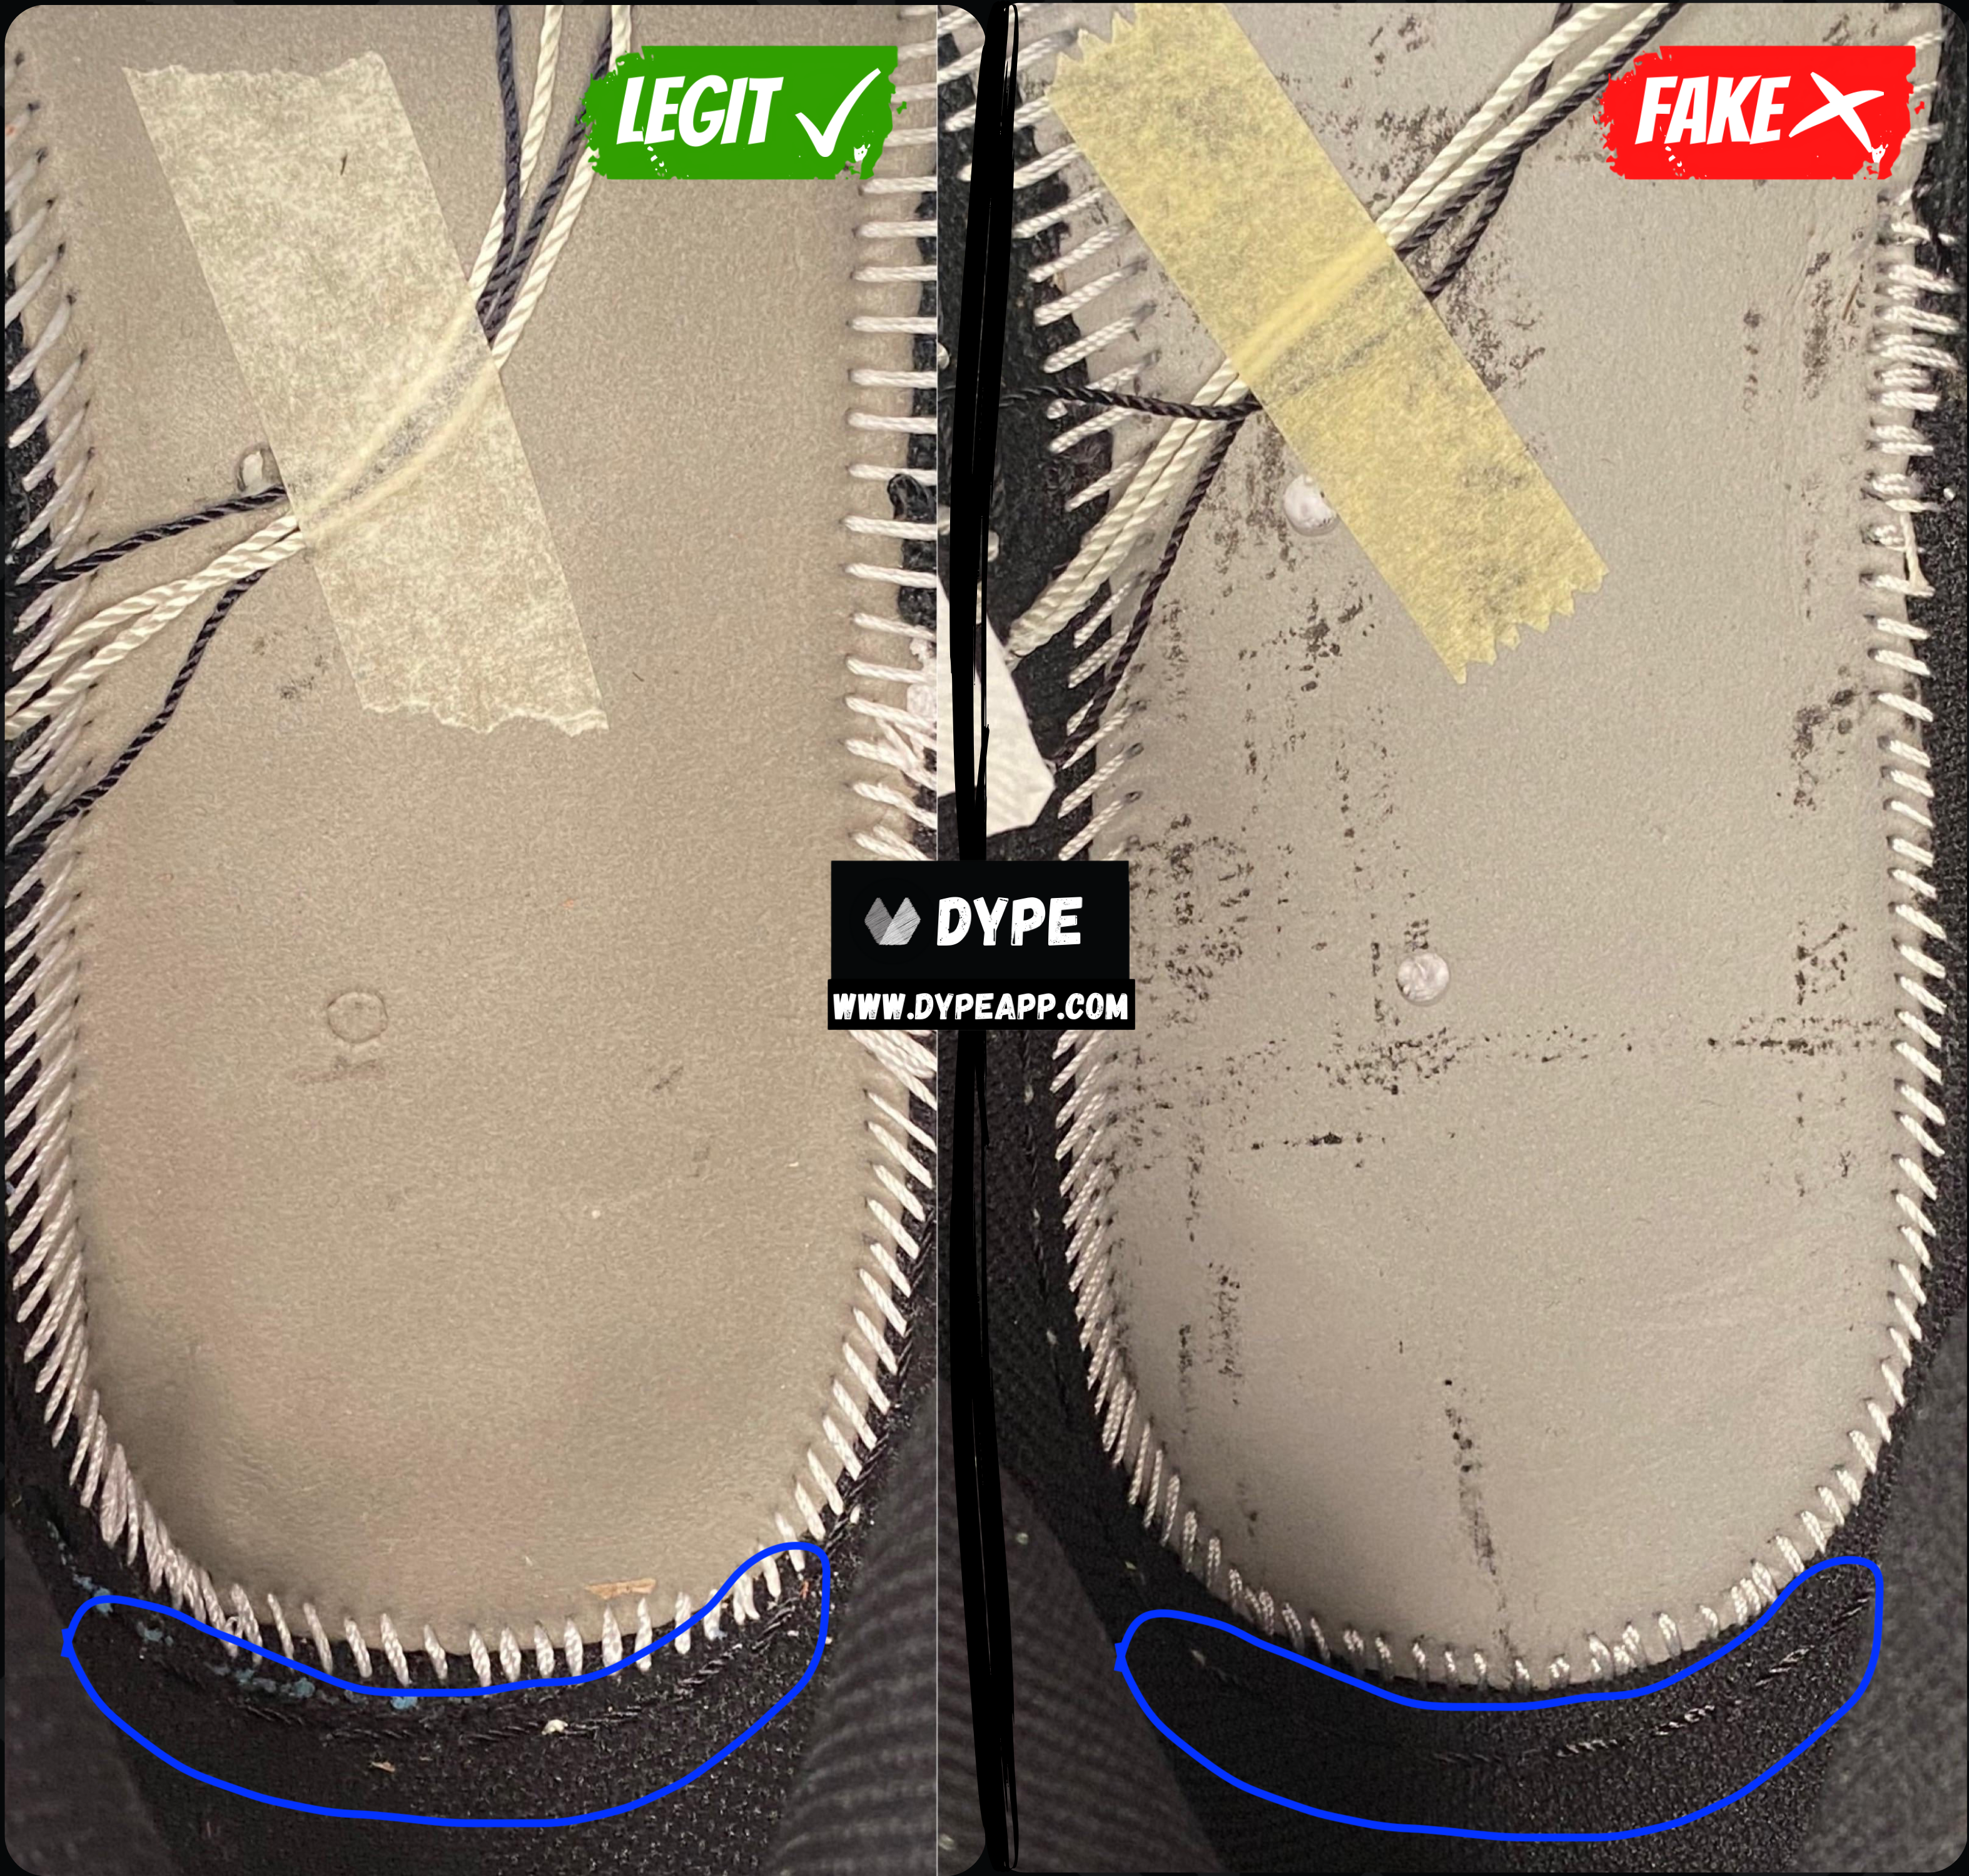
Denoted by the blue highlight. We'll be looking at the upper stitching (not the white threads, but the black ones). Notice the spacing between each thread. On the legit ones, there is barely any gap between each thread, whereas on the fake you can see a notable space between each thread. Also notice the number of visible threads are much higher on the authentic than on the fake.
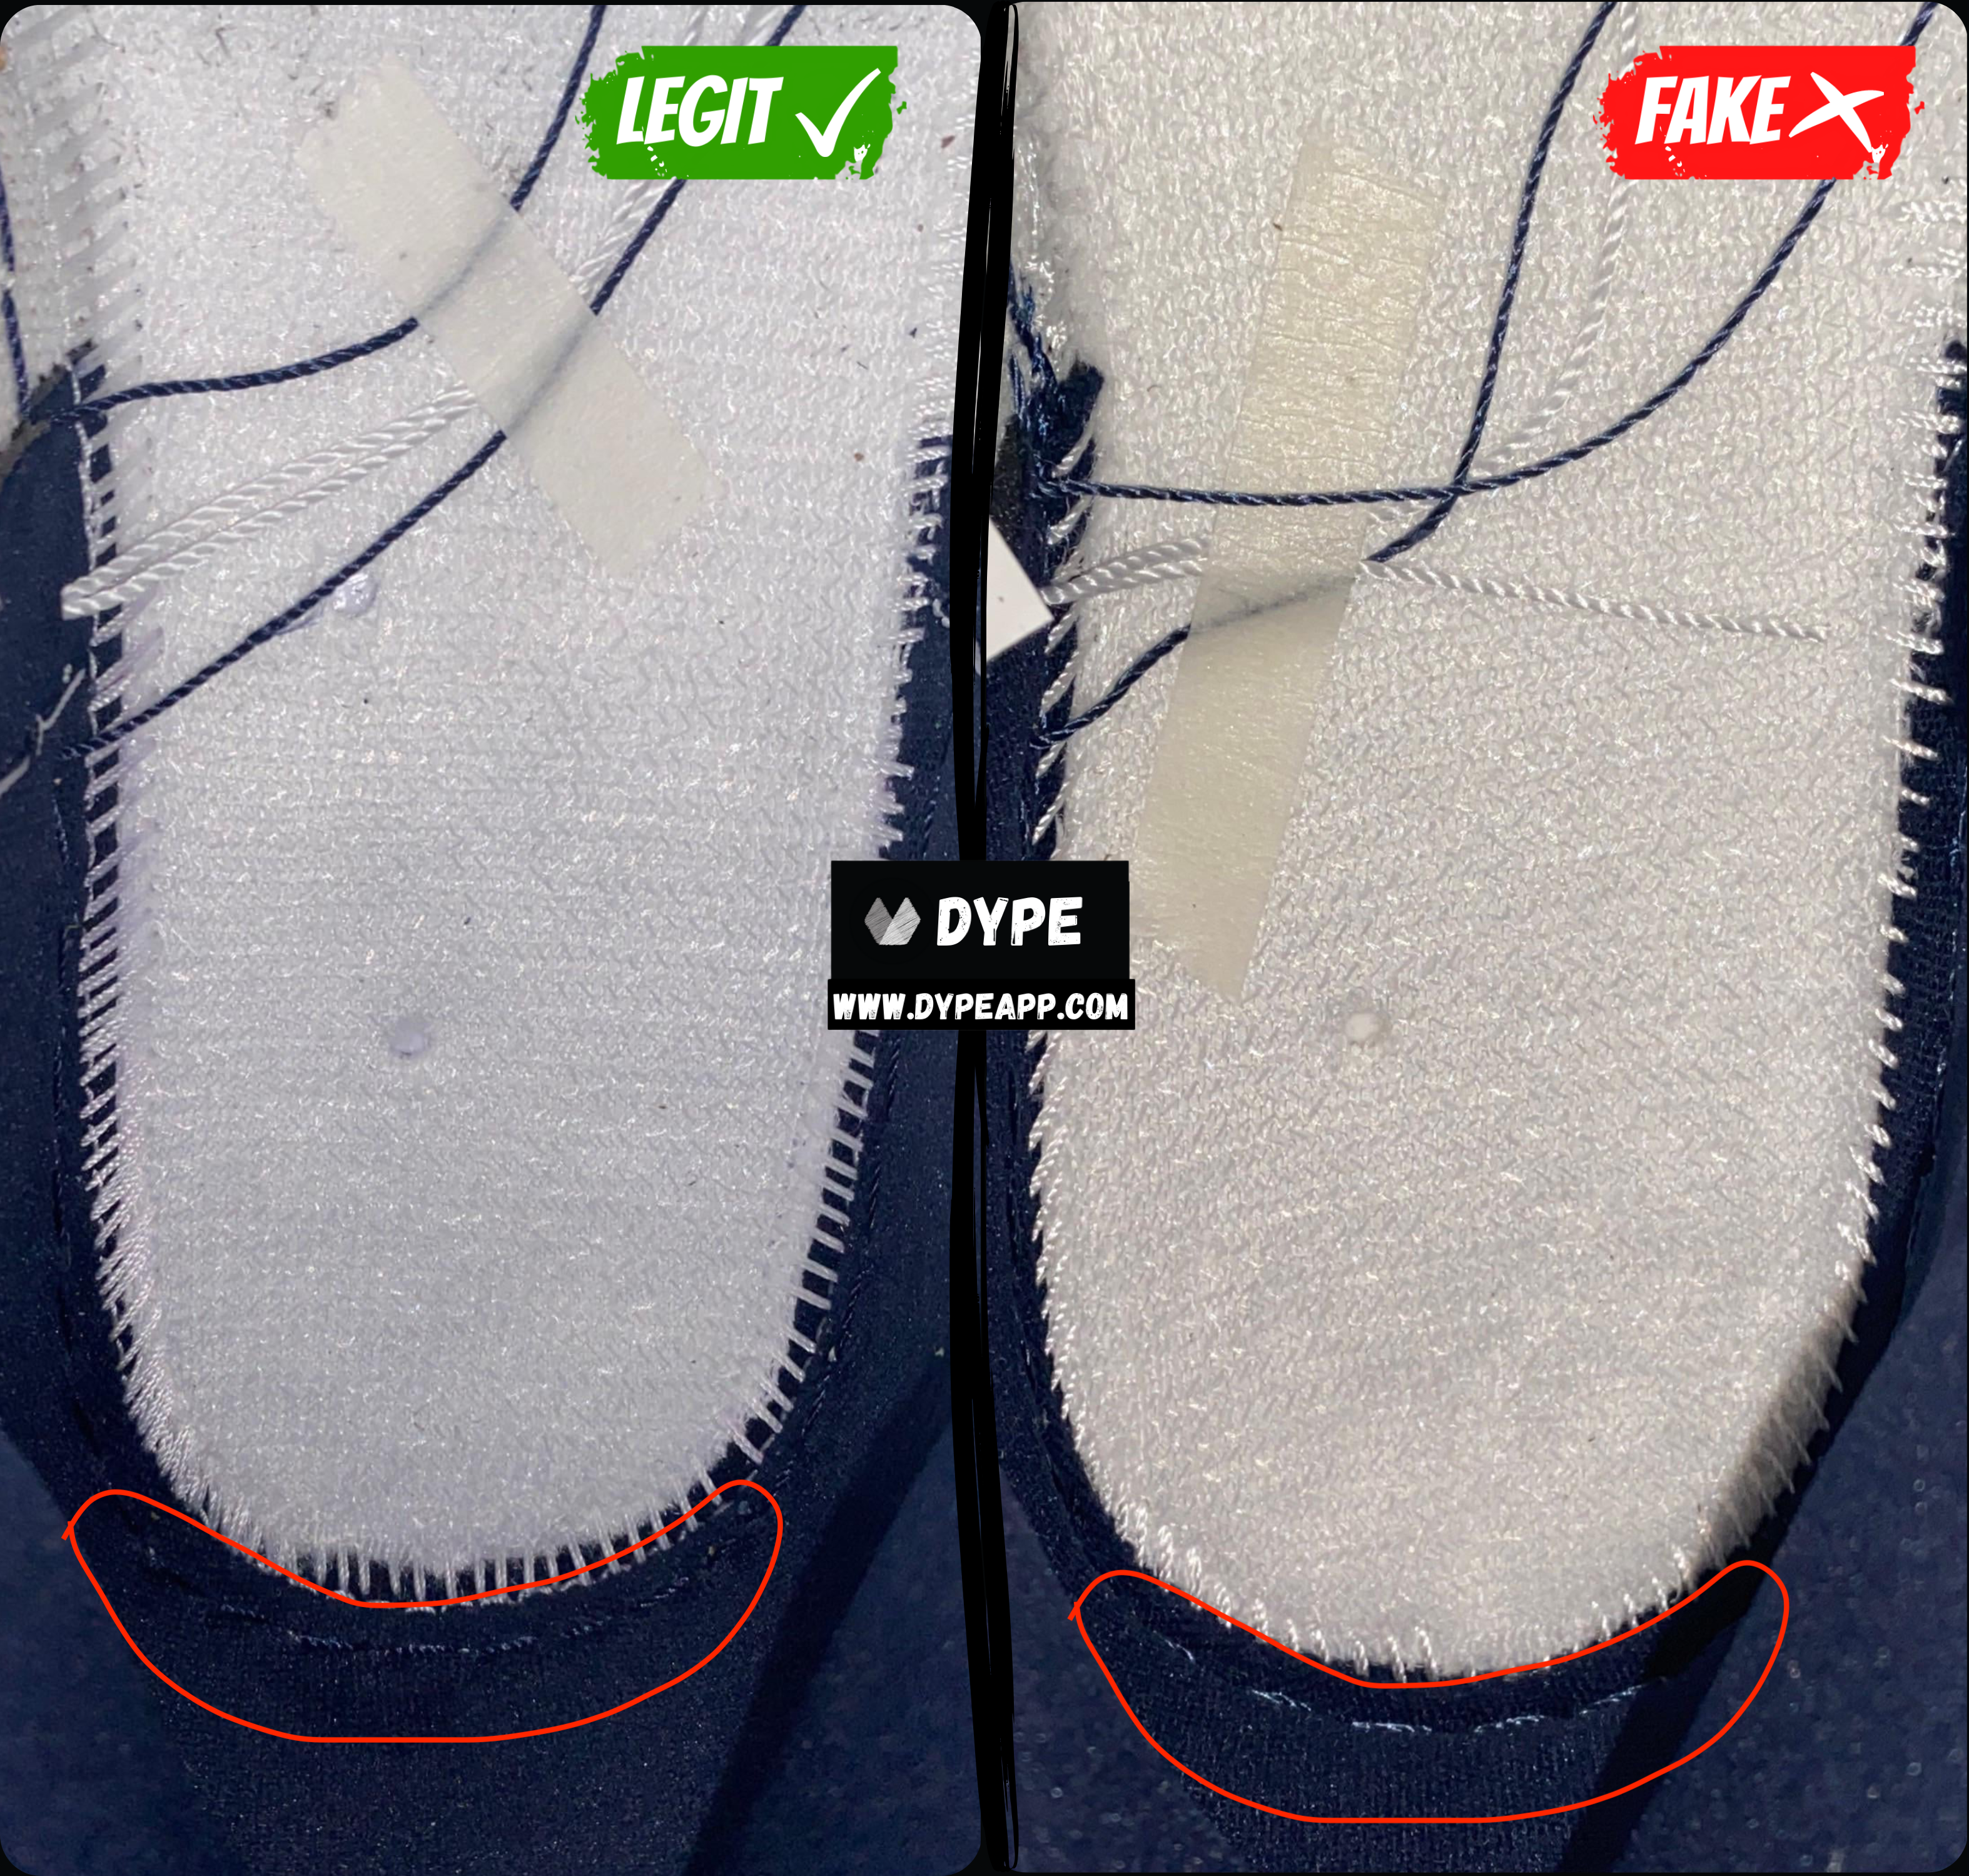
Here is another example where the upper stitching where there aren't enough threads and the spacing of the threads are larger on the fakes. The authentics have more threads and very small spaces in between each thread.
Footbed Coloring
Denoted by the red circle. The color of the authentic footbed shouldn't be too dark. The lighting is the same in the images above, however the lighting will most definitely affect your perception. The color differences can either be very miniscule (usually need a retail to compare) or very obvious (usually don't need a retail to compare).
Insoles
Next, let's move onto the insoles of the Air Jordan 1. We will look at the front and back of the insoles. We will be focusing in on a couple indicators on the authentic versus the fake Air Jordan 1s: [1] Nike Logo [2] Material Texture [3] Glue Pattern [4] Back Insole Coloring.
We'll look at multiple examples, once again...
Front Insole
Let's take a look at the front insole first where the Nike Logo is present.
Nike Logo
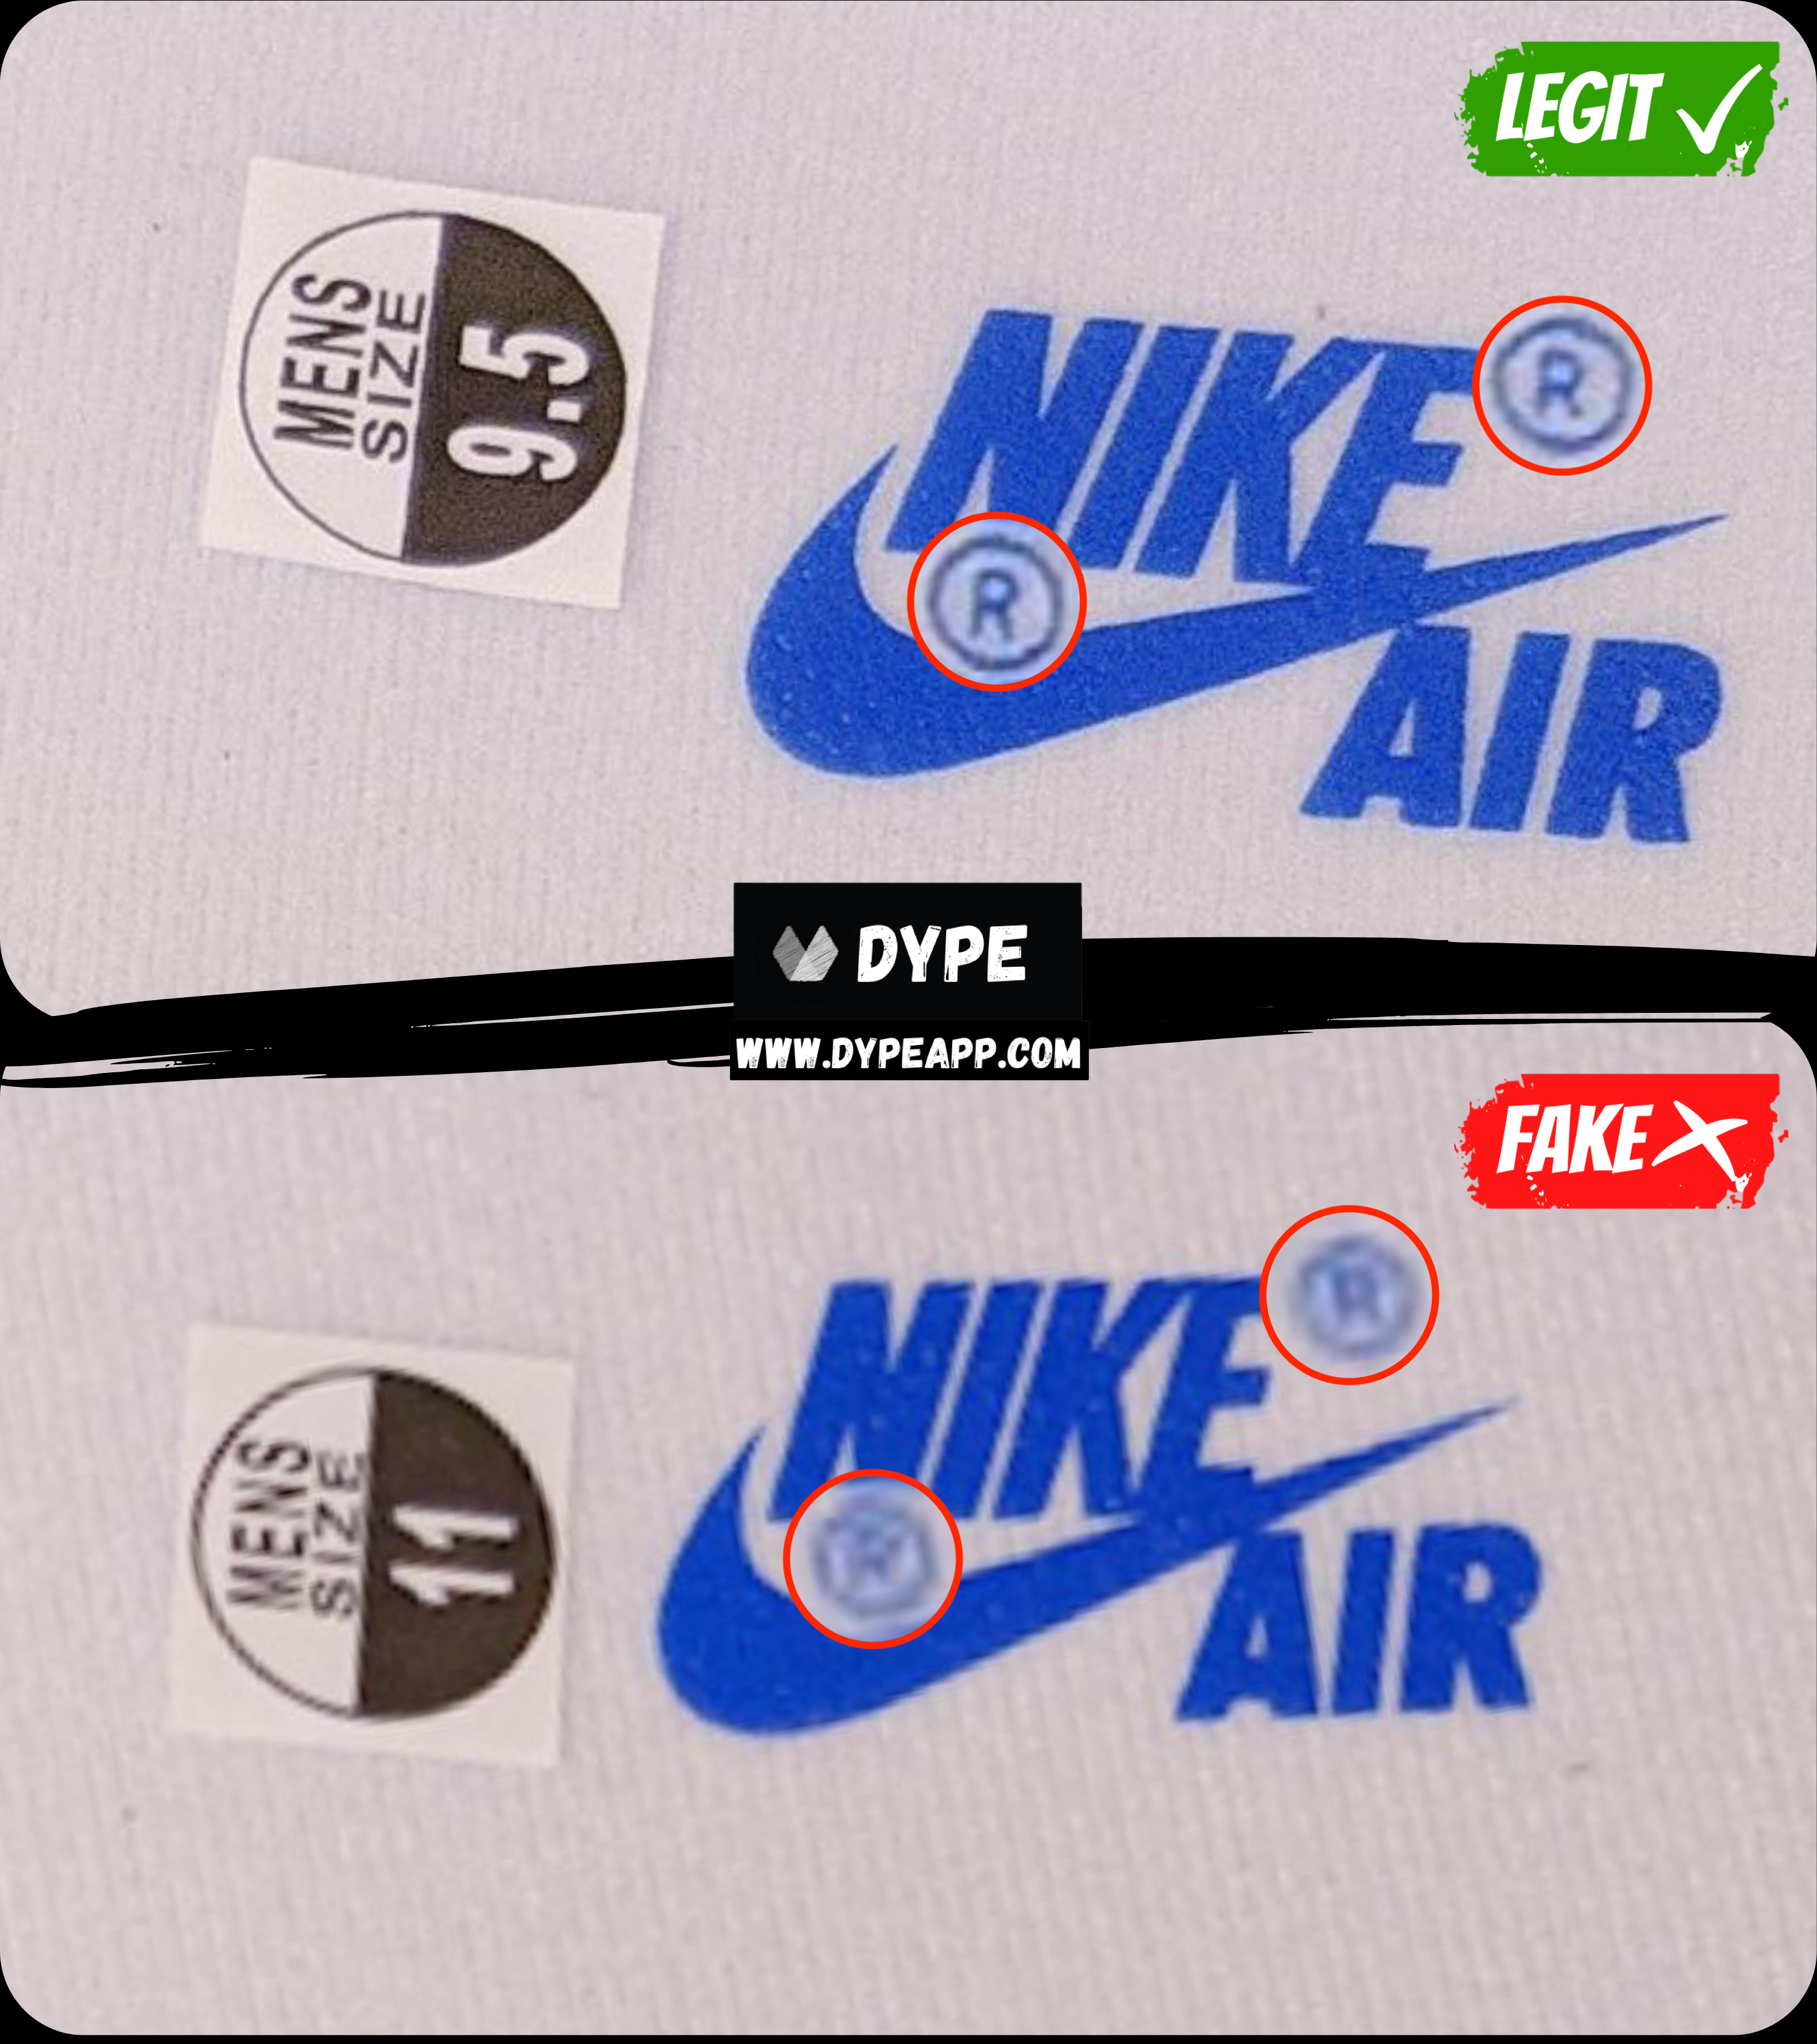
Let's take a look at the Nike Logo. This logo is the same as the logo that is present on the front tongue label. The top tier replica Air Jordan 1s, once again, usually have the "NIKE AIR" text correct, so that isn't too reliable of an indicator. However, the "R" is usually the culprit that distinguishes between the authentic and fake.
Denoted by the red circles. We can see that the legit "R" text is much bigger than the fake. The circle encasing also leaves more room around the letter "R". Whereas, on the replica, you can see how much smaller the "R".

Material Texture
The next thing we can take a look out is the texture of the insole material. Denoted by the red circle. Here we can see the difference in the material makeup. On the retail insoles, we can clearly see how fibrous the insole is. The legit insoles are supposed to have striations.
In this case, we don't see those same striations in the replica. Instead what we see if a lower quality and more generic foam that is used on the insole.
Back Insole
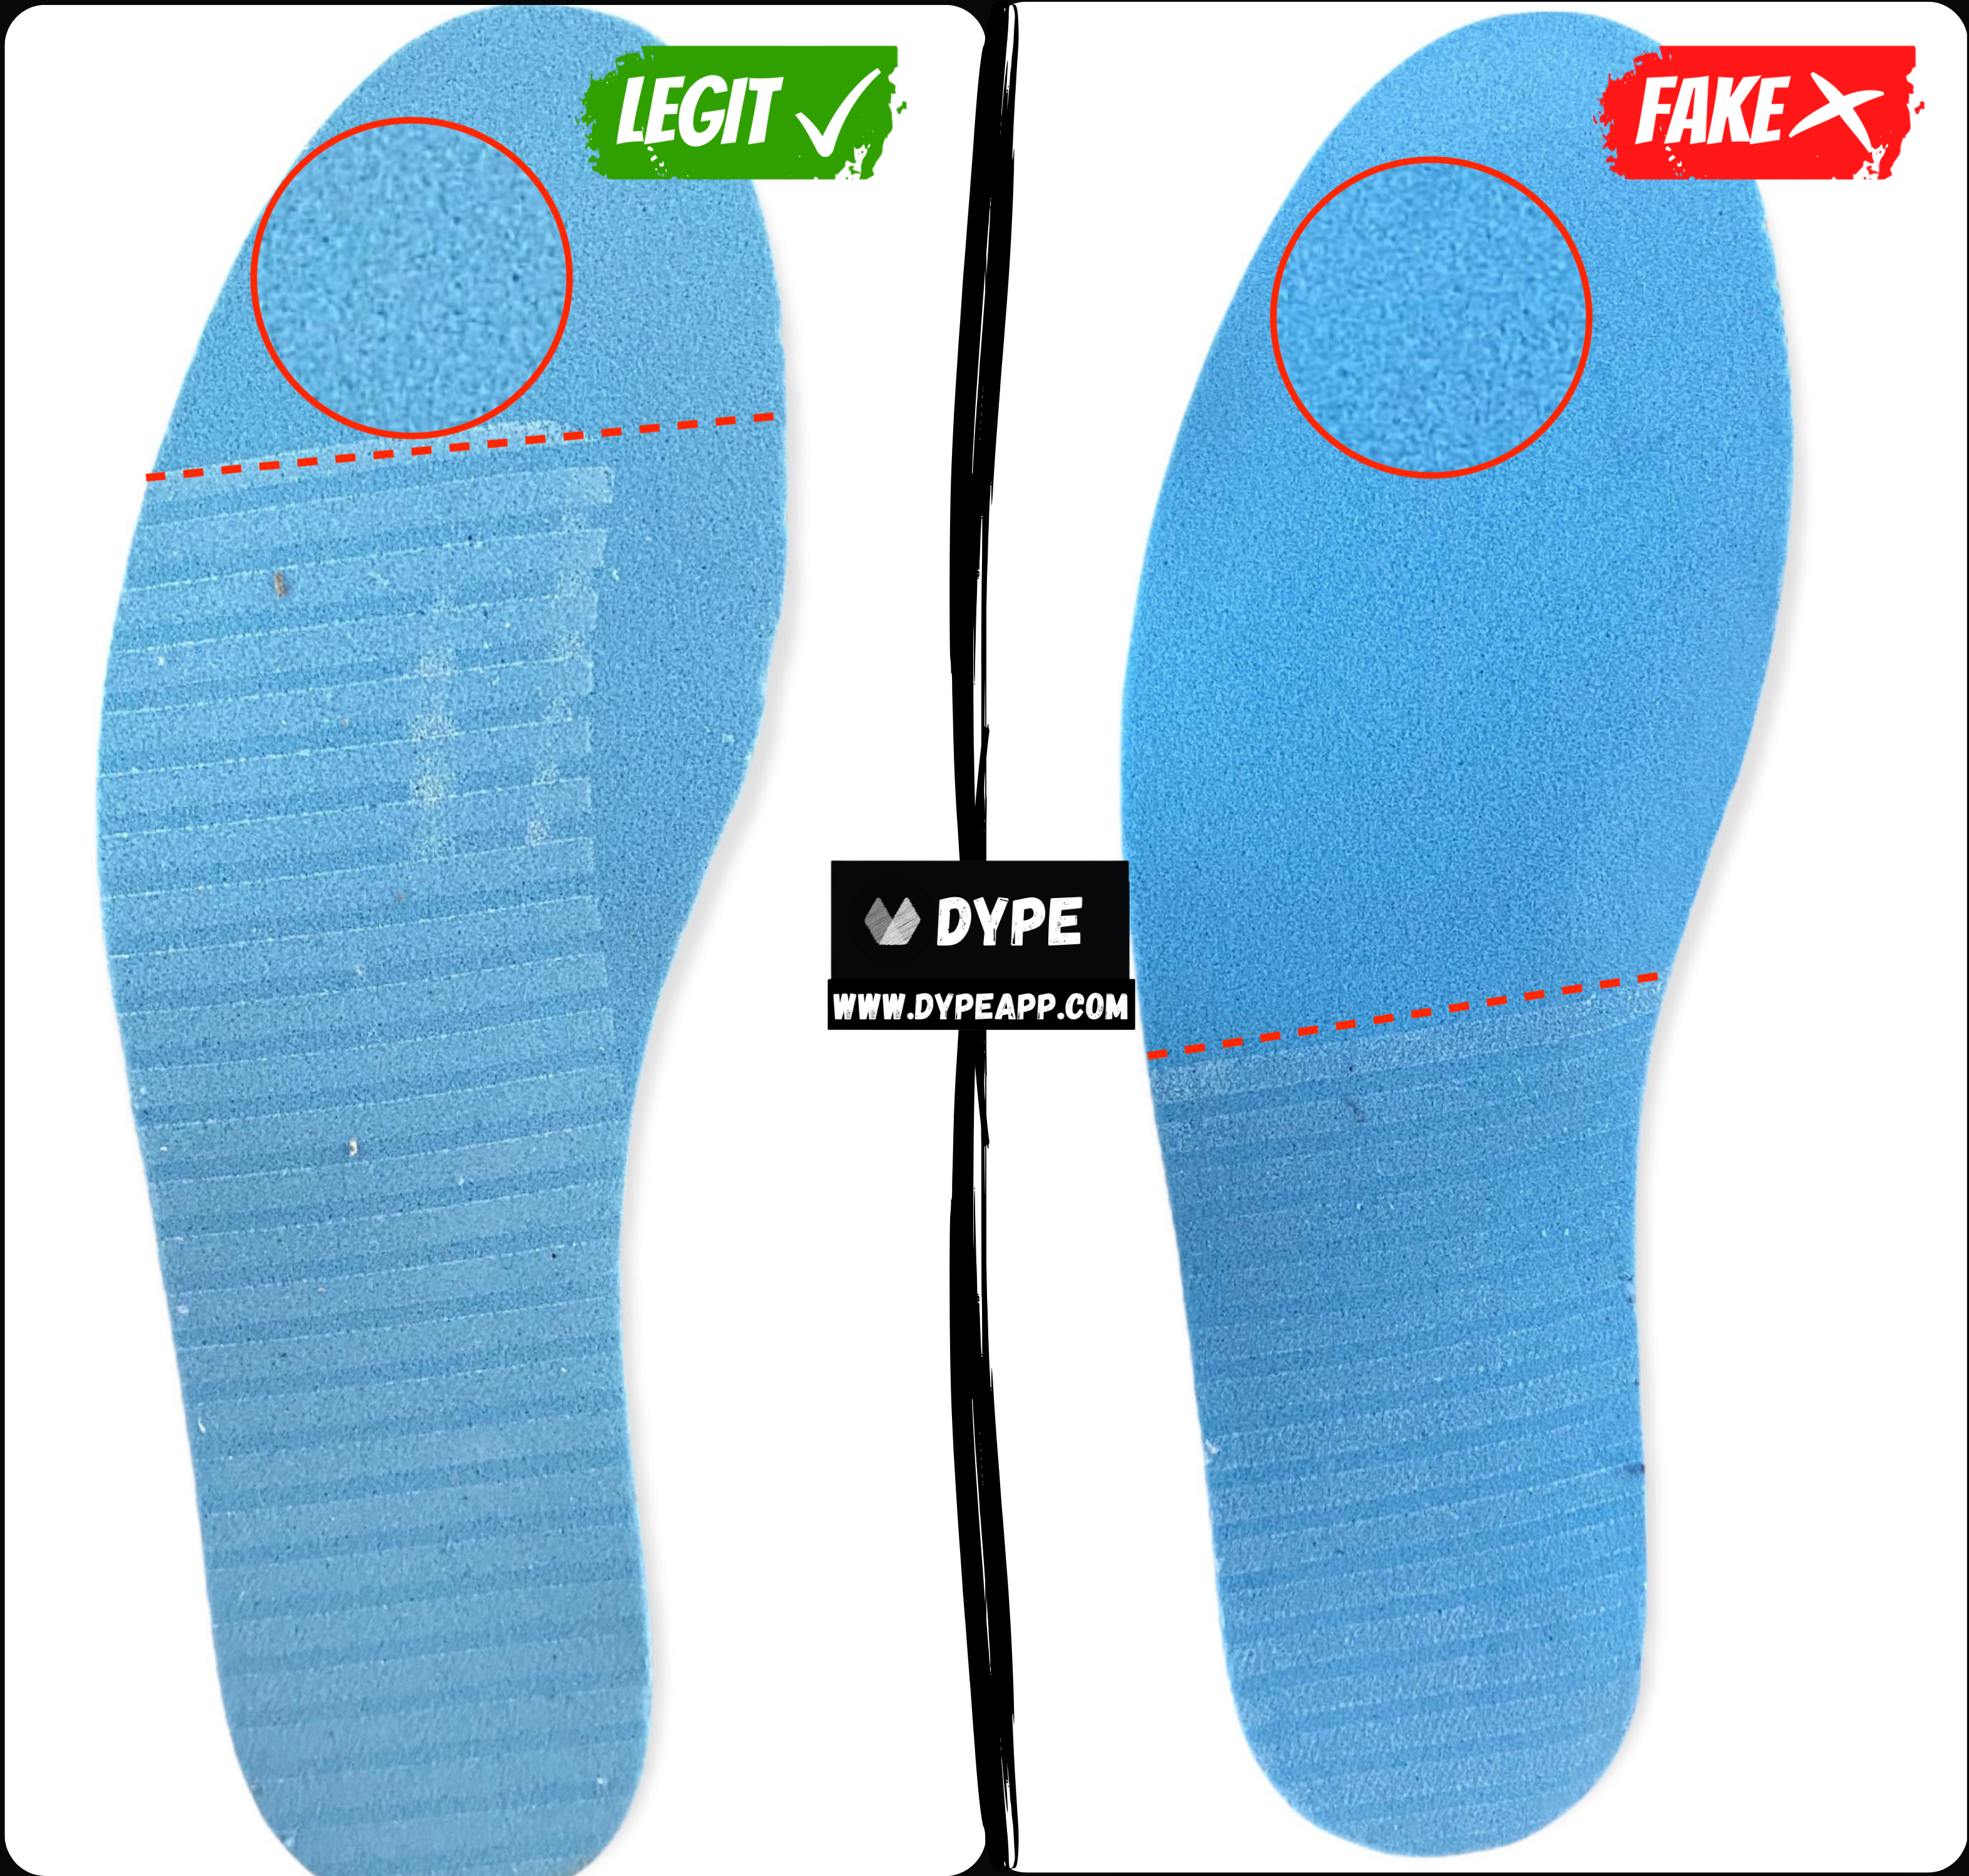
Flip the insole around to the backside, which will be light blue. The authentic insoles should have parallel glue stain markings. We'll look at multiple examples as well because the glue patterns will differ depending on the Air Jordan 1 release...
Glue Pattern
Take a look at the white blue markings that run parallel to each other. Keep in mind that on authentic sneakers, the glue markings should have more than 50% coverage of the back insoles. Some will have 100% converage of the insoles, such as the Travis Scott AJ 1 collaboration. Other general releases of Air Jordan 1s will have ~60-80% coverage. In the image above, we can clearly see that the authentic insole has 60-80% glue mark coverage. Whereas on the fake, it's less than 50%. If the insoles have less than 50% glue stain coverage, then be wary it may be a replica.
This pattern will differ based on the Air Jordan 1 sneaker. For example, general releases usually share the same pattern, and collaborations such as the Off-White will share similar patterns.
Insole Coloring
Denoted by the red circle for more clarity. Have a look at the difference in the shade of blue used. In the retail insoles of the Air Jordan 1, we can clearly see that it's a lighter shade of blue compared to the replica insoles. This comparison will be difficult to make without a reference insole. Keep in mind that the lighting will also affect your perception of the color.
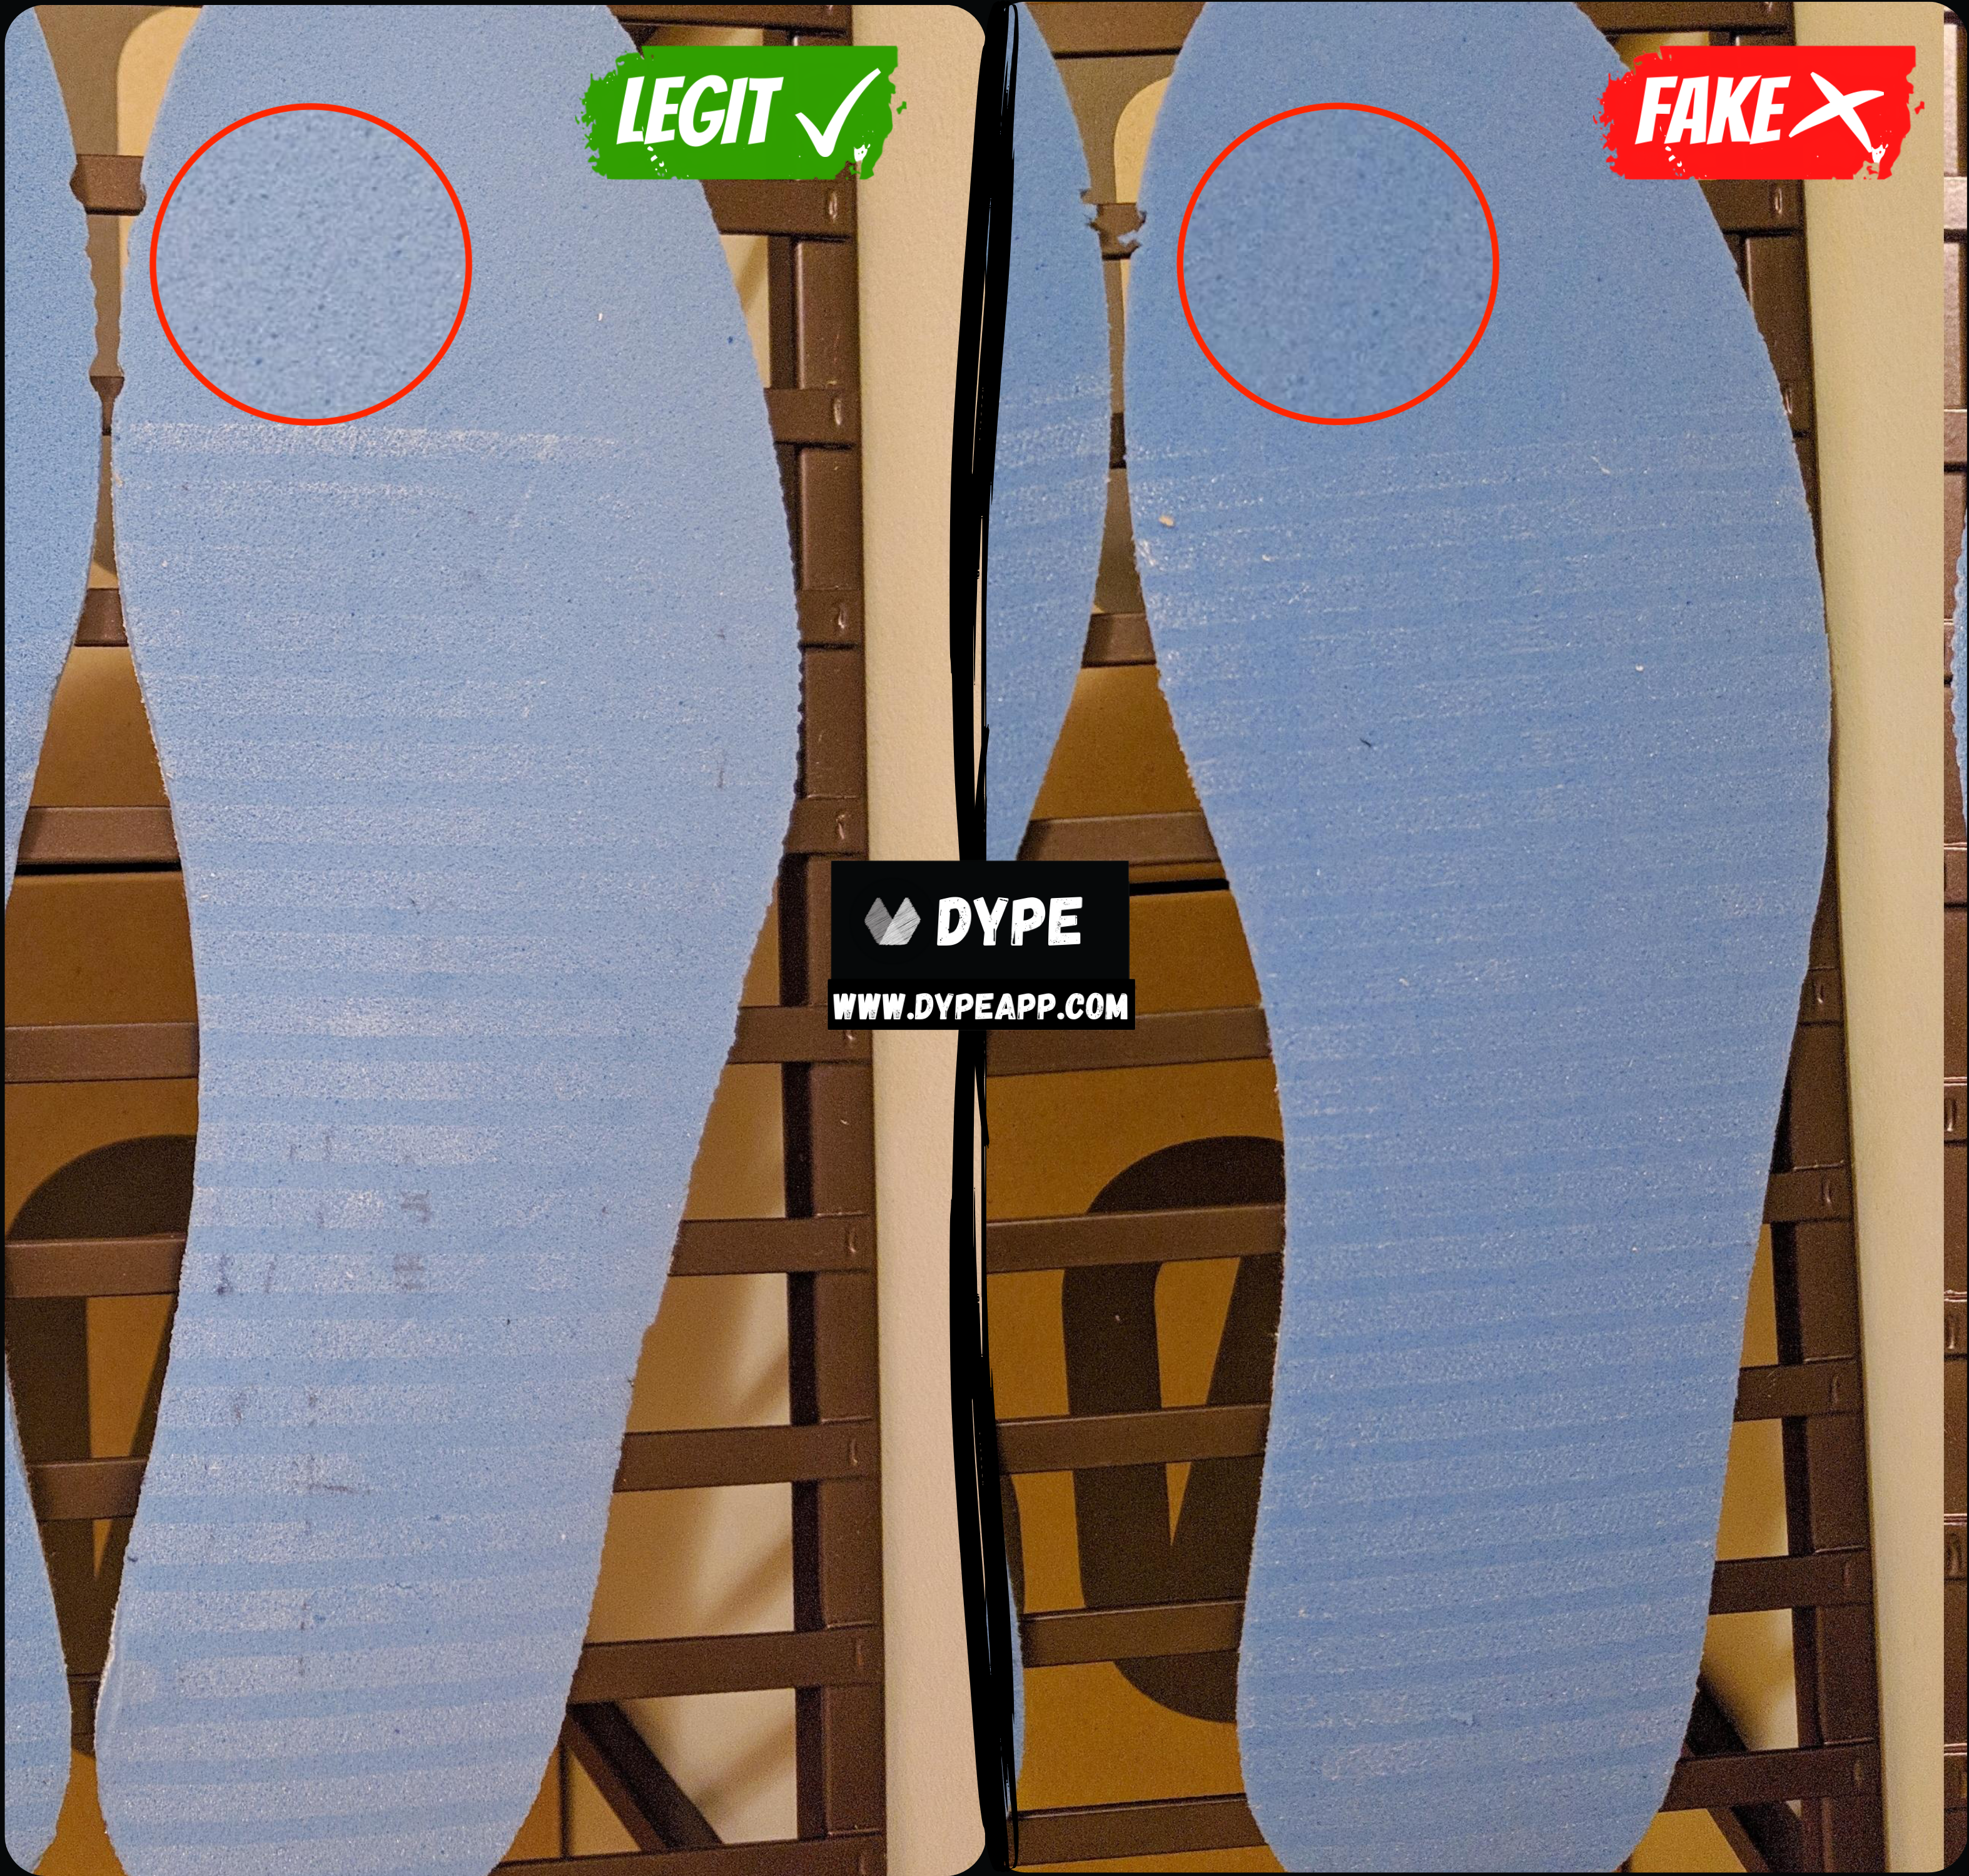
Here's another example of the difference in the shade of blue used on the Air Jordan 1 insoles. On the authentic insole, it is a lighter shade of blue than the fake Air Jordan 1 insoles.
Size Tag
Next, let's take a look back inside the Air Jordan 1 sneaker, where the size tag resides. On the size tag, we'll be on the lookout for discrepancies in the font: [1] Text Thickness [2] Text Spacing.
There are 2 common Air Jordan 1 size tags on the retails. We believe it's always important to have a retail reference to compare, since consistencies will vary in different sneaker releases. We'll go over multiple examples...
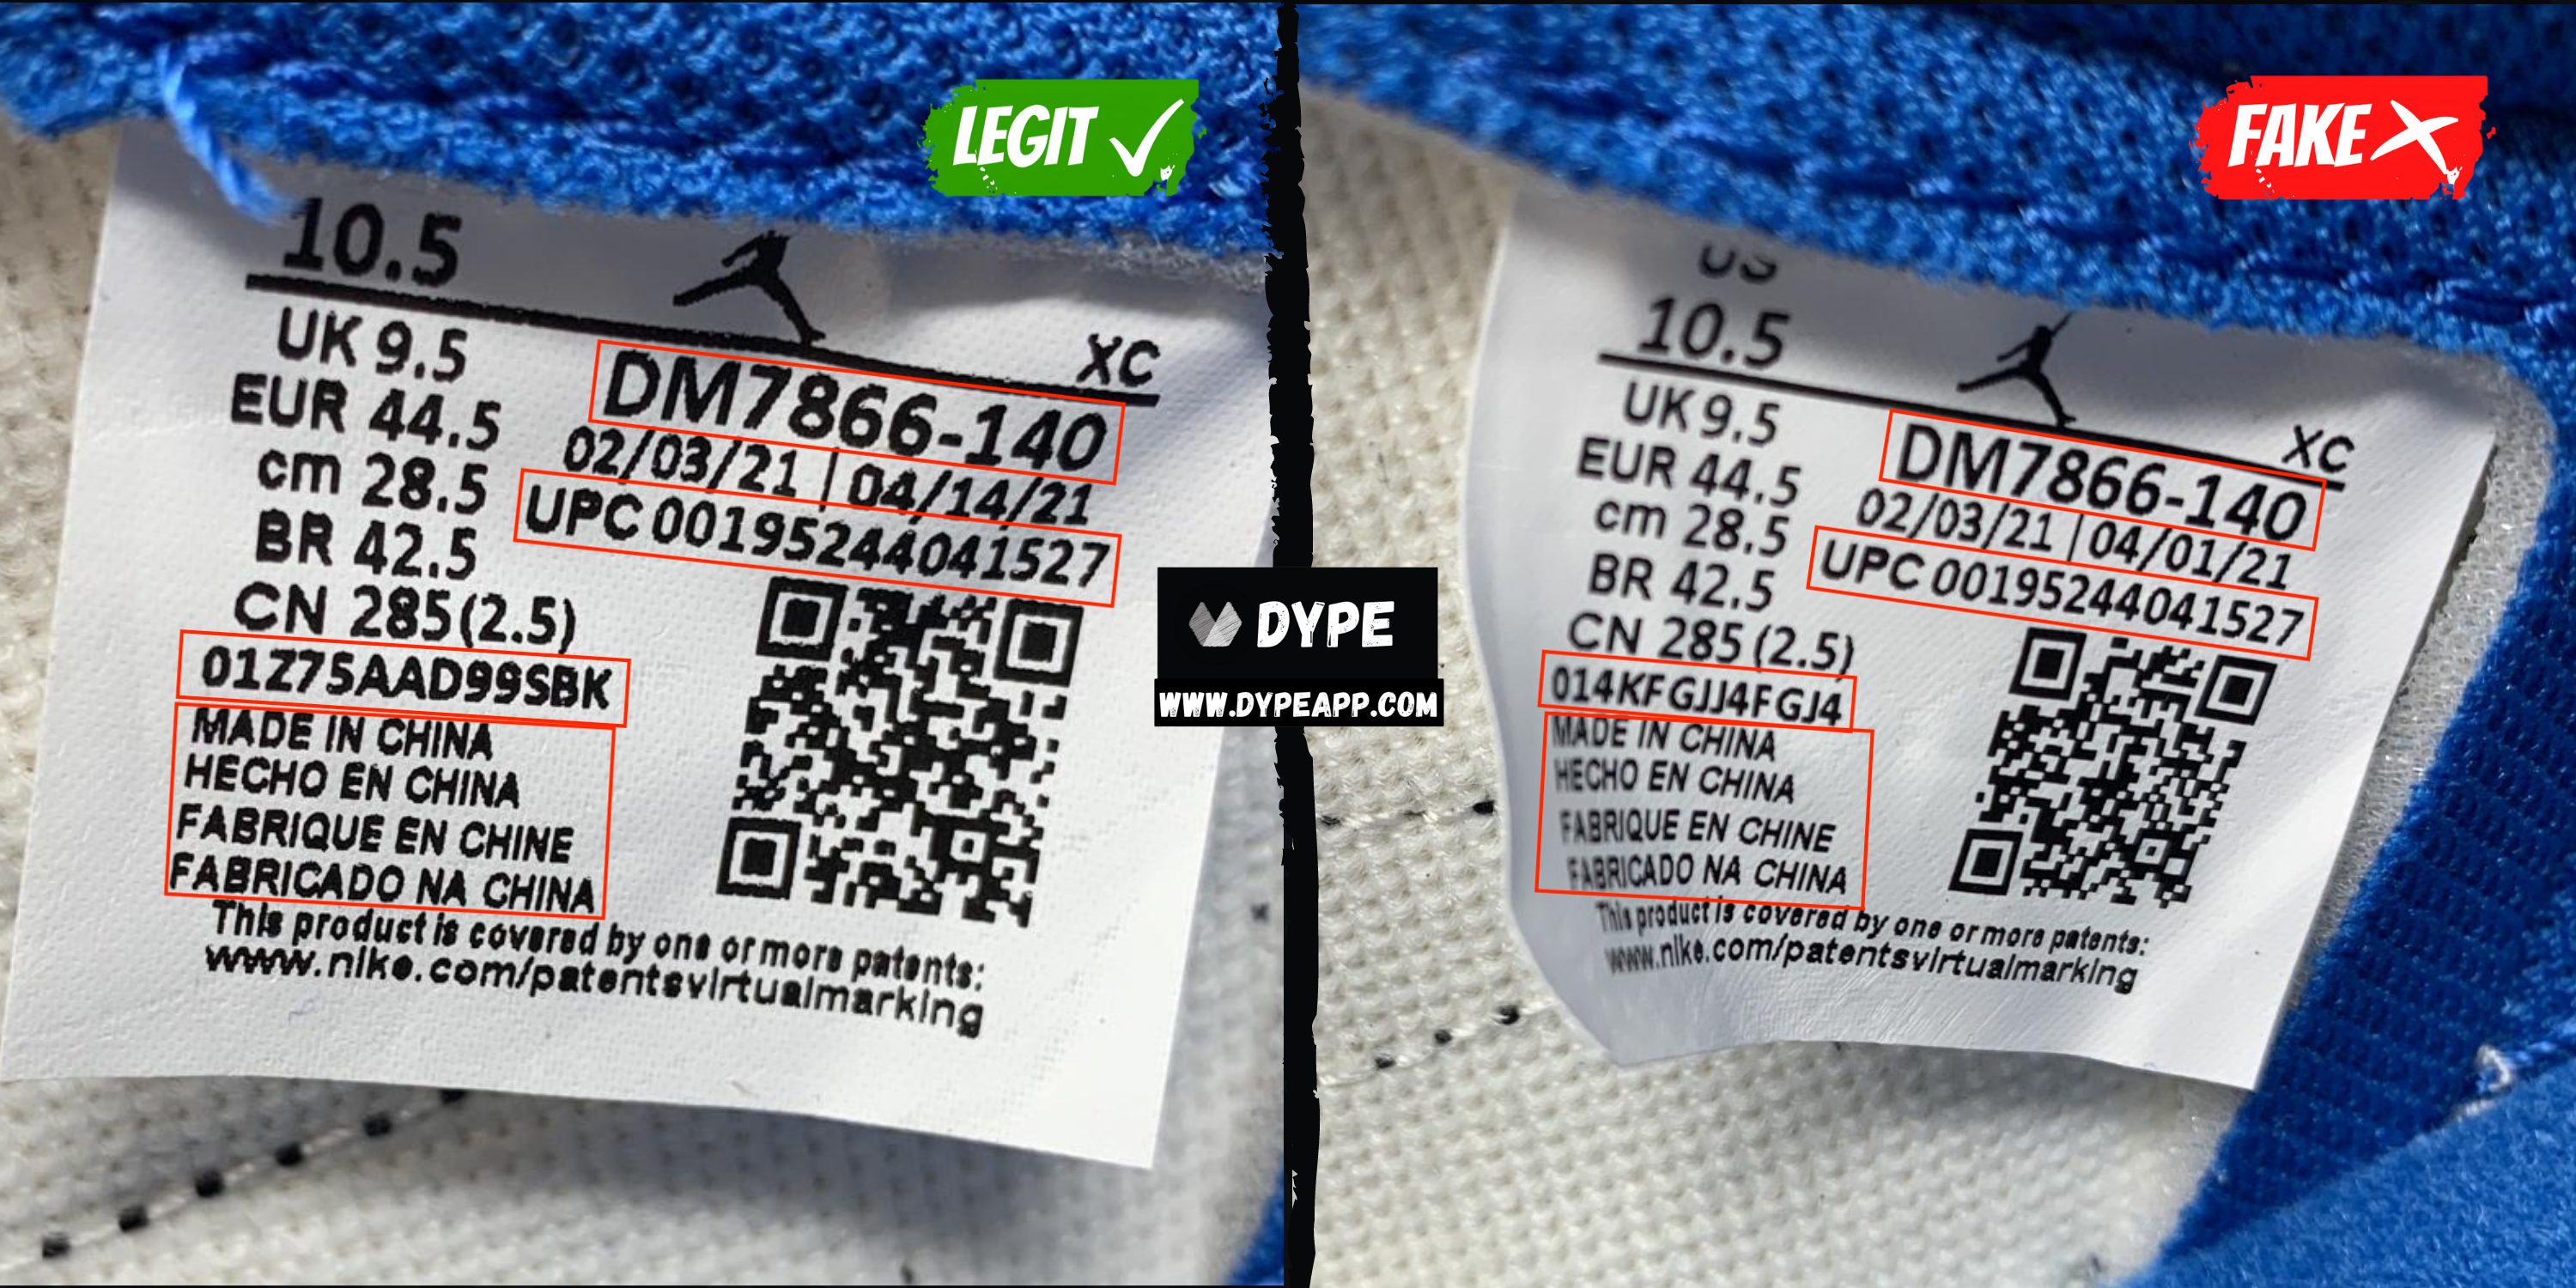
This is one of the rare cases, where the authentic Air Jordan 1 size tag text is a lot of more sloppy and inconsistent than the fakes. Nike quality inconsistencies is a real thing, which will vary from sneaker to sneaker. However, our focus this time around would be on the font thickness, rather than the sloppiness.
Right off the bat we can easily see how the authentic size tag font is bolded and much thicker than the replicas. Virtually almost all the text is thicker than on the fakes. The red rectangles highlighted are examples of the most obvious examples.
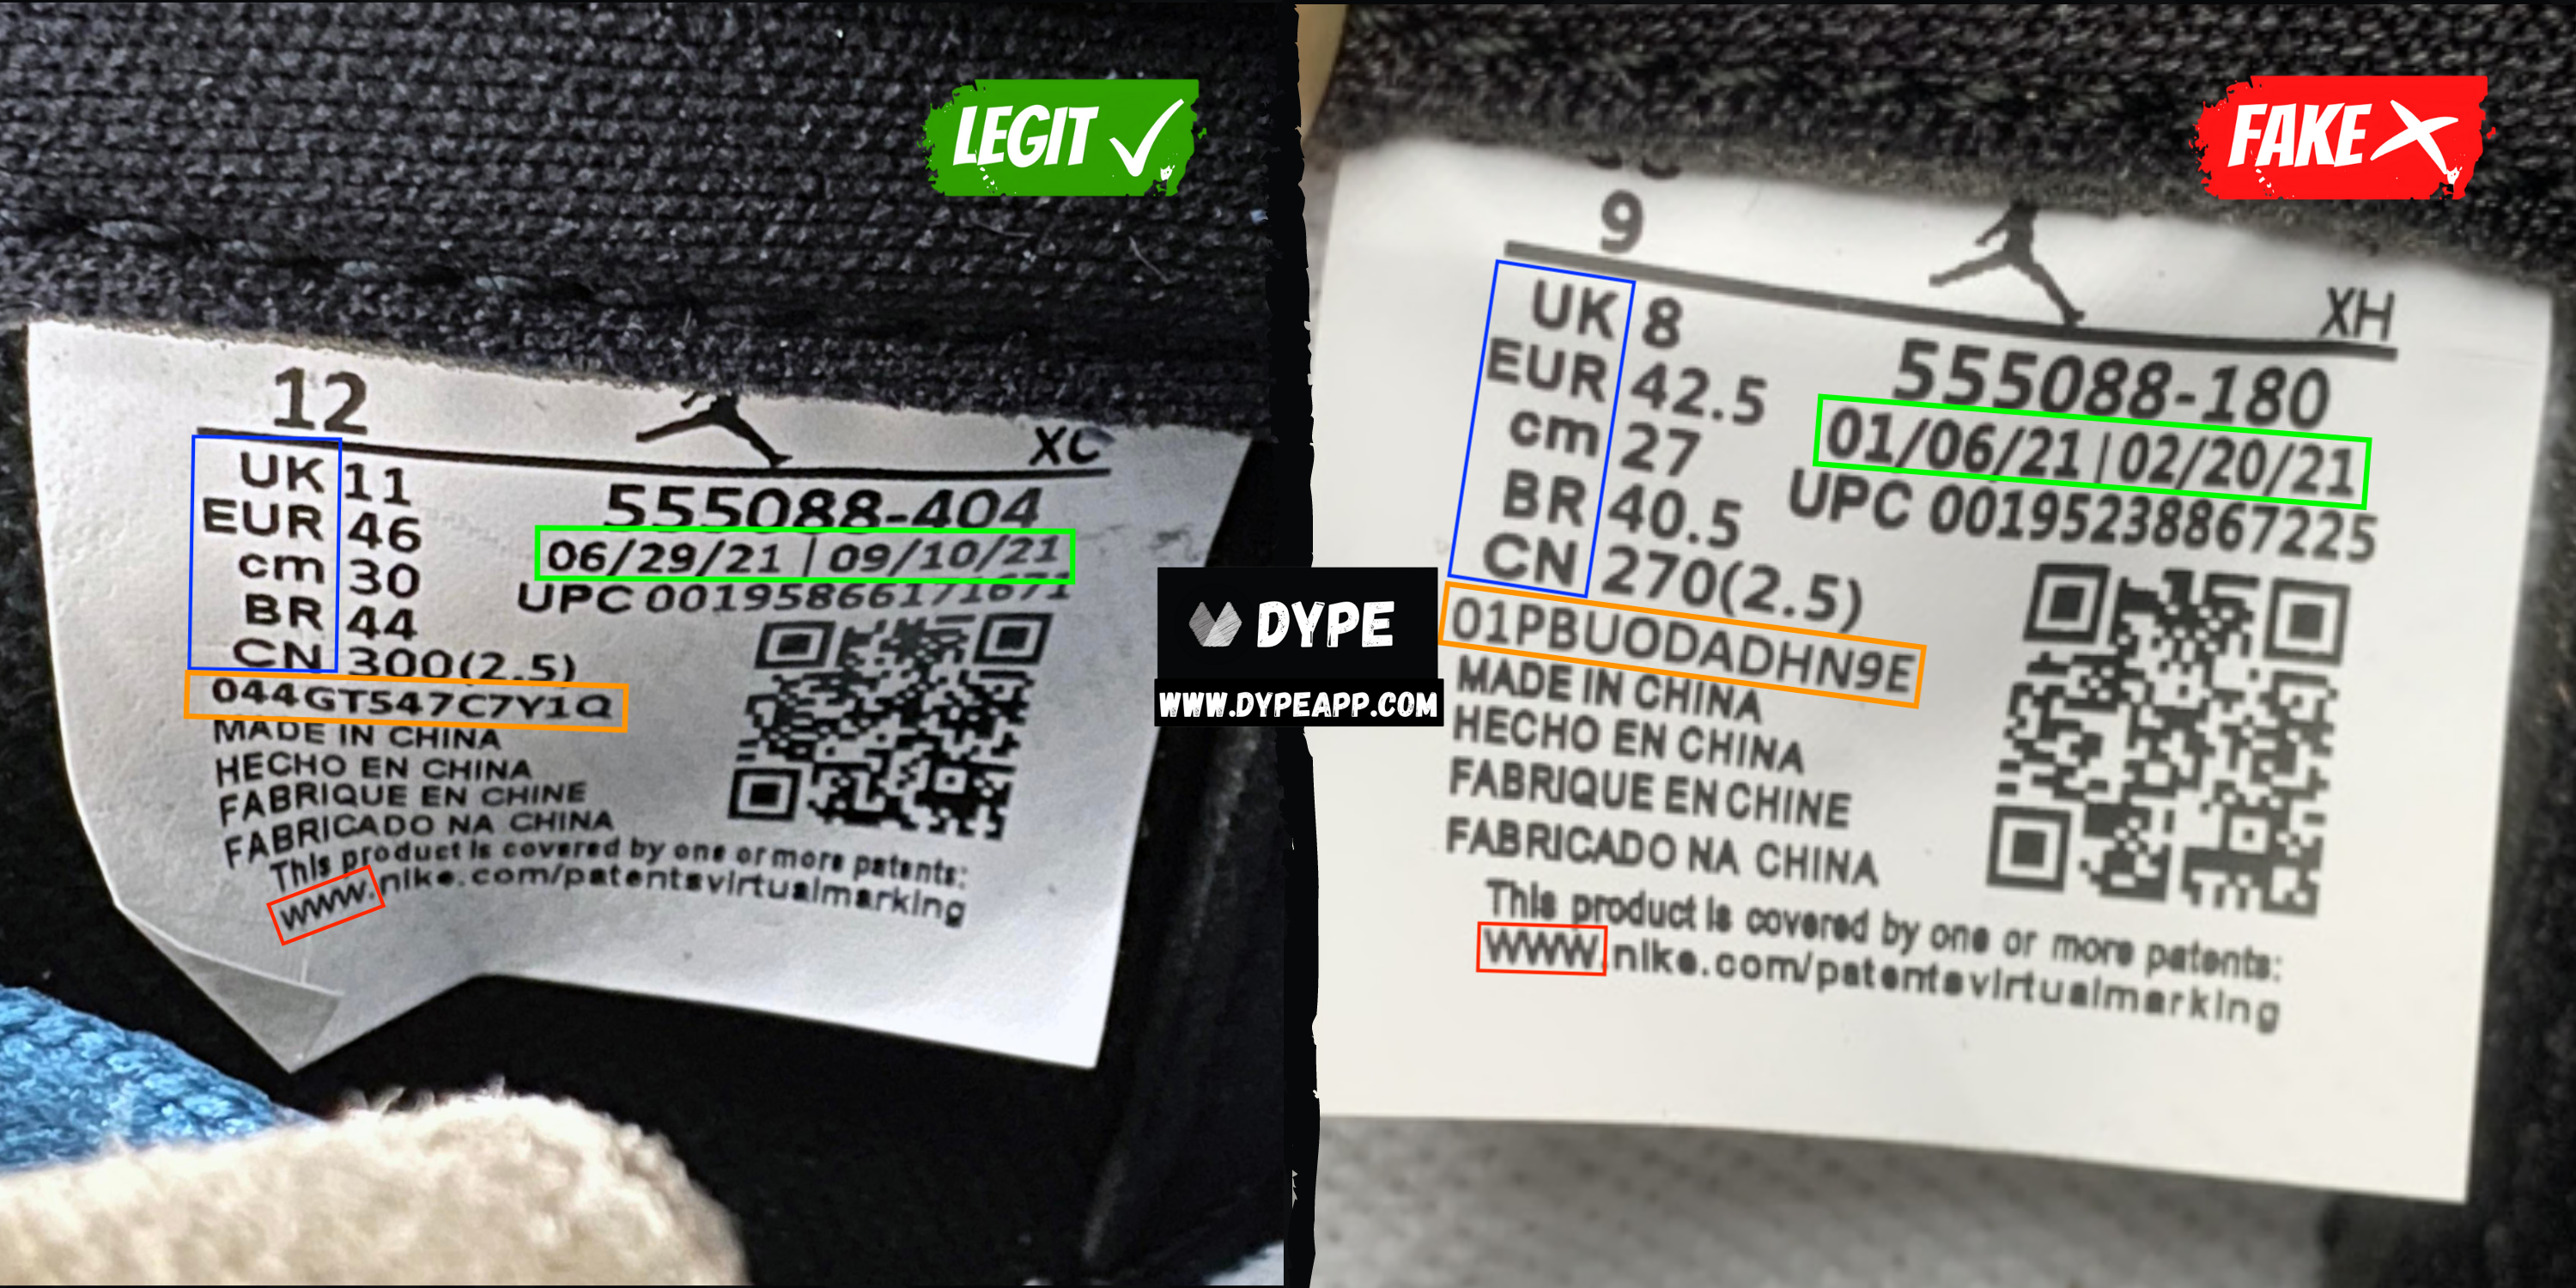
Here we see another example in which font bold/thickness is inconsistent amongst the replicas versus the retails. Here are some examples...
Denoted by the blue box. Here we can notice that the authentic size tag font is not bolded and quite thin. On the replica, the text is bolded and too thick relative to the retail.
Denoted by the green box. Here we can see the retail is thin and not bolded. However, on the fakes, it is bolded unnecessarily. This is especially noticeable if you compare the number "1" and "6".
Denoted by the orange box. Here we can notice on the retails, the text is bolded. Whereas on the fake Air Jordan 1 tags, the font is regular and quite thin.
Denoted by the red box. Here we can notice the relative size difference of the "WWW" between the legit and fake size tags. On the authentic, the "w" is rather small and looks lowercased. However, on the fake it's big and looks uppercased.
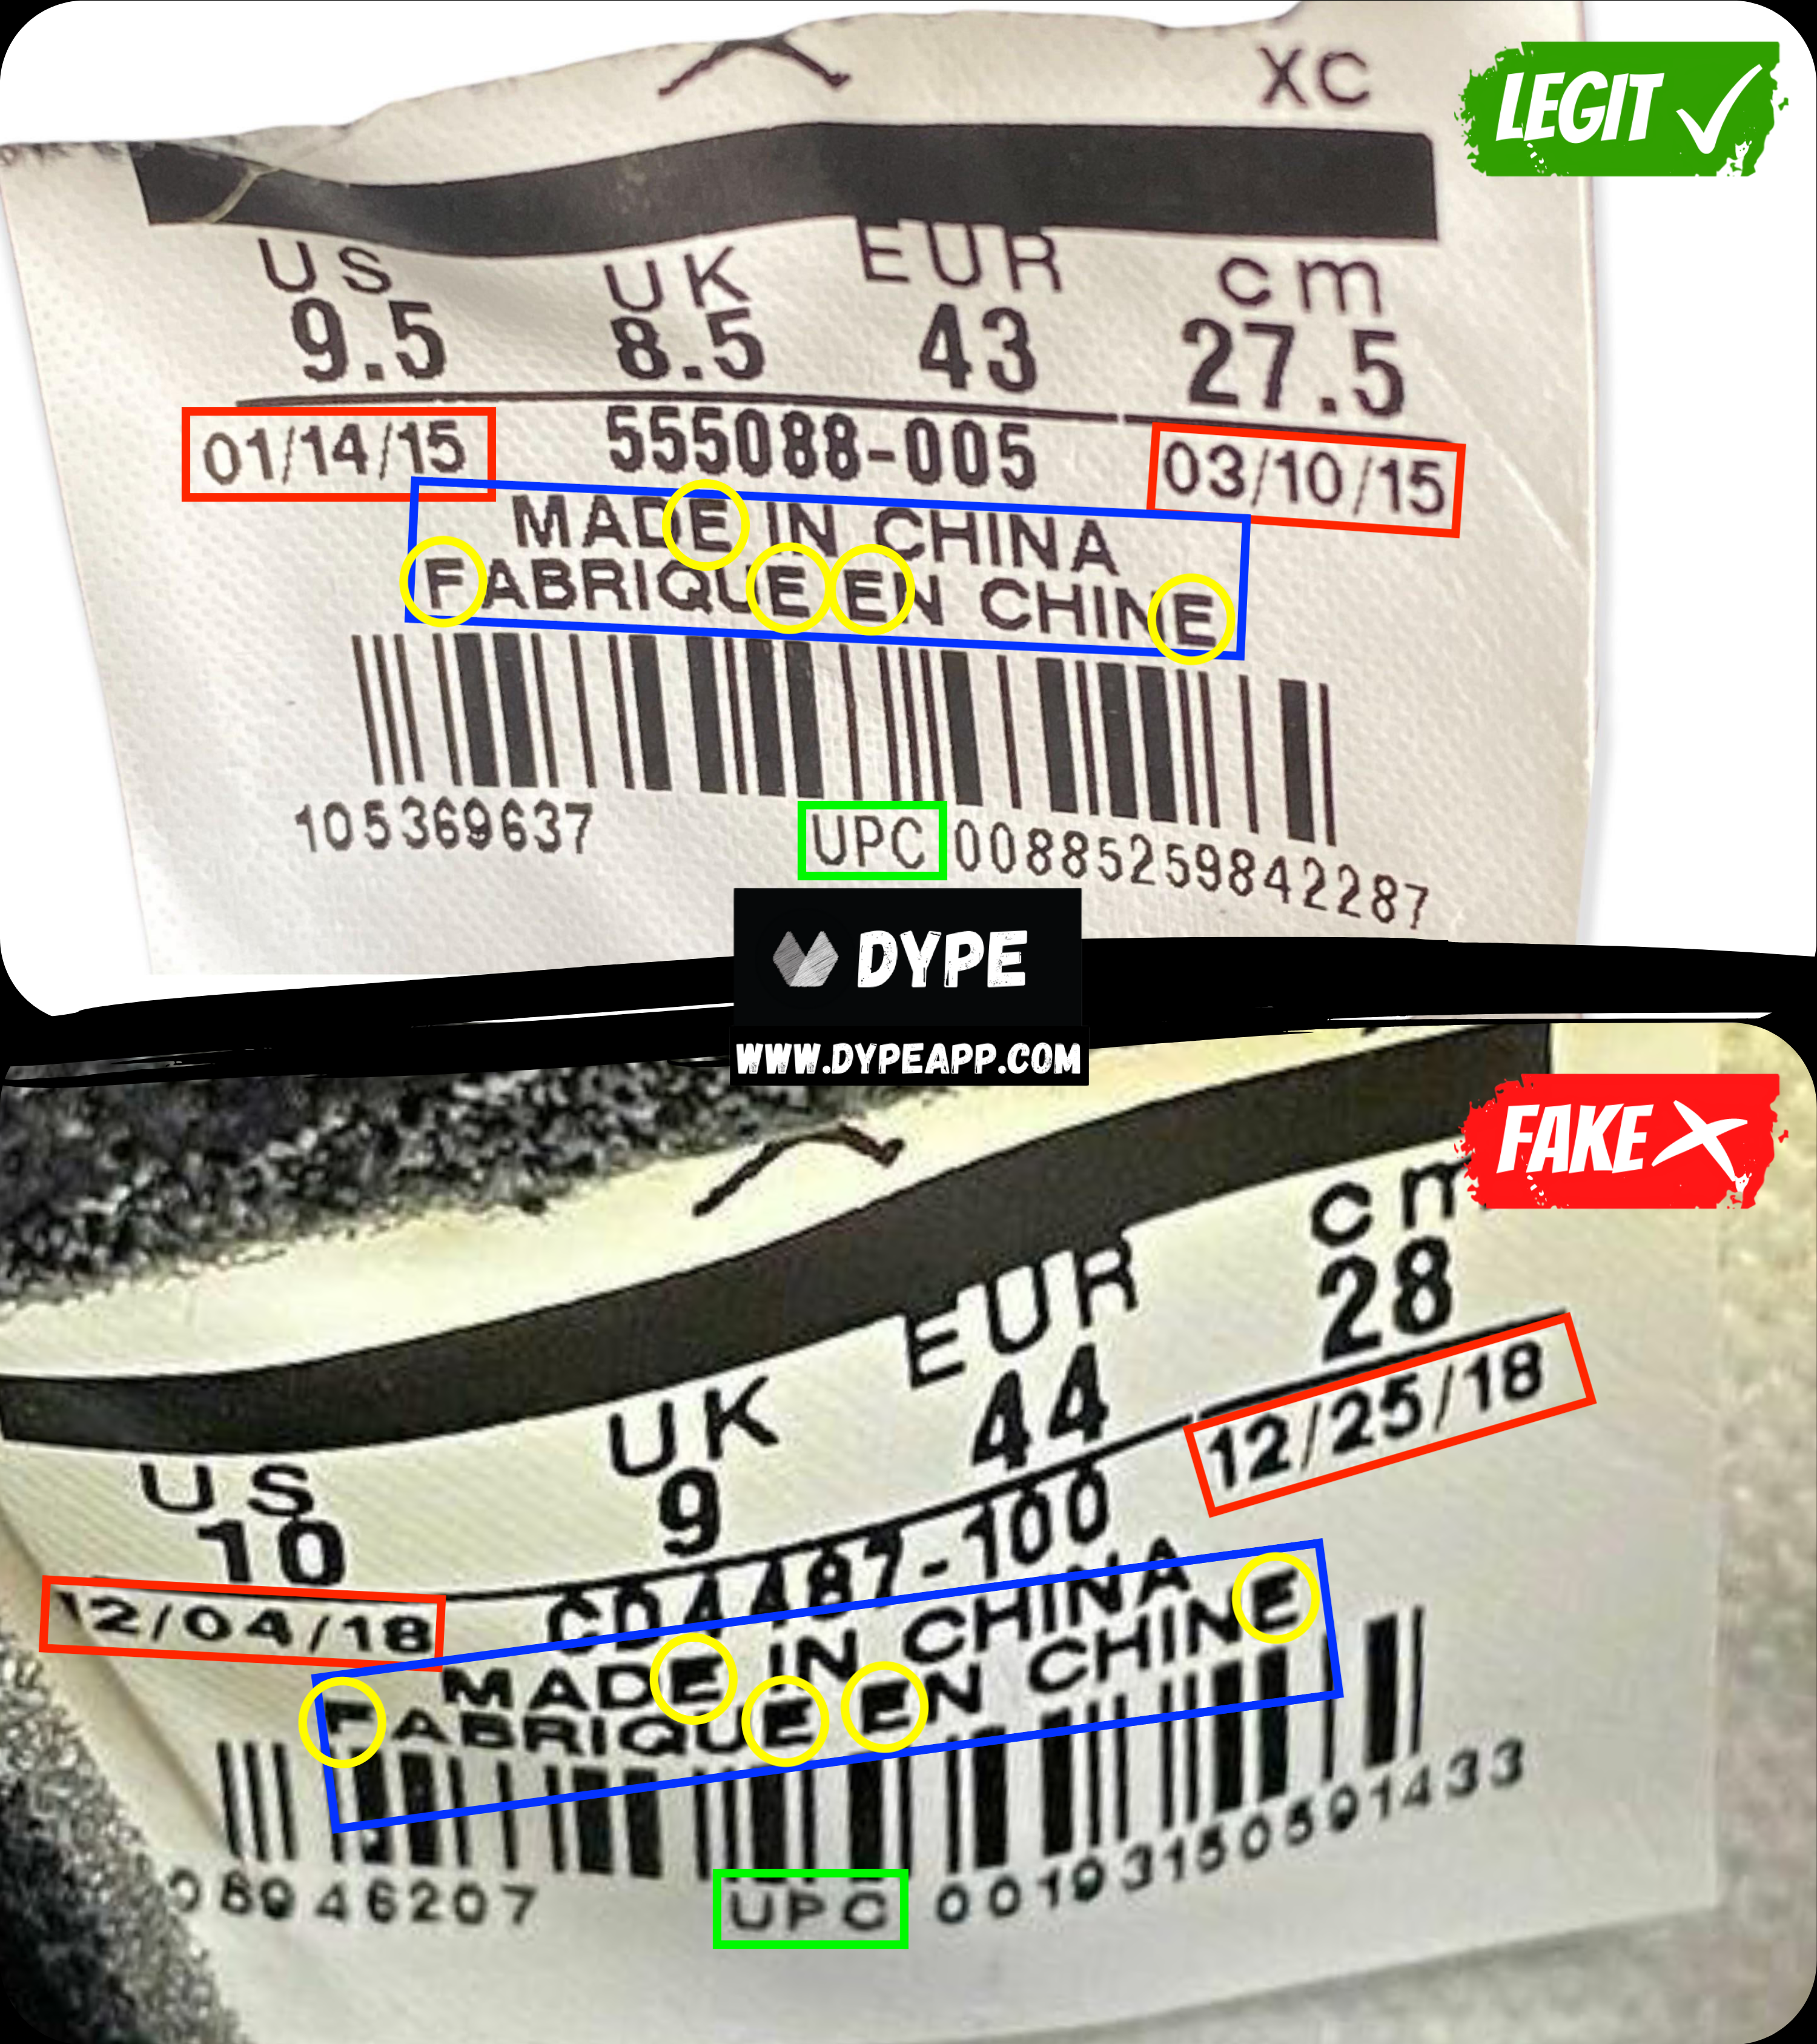
Here we see an example with the other type of size tag on the Air Jordan 1s.
Denoted by the 2 red boxes. We can see on the authentic tag, the font is thin/slim. However on the replica tag, it is quite bold/thick and way too big.
Denoted by the blue box. Here we can notice that the entire text is slim and thin on the legit size tags. Whereas, the fake ones are bolded and also sloppy. This is most prominent on the letter "E" and "F", which is all denoted by the yellow circles. The "arms" of the letter "E" and "F" come into contact with each other making it look smudged.
Denoted by the green box. On the authentic size tag, you can see the height difference of the letter "UPC" compared to the fakes. The fakes have the "UPC" text short/condensed, which makes it look like a completely different font.
Box Label
Next, let's take a look at box label on the Air Jordan 1s. There are many variations of Nike box labels over the years. For your satisfaction and convenience, we'll show you 3 variations. We'll be looking at the text consistencies in thickness and spacing.
For the most part, top tier fake box labels have gotten nearly impeccable relative to the retail box labels. So looking for these differences is quite challenging without a retail on hand. In order to spot these differences you're going to need to need extremely good eyes. This is due to how easy it is to simply copy paste labels.
You'll have an easier time distinguishing differences on lower or medium tier counterfeit Air Jordan 1s.
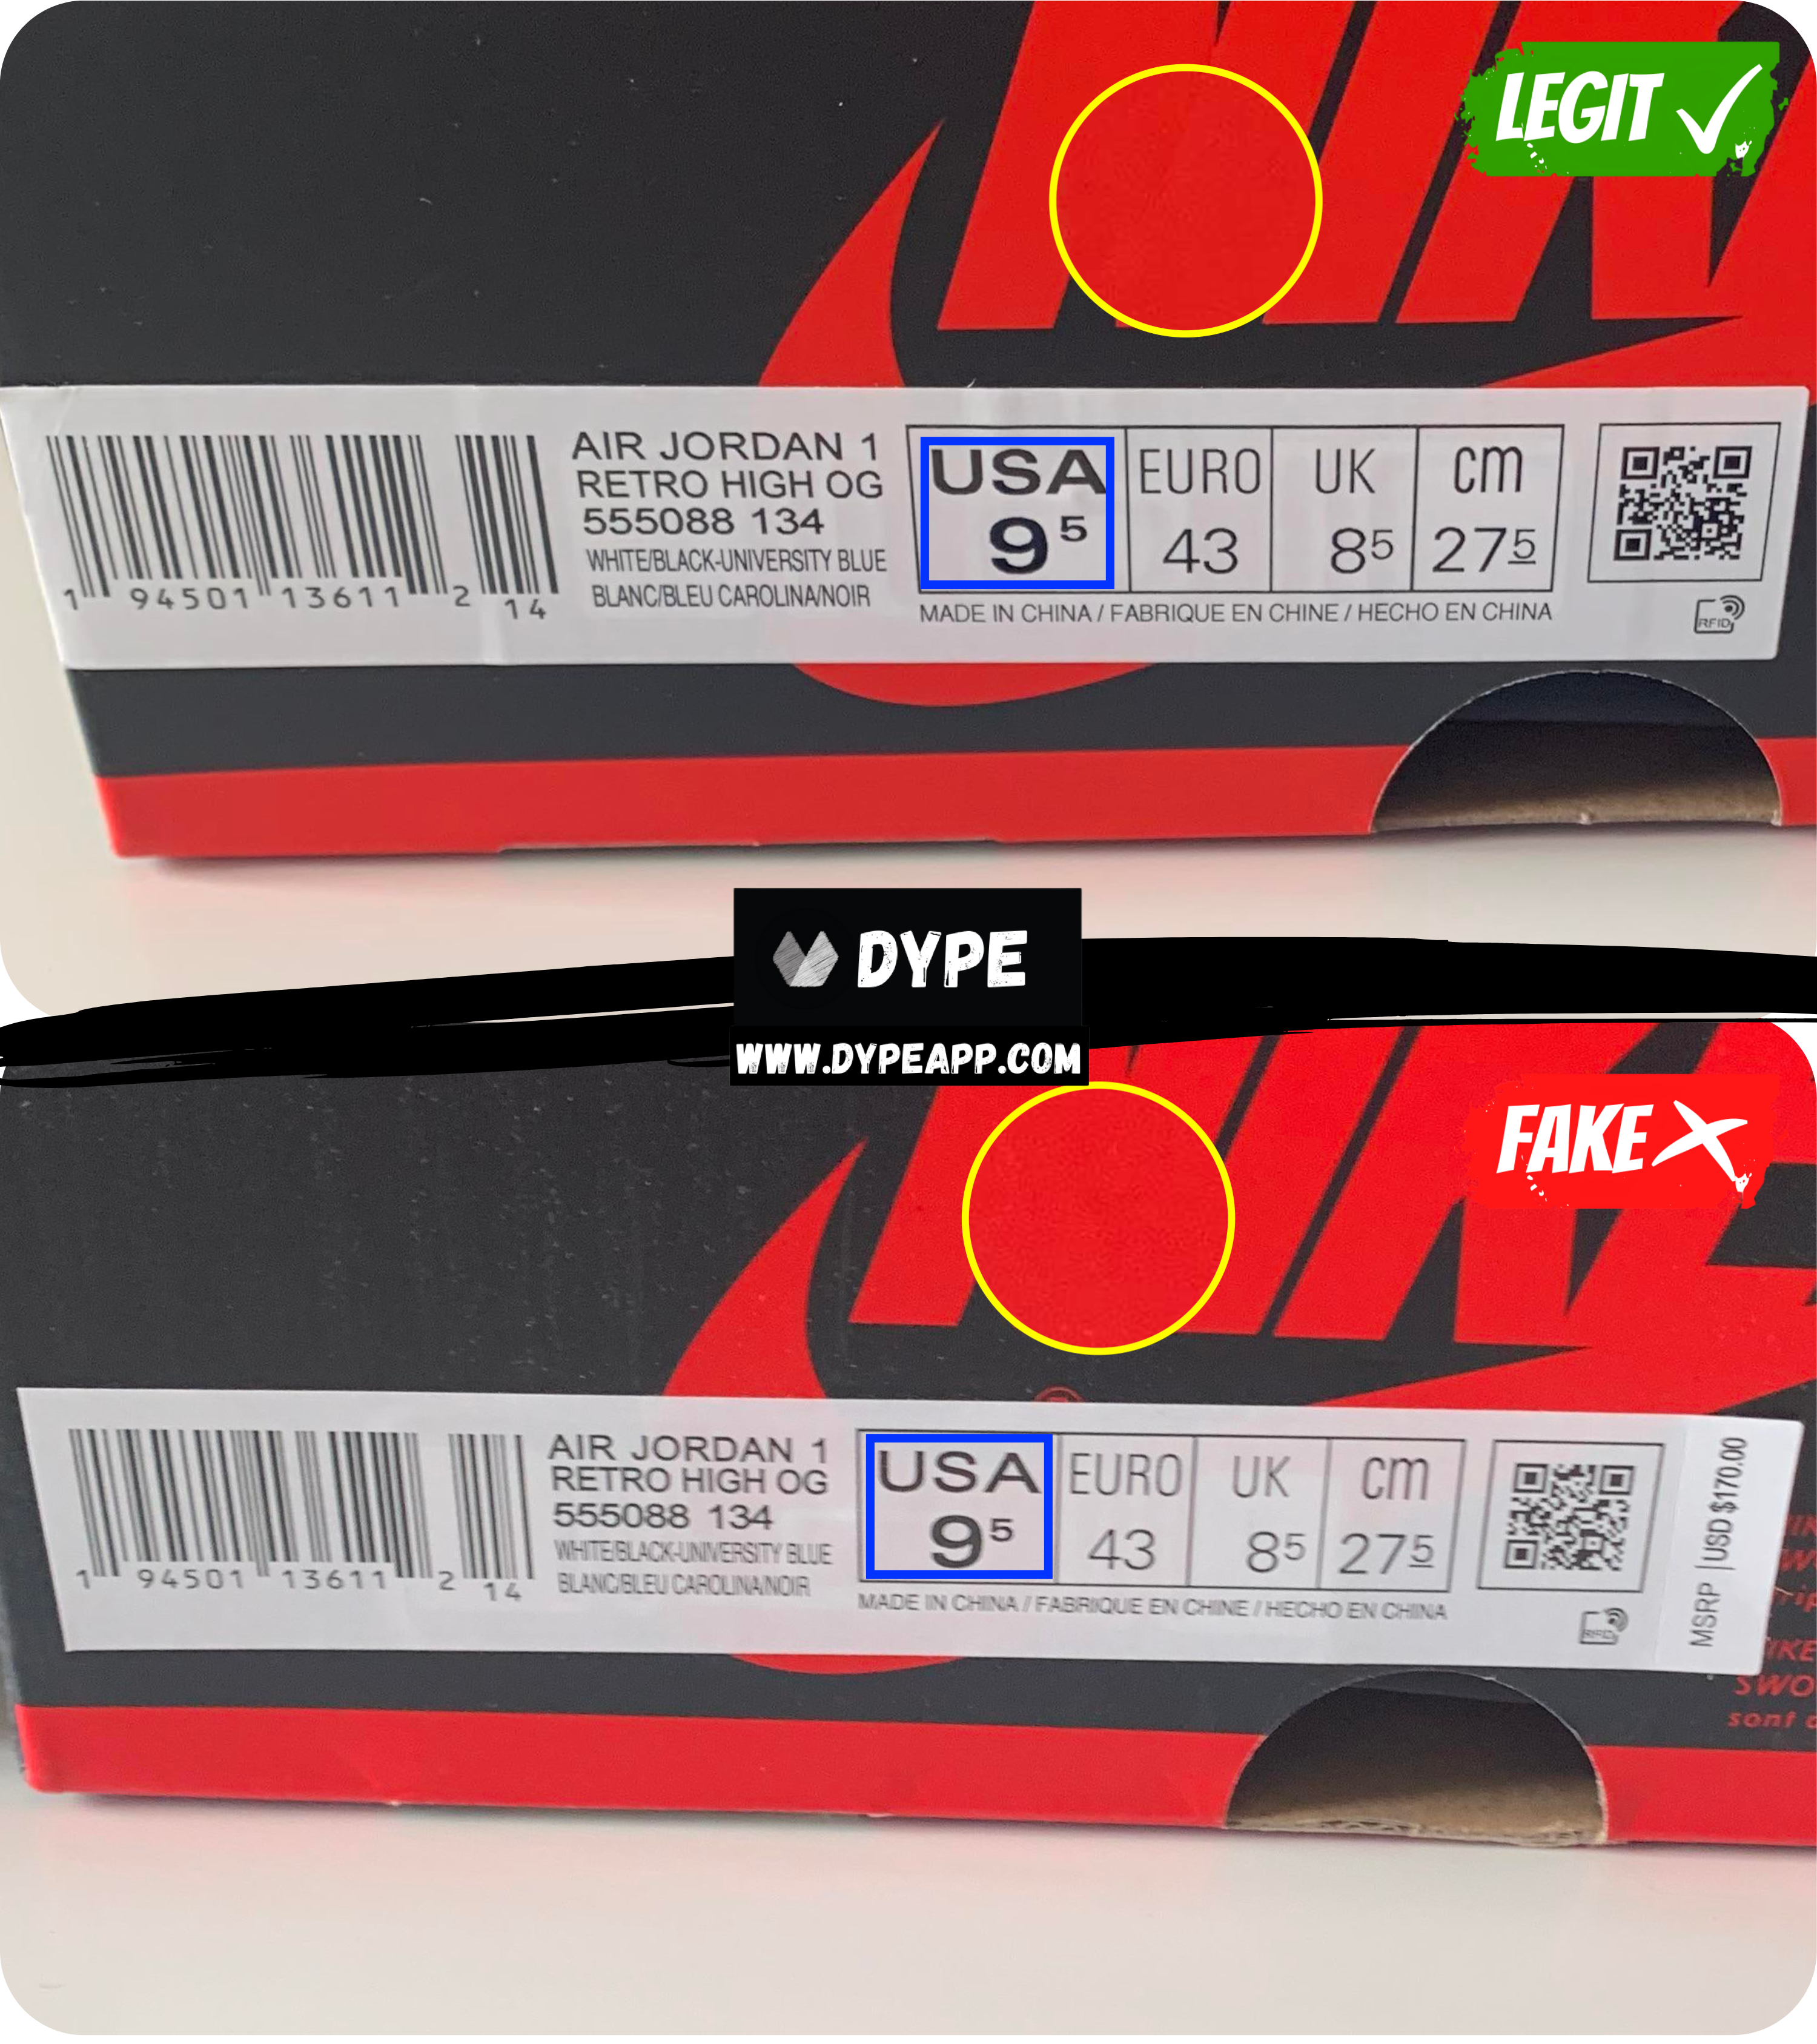
Take a look at the authentic and fake box labels of the Air Jordan 1s in the image above. Right off the bat, you won't be able to spot any obvious differences, and I don't blame you. But look at the blue box highlight. On the retail label, we can see the font weight of "USA" an "95" is ever so slightly much bolder than on the fake labels.
Denoted by the yellow circle. Another very slight difference if you squint enough, is the different shade of red being used. On the replica box, it is a bit brighter and more vibrant compared to the retail box. Keep in mind lighting will change your color perception. However the lighting in the image above is the same. The color difference is typically only noticeable when an authentic box is in hand.
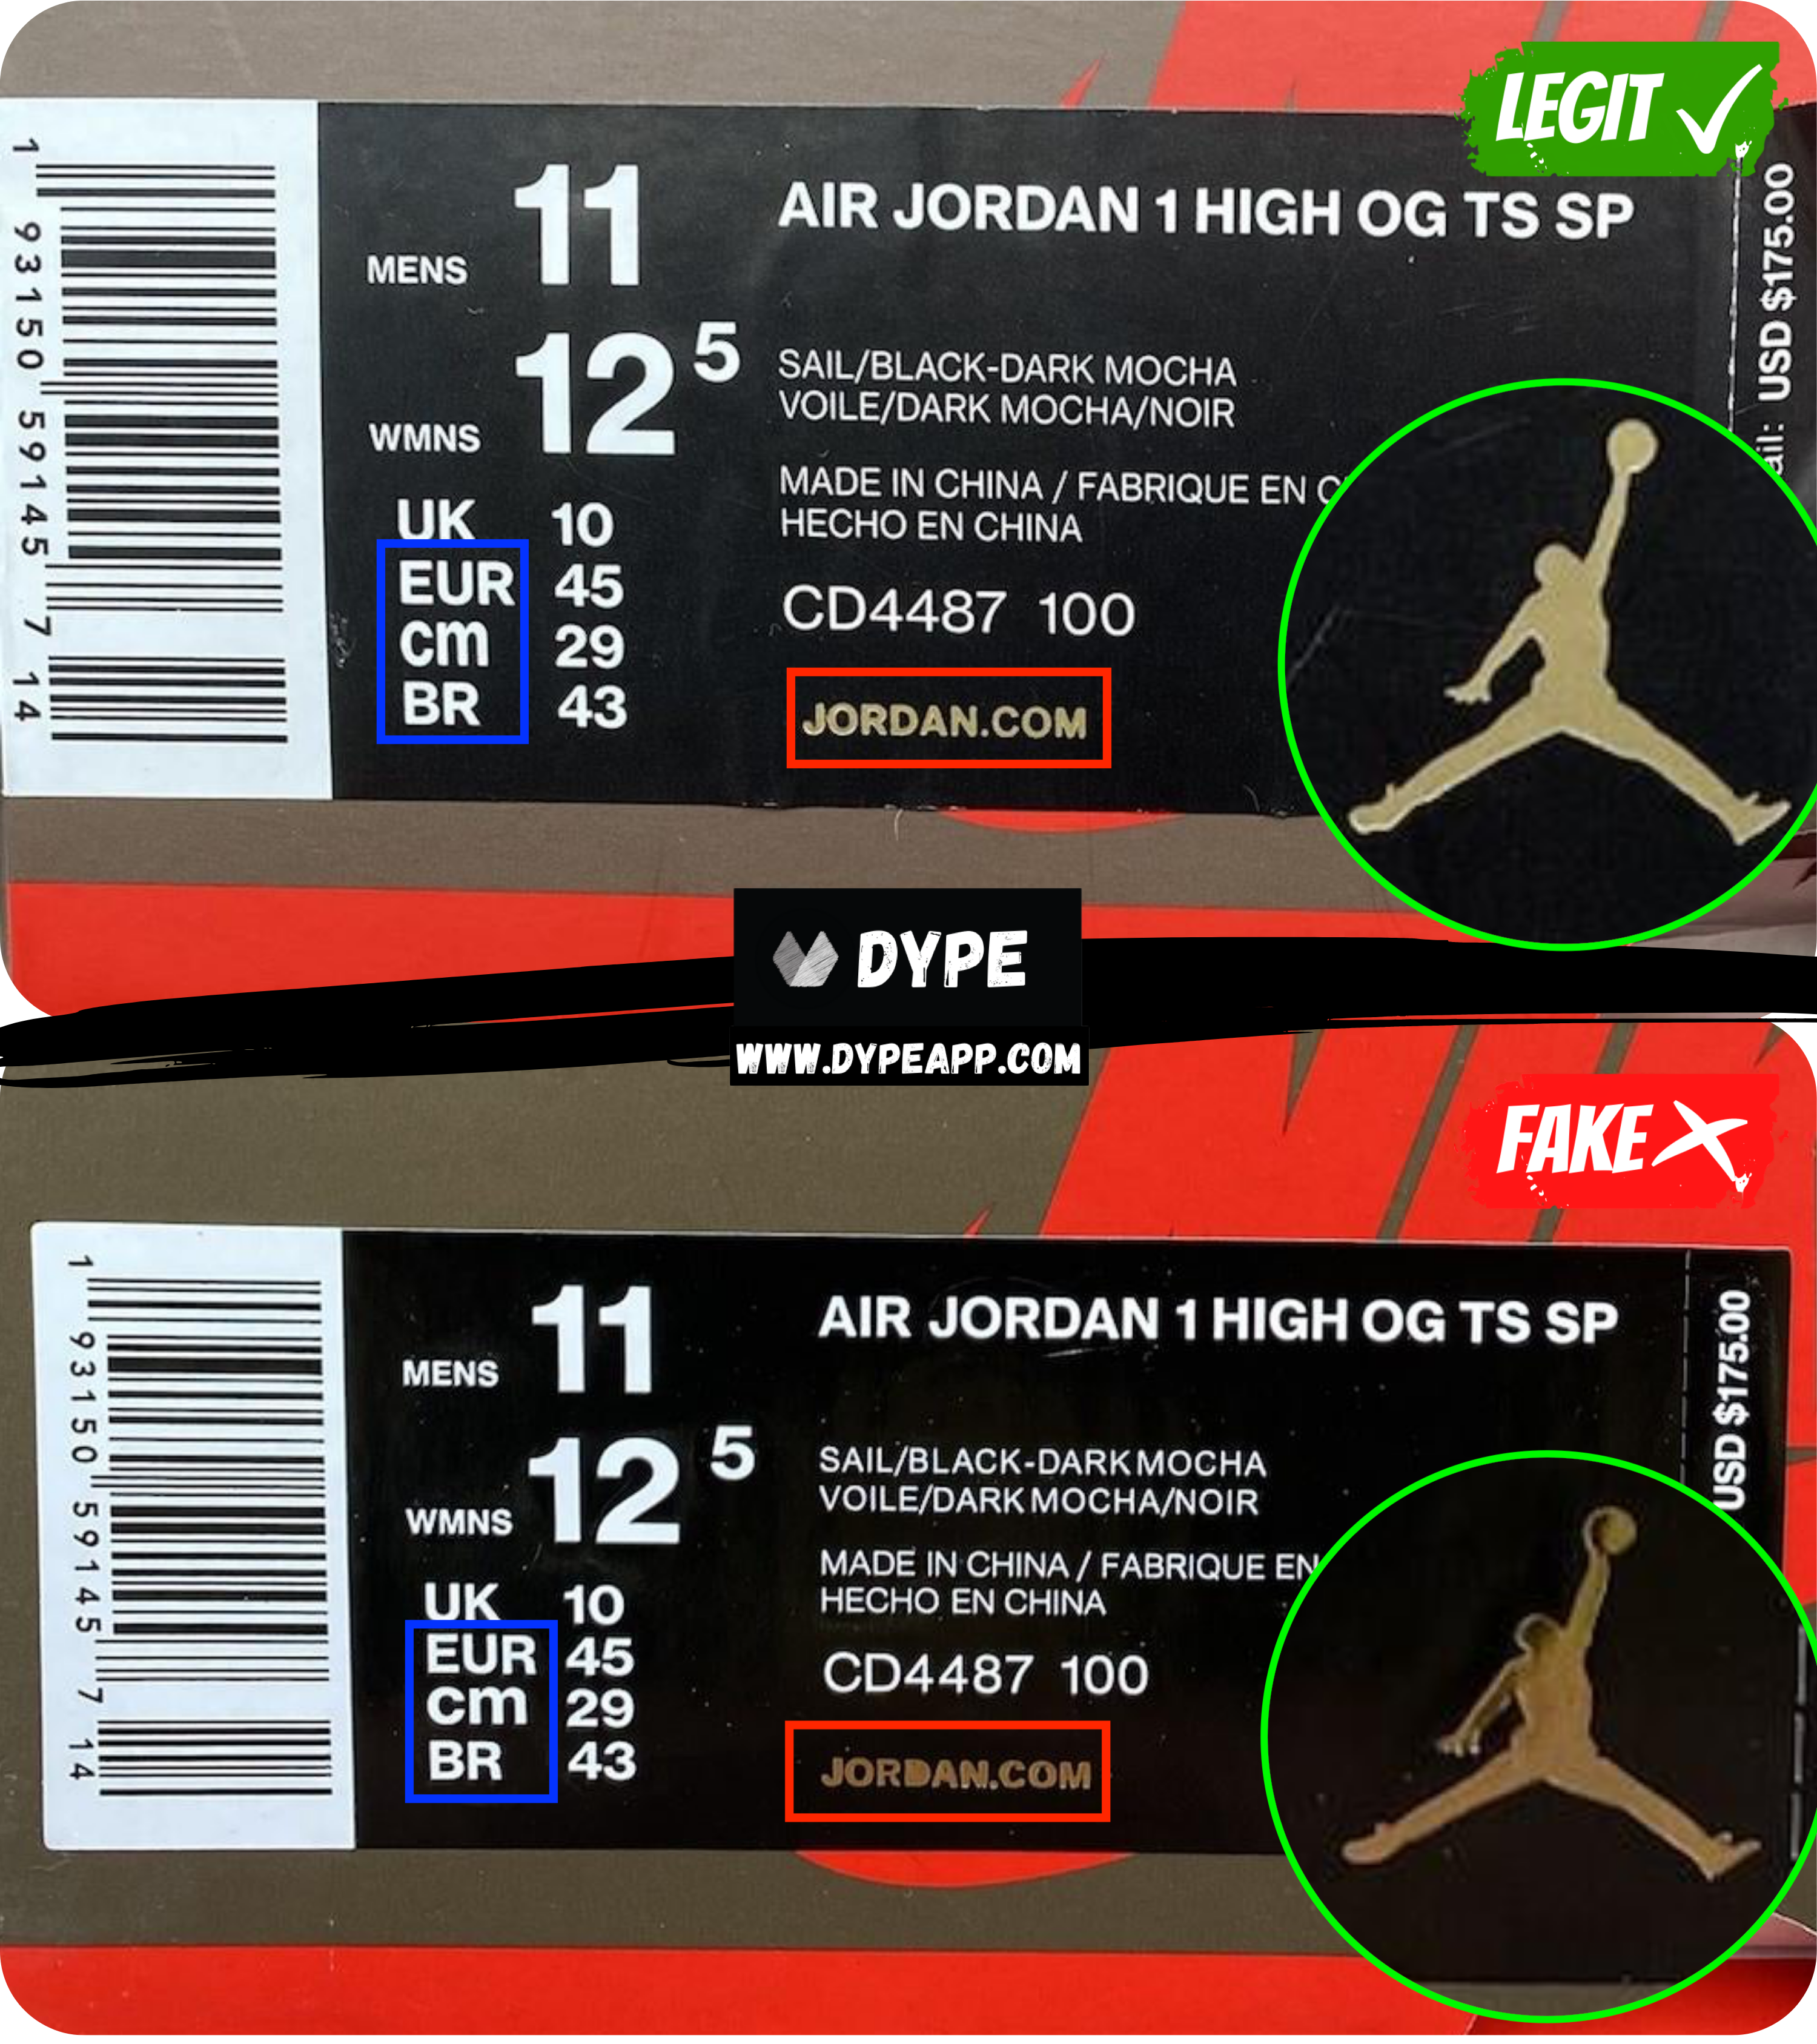
Denoted by the blue box. Here you'll notice the difference in the boldness and font of the text "cm". On the authentic box label, the "cm" is much thinner than on the replica label. You can notice this a bit more when you compare the length of it relative to "EUR" and "BR" above and below it. On the legit one, you can see how "cm" and "BR" is relatively the same length. Whereas in the fake, "cm" is much lengthier than "BR".
Denoted by the red box. Here is a more obvious flaw on the replica label. There's 2 main flaws that stand out here. First the coloring is more bronze on the fake than it is gold like on the retail. Second, the "D" is completely filled and has no hole between it on the fake.
Denoted by the green circle. Here we can see the same problem with the color difference on the legit versus fake label. The replica is bronze, while the retail is golden.
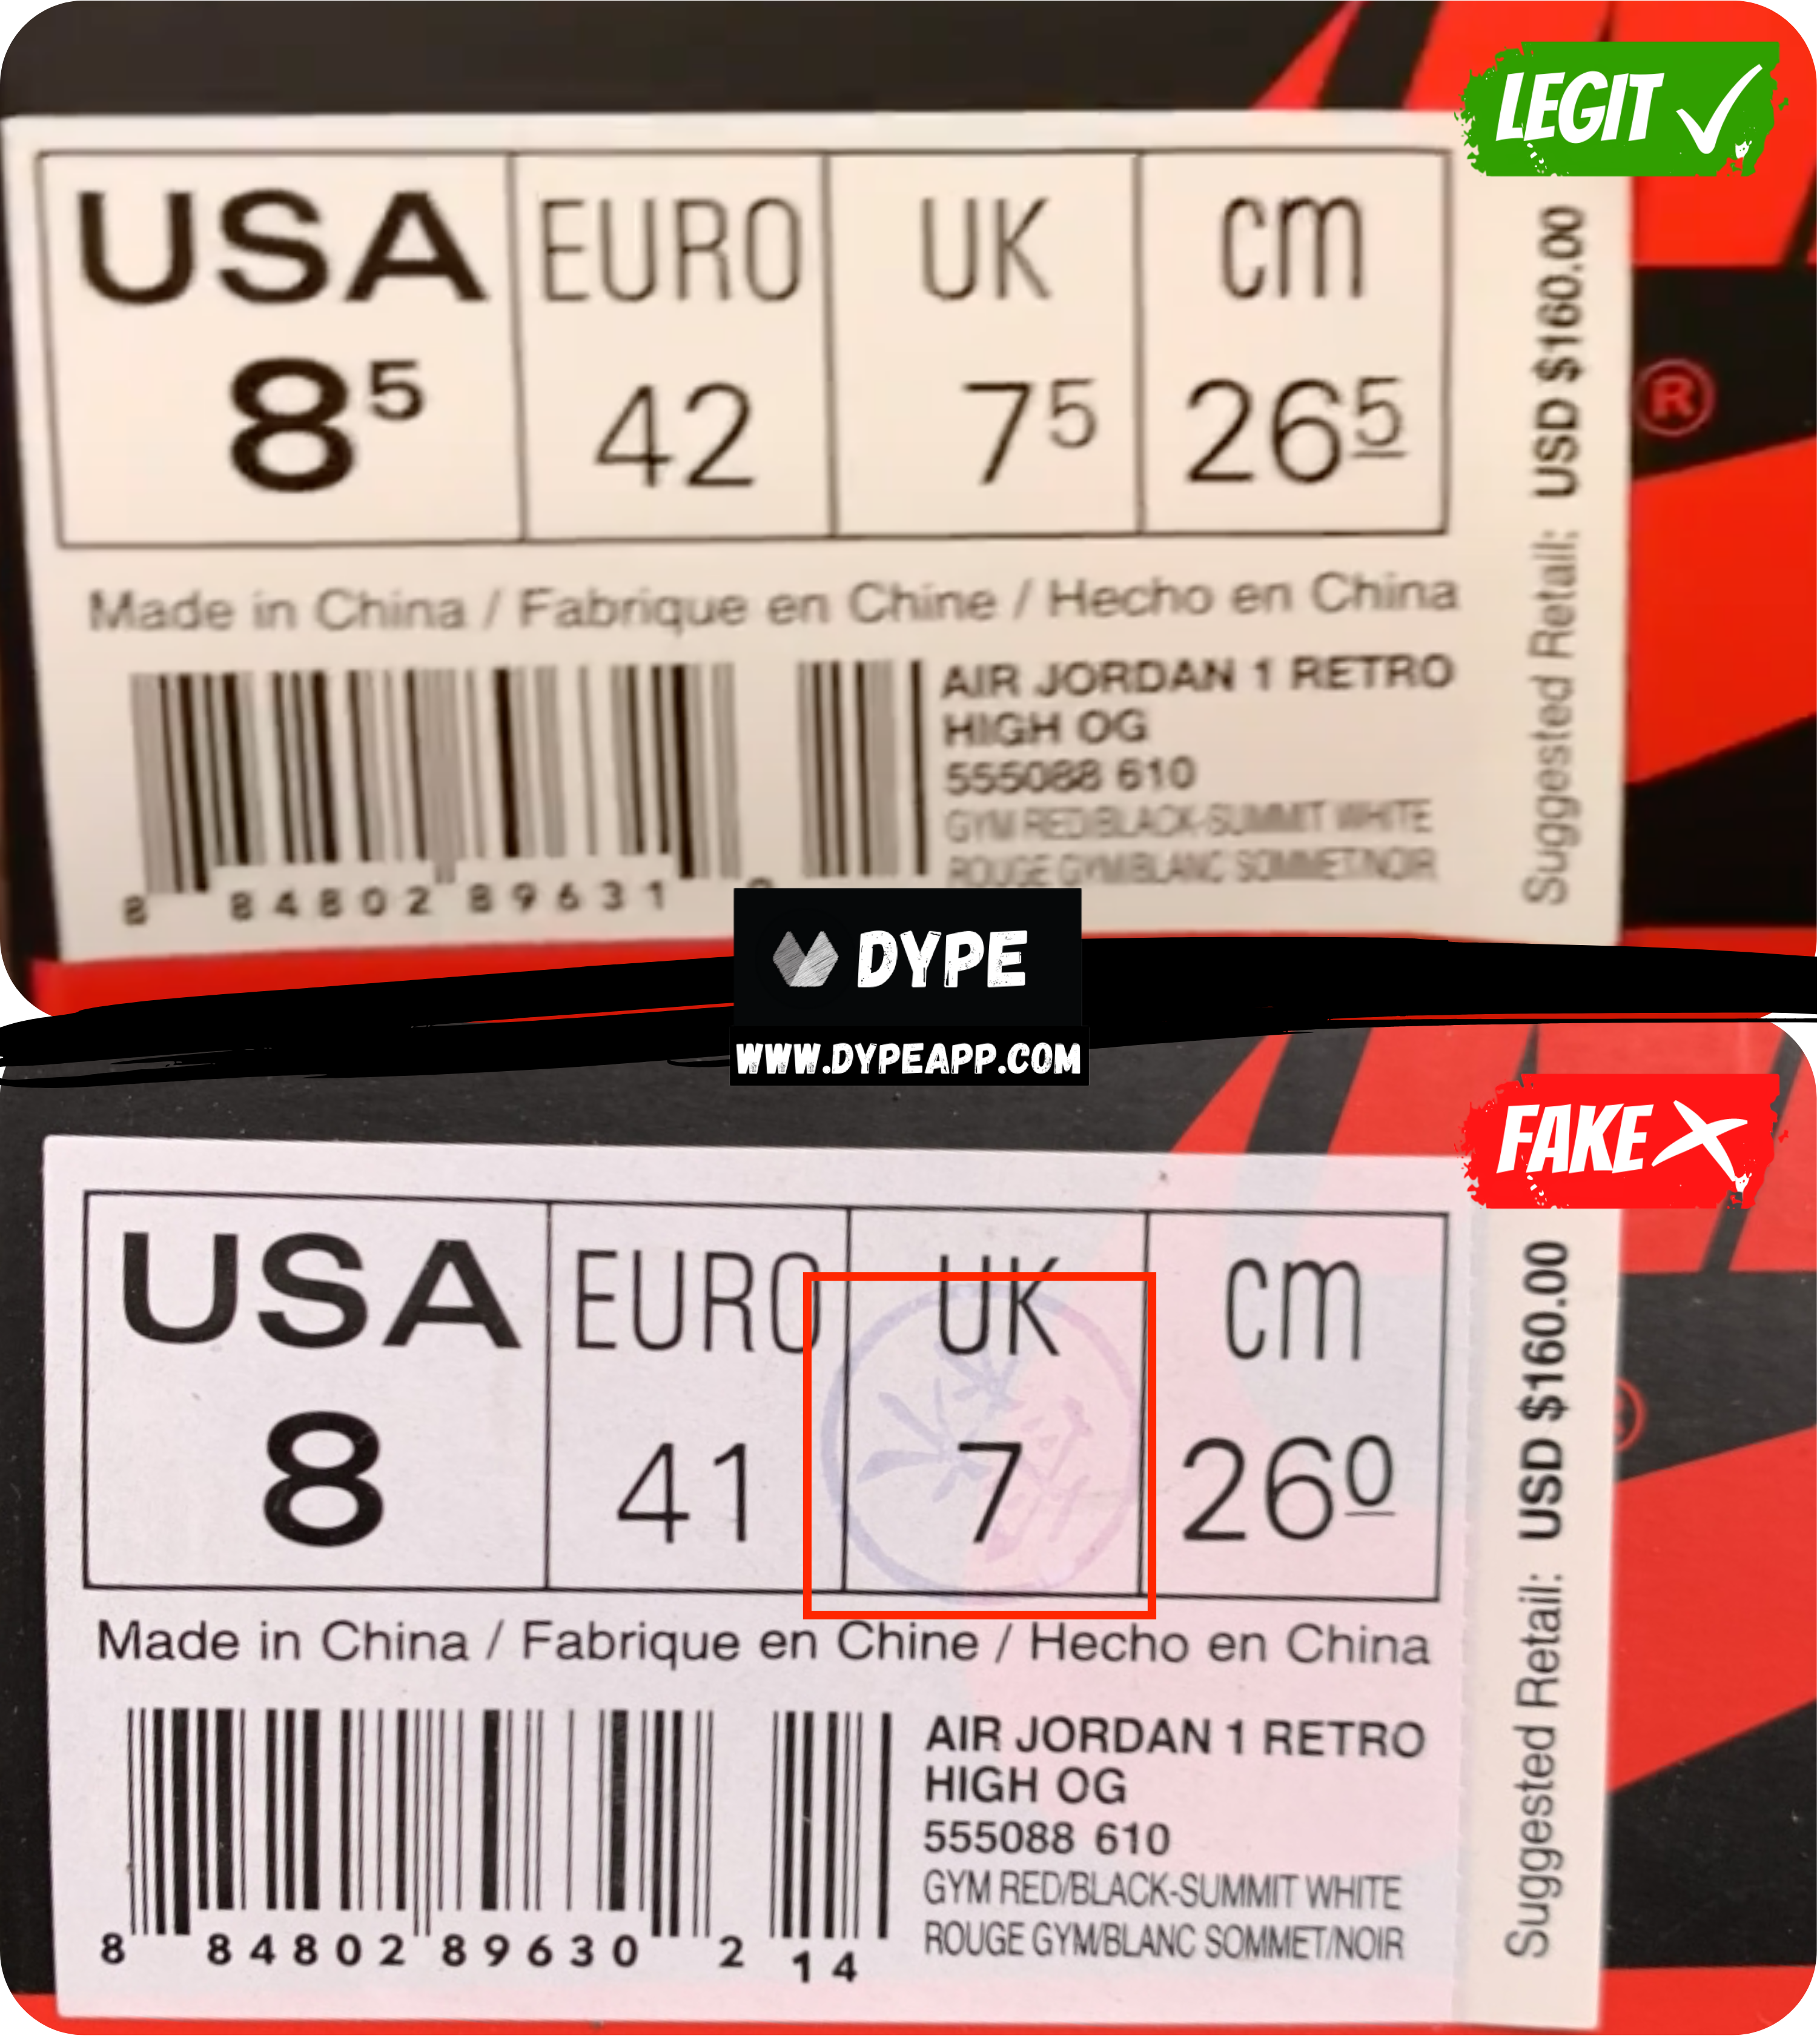
In this example, the counterfeit manufacturers got the box label pretty much spot on in text thickness and spacing. However all that, just for it to be ruined by the obvious chinese character stamp. These stamps on fake Air Jordan 1s are usually done in invisible ink that is visible by a UV light source. However, in this case we can see it quite well.
Shoe Tree
Next, we'll take a look at the cardboard shoe tree inside the Air Jordan 1s. This is for deadstock or new condition pairs, where maybe you'd still have it laying around. The shoe tree used inside authentic Air Jordan 1s are usually all identical.
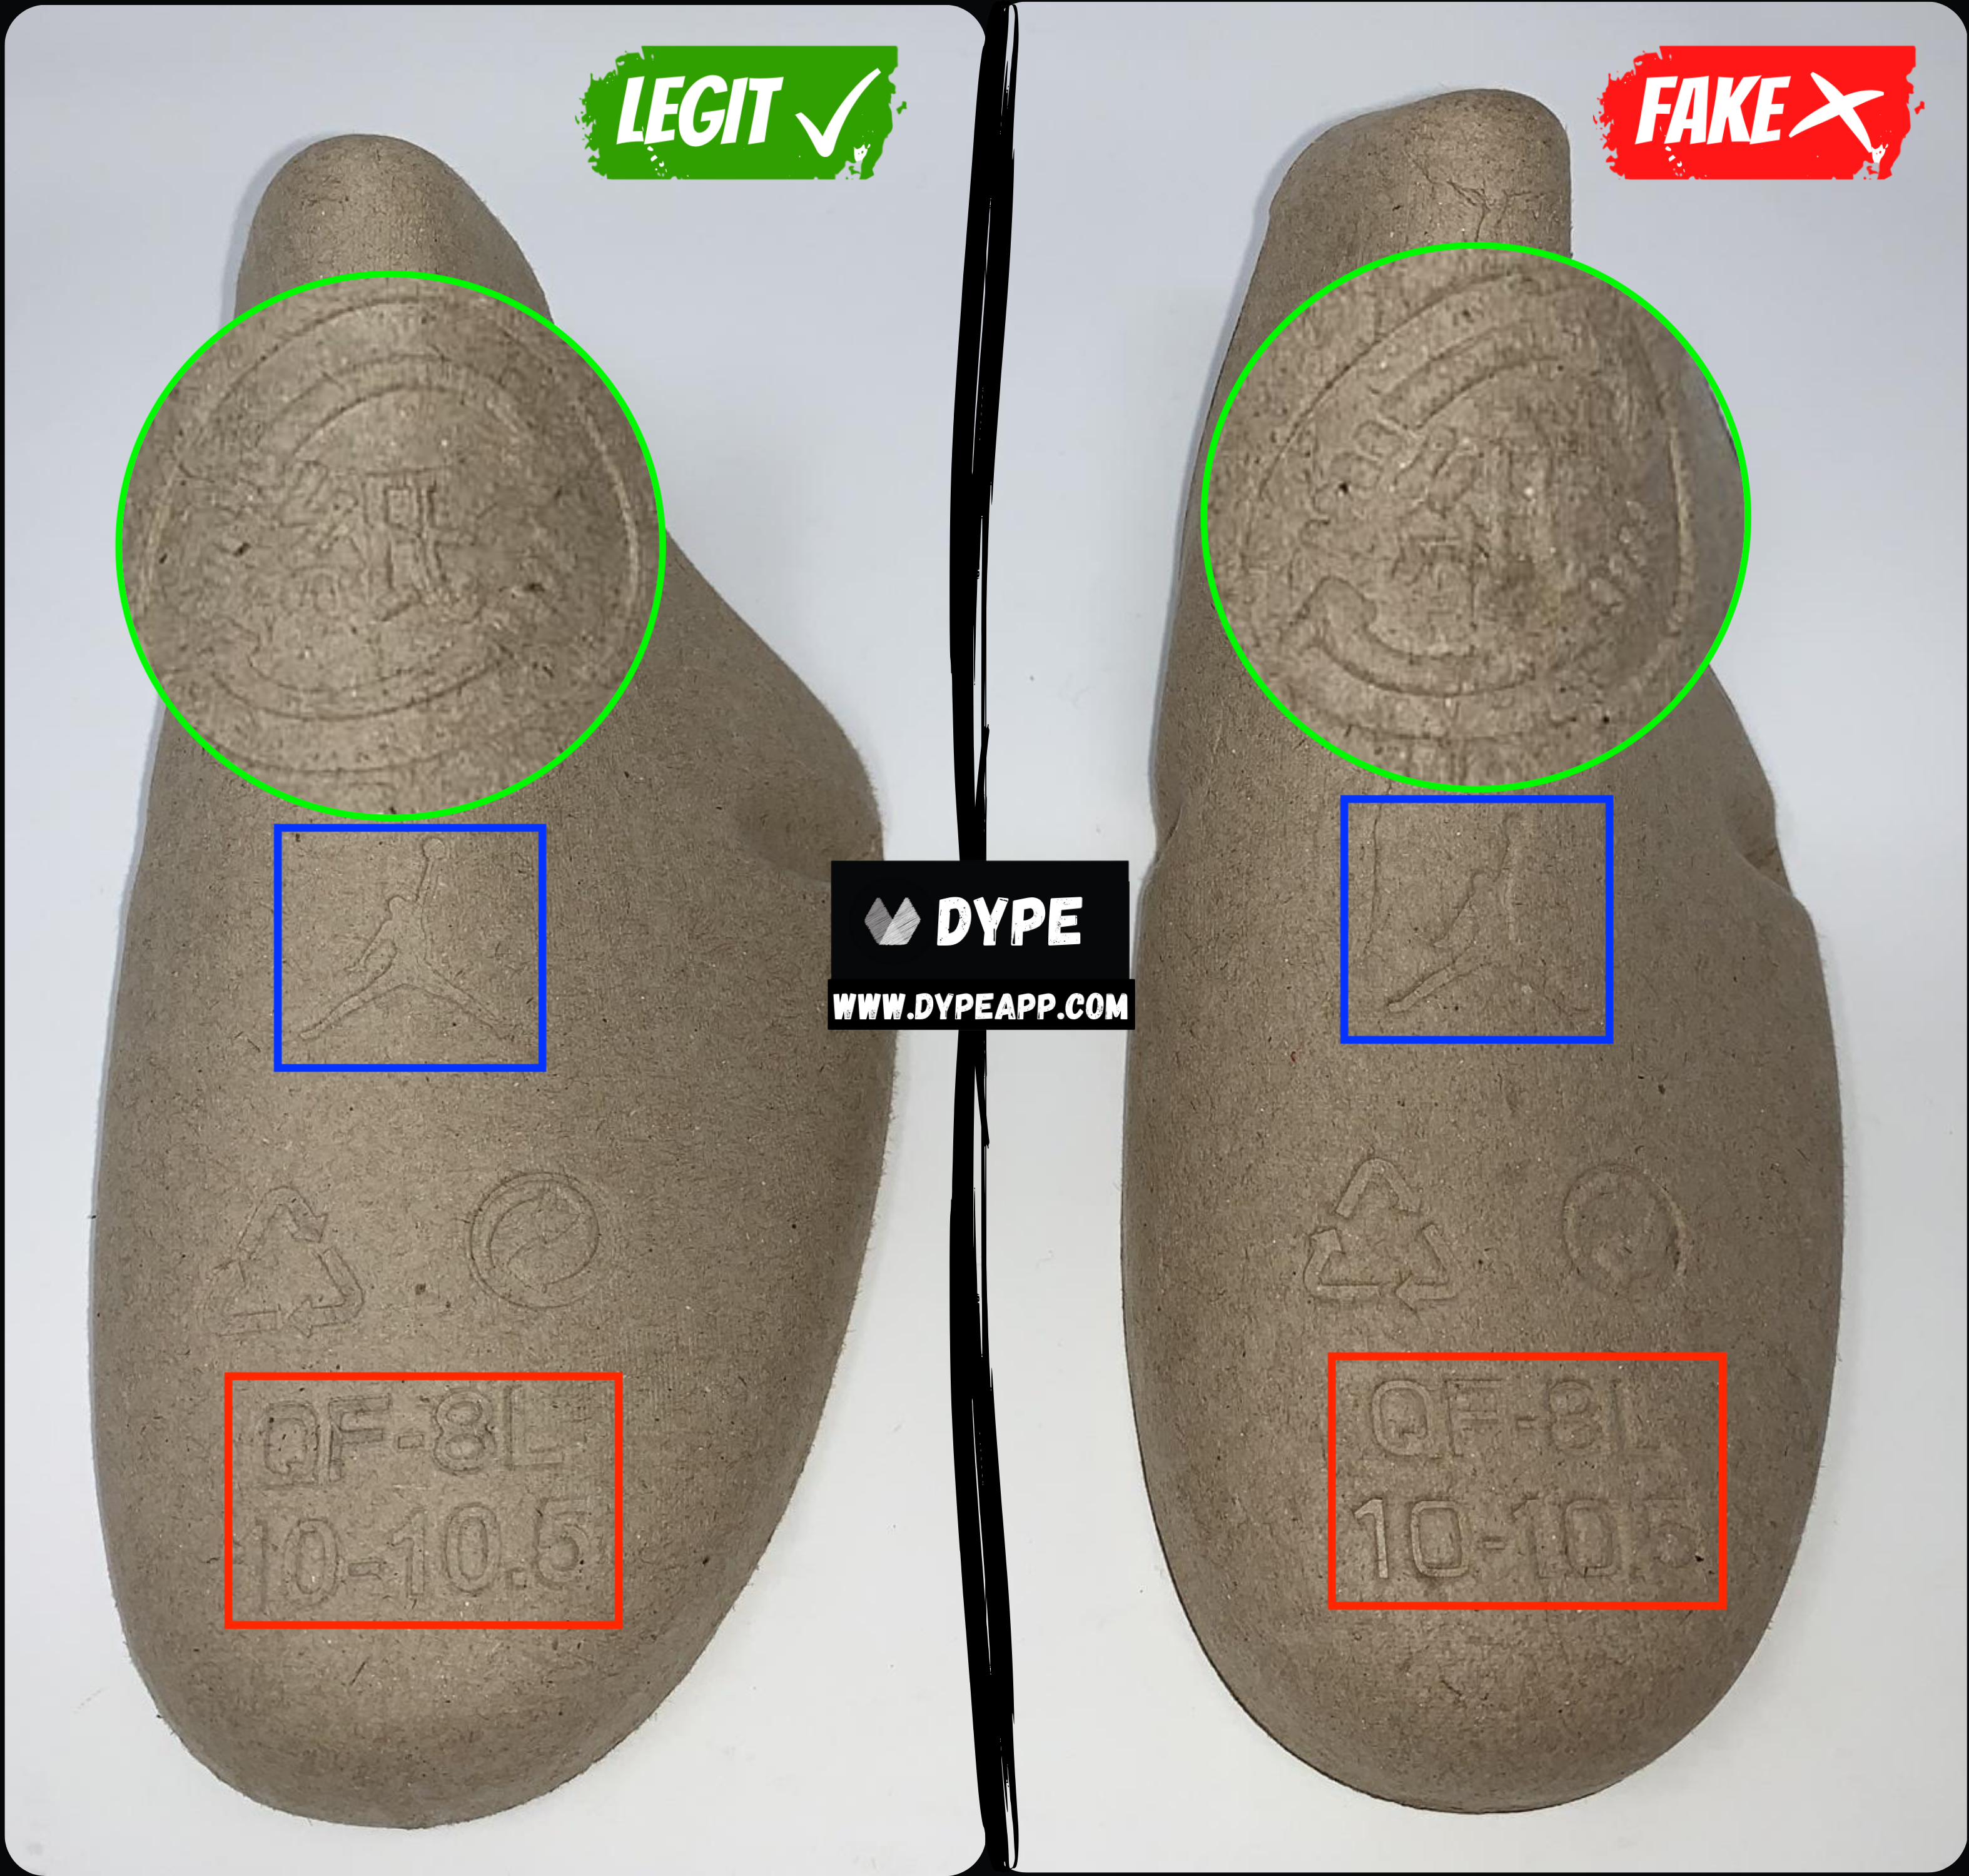
The first obvious flaw we can point out is the difference in the width of the shoe tree on the authentic and the replica. The authentic one is clearly wider, whereas the fakes are more narrow.
Denoted by the green circle. We can see on the legit shoe tree that the imprint made on the cardboard is completely different than on the fakes.
Denoted by the blue box. The Air Jordan logo imprinted on the legit shoe tree is much sharper and also thinner than the replica imprint.
Denoted by the red box. You can notice the difference in the font being used on the retail versus the fake. The legit one has a thicker font. It's more prominent in the differences if you look at the number "0". The authentic one is round and circular, while the fake is angular and boxy. This can also be said for the other letters.
UV Light
Finally, to tie it all up. This final step is optional only for people who have a UV light source. Turn off all external lights, and shine your UV light on the Air Jordan 1 and the box itself. Your goal is to look for any marks, stamps, or liquid/glue stains.
NOTE: Some very bad quality retail Air Jordan 1s will have noticeable glue stains at times. However, stamps/marks should NEVER be on the authentic pairs.
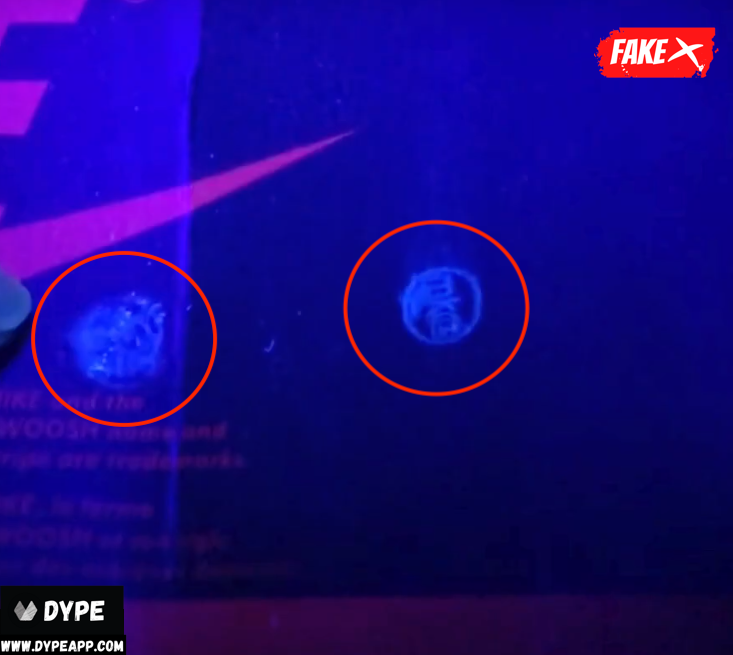
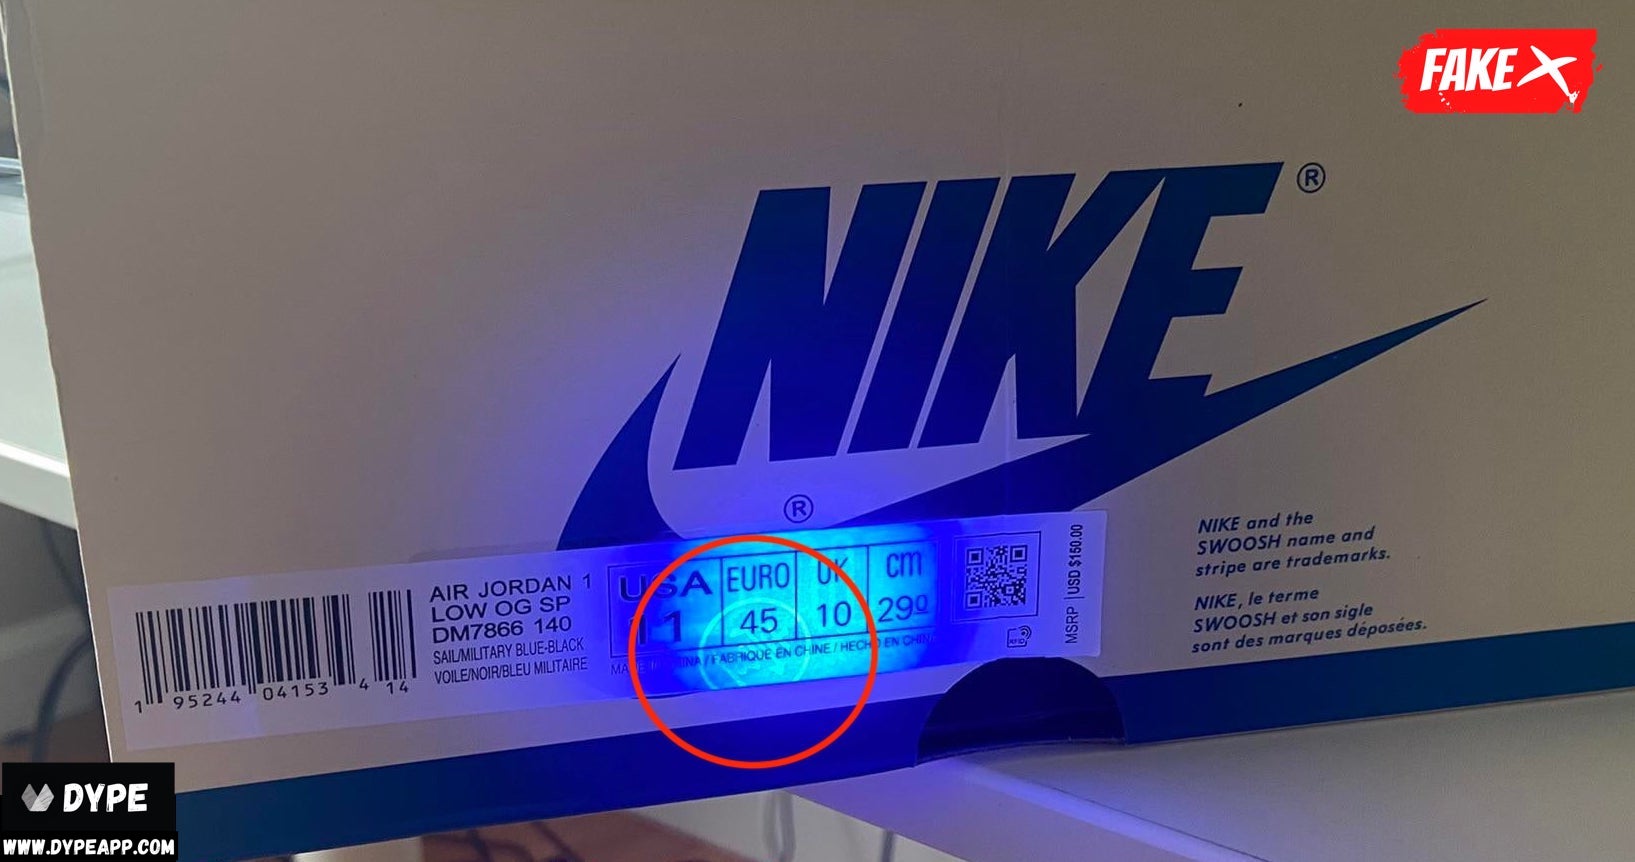
Above are some examples and indicators you're trying to look for. Authentic Air Jordan 1s should be completely mark or stamp free on the shoe itself and the box as well.
The marks shown in the above images are stamps from counterfeit manufacturers.